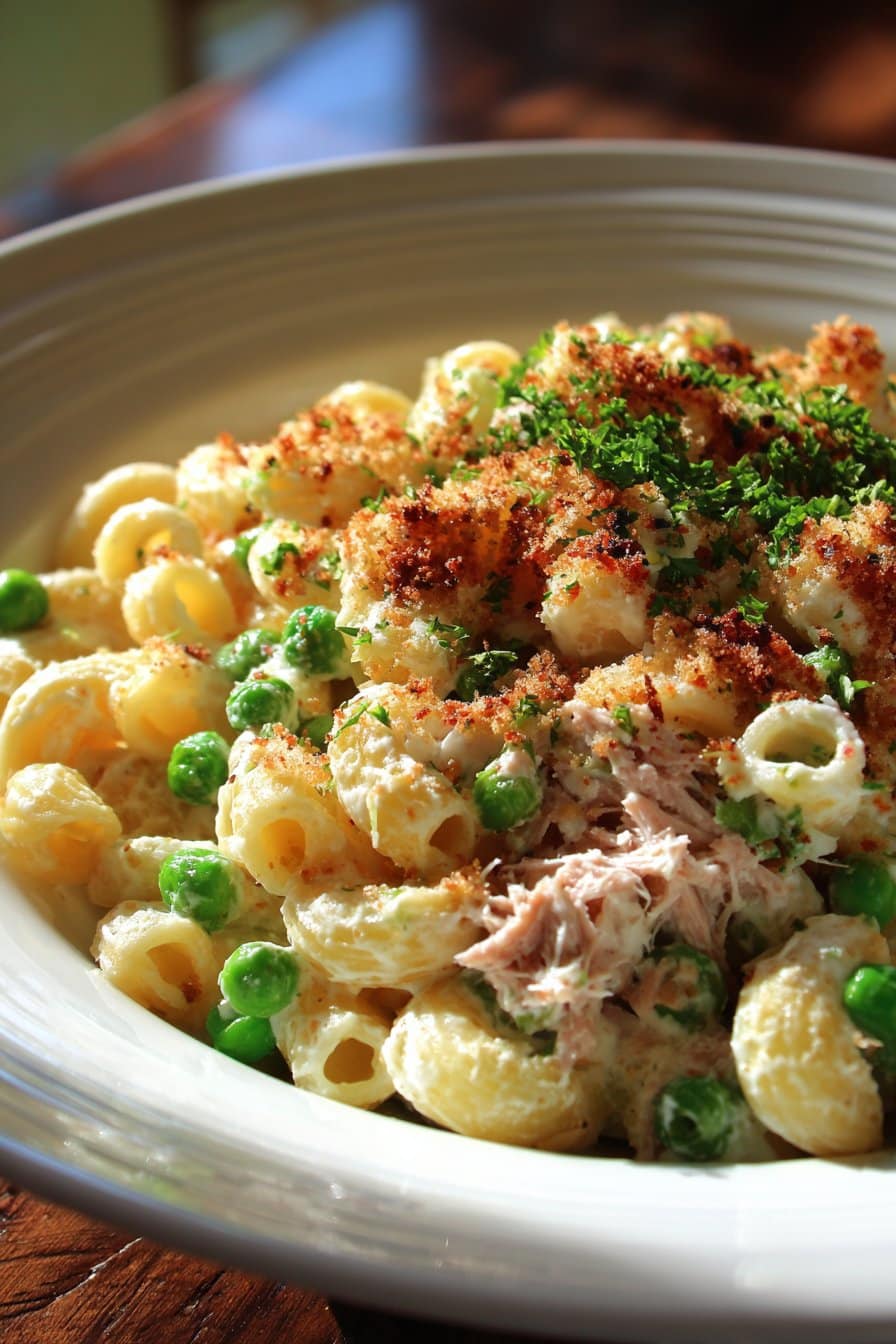
Stovetop Mac and Cheese with Tuna and Peas
Pull Up a Chair: Let’s Chat About My Go-To Mac and Cheese Rescue Meal
I’m pretty sure I’ve made “Stovetop Mac and Cheese with Tuna and Peas” more times than I can count. There was this one snowy Sunday where I hadn’t done proper grocery shopping (again, classic me), but by some divine intervention, I had a can of tuna, a little pasta, and the last handful of frozen peas hiding out in the freezer. (And, let’s be honest, a half-block of cheese that I’d been slowly whittling away at like a hungry mouse.) Long story short: this weird combo totally saved the day and it’s been a repeat ever since. And can we talk about the 90s? This dish is basically a throwback to all those old-school casseroles my mom used to make—except, you know, way less beige. Anyway, you’ve got to try it if you haven’t already.
Here’s Why I Keep Making This (Even When I Probably Should Cook Something Fancier)
I’ll be honest, I whip this up when I just can’t face a complicated dinner, or when the fridge looks like a barren wasteland. My brother used to groan whenever I’d suggest mac and cheese for the third night in a row, but then I started adding tuna and peas—suddenly it’s like he thought I went to chef school. Plus, there’s something extra cozy about the way it all comes together in one (kinda crusty) pot. Oh! And the peas make it, you know, sort of green and therefore healthy. Kind of. (Don’t quote me on that.)
What You’ll Need (And What Works in a Pinch)
- 2 cups dried elbow macaroni (or, use penne or shells. I’ve even used broken-up spaghetti once, not recommended but hey, it still tasted good)
- 2-ish cups shredded sharp cheddar (sometimes I mix in a handful of mozzarella, and my grandmother always swore by Kraft, but honestly just use real cheese—skip the powder please)
- 1 can good ol’ tuna in water, drained (oil-packed also works, but maybe reduce the butter)
- 1 cup frozen peas, no need to thaw (if you forgot to buy peas, chopped green beans aren’t half bad here)
- 2 tablespoons butter (or margarine if it’s all you’ve got. I’m not judging.)
- 2-ish tablespoons plain flour (all-purpose, not self-raising, though once I made that mistake and it wasn’t a total disaster)
- 2 cups milk—whole milk is best for creaminess, but low-fat is okay; if you only have oat milk, use it, but maybe add a smidge more cheese for oomph
- 1/2 teaspoon mustard powder (optional, but I like the tang. Dijon mustard works in a pinch.)
- Salt, pepper, and a tiny sprinkle of paprika if you like a bit of color
Alright, Here’s How I Throw This Together (Don’t Stress!)
- Get a big saucepan (or whatever’s clean—this is not the time to get precious) and bring salted water to a boil. Dump in your macaroni and cook till just shy of al dente—about 7 minutes for most brands. It’ll cook more later. Drain it, but don’t stress if a little water clings to the pasta.
- In the same pot, melt the butter over medium heat. Toss in the flour and whisk until it looks like wet sand. Seriously, don’t let it brown up too much. (I once cooked it for too long and ended up with weird-tasting sauce. Not recommended.)
- Slowly pour in the milk, whisking constantly. (If you get lumps, keep going—they usually vanish. If not, just embrace it. Rustic!)
- When it starts to thicken—think light gravy—stir in your cheese, mustard, a pinch of salt and pepper. (This is where I usually sneak a taste… just to check cheese-iness, obviously.)
- Toss the cooked pasta back in. Mix it up. Add the drained tuna (I break it up a bit with a fork), and peas straight from the freezer. Give the whole thing a gentle stir, and let it hang out on low for about 3 minutes. The peas will go bright green. Don’t worry if the sauce seems a little loose; it thickens as it stands.
- Spoon it into bowls. Sprinkle on paprika if you’re feeling fancy (or, actually, sometimes I just add kettle chips on top for crunch, don’t @ me).
What I’ve Learned (Sometimes the Hard Way)
- Don’t overcook the pasta—seriously, mushy mac is tragic. (I know form experience, it’s not worth it!)
- If you run out of real cheese, those cheese singles almost kind of work—sort of. But grate your own if you can, it just melts better.
- I used to think more butter = better, but then the sauce just got greasy. Two tablespoons, trust me—it’s plenty.
Ways I’ve Messed With This (Plus the One That Bombed)
- Extra veggies: Sometimes I throw in corn, or the dregs of a bag of spinach. Actually, spinach goes oddly well—just stir it in near the end so it wilts.
- Hot sauce: A few shakes of Frank’s RedHot perks it up if you like a kick. My dad swears by Worcestershire sauce (though I think it makes things almost too savory. Personal preference!)
- I once tried swapping the tuna for smoked mackerel. Wouldn’t do that again. Way too fishy, and not in a good way.
What You’ll Need to Make Life Easier (But You Don’t Need Everything)
- Decent saucepan (if you only have a frying pan, just be careful stirring—learned that the hard way!)
- Whisk or wooden spoon (I use a fork sometimes when the whisk’s AWOL. It works.)
- Colander for draining pasta—but, in a bind, I sorta just tilt the pot and pray nothing spills out
How To Store It (Not That We Ever Have Leftovers…)
If you actually have any left (big if), put it in an airtight box and stick it in the fridge. It’ll keep for another day, maybe two if you’re lucky, but the pasta does get a bit softer. Oh and it thickens up a lot—so I splash on some milk when reheating. Just between us, in my house someone always eats the last bit cold straight from the fridge.
How I Like to Serve It (But Do Your Own Thing!)
I’m very partial to a bit of chives on top or crushed-up potato chips (crisps if you’re British). My sister likes it with a squeeze of lemon, which honestly I thought was weird until I tried it, but it’s refreshing! We sometimes just have this with a salad tossed together from whatever’s fading in the veg drawer. Sunday lunches or midnight snacks—anything goes.
Things I Wish I’d Known (Before the Cheese Disaster of 2021)
- Don’t jump the gun when adding the milk. If it’s not fully whisked out, the sauce goes lumpy as heck and just… sits there. Trust me, some patience pays off.
- I once tried using pre-grated bagged cheese to save time, but it clumped up and got stringy. Grate your own if you can. (Yes, I know it’s more washing up. Sigh.)
Quick FAQ—Stuff People Have Actually Asked Me
- Q: Can I use gluten-free pasta?
Yep! Just watch the cooking time—it can go gloopy fast. (Been there.) - Q: Is this freezable?
Eh, not really. The sauce splits after thawing. But here’s a handy resource about freezing mac and cheese if you’re more patient than me. - Q: Do I have to use tuna?
Nope. Chicken works, or just extra veggies. Or, if you must, bacon, but then it turns into something else entirely. - Q: Can I add more cheese?
Absolutely. No one ever said, ‘This has too much cheese,’ right? - Q: Is this better the next day?
Honestly? I think so. Flavors sort of come together—if it lasts that long.
Tried this? Or made an even better version? Send me your wildest tweaks—I live for kitchen experiments. Oh, and if you’re looking for more quirky comfort food, these broccoli melts are genius.
And there you go. Not exactly five-star dining, but this mac and cheese is like a nice cuddle in a bowl. Cheers!
Ingredients
- 8 oz elbow macaroni
- 2 cups shredded sharp cheddar cheese
- 1 can (5 oz) tuna, drained
- 1 cup frozen peas
- 2 tablespoons unsalted butter
- 2 tablespoons all-purpose flour
- 2 cups milk
- 1/2 teaspoon salt
- 1/4 teaspoon ground black pepper
- 1/4 teaspoon garlic powder
Instructions
-
1Cook the elbow macaroni in a large pot of salted boiling water according to package directions, until al dente. Drain and set aside.
-
2In the same pot, melt butter over medium heat. Whisk in flour and cook for 1-2 minutes until bubbling but not browned.
-
3Slowly whisk in milk. Cook, stirring constantly, until the mixture thickens, about 3-5 minutes.
-
4Reduce heat to low. Stir in shredded cheddar cheese, salt, pepper, and garlic powder until the cheese is fully melted and sauce is smooth.
-
5Add drained macaroni, tuna, and frozen peas to the cheese sauce. Stir well and cook over low heat for 2-3 minutes until heated through.
-
6Serve warm, sprinkling with extra black pepper if desired.
Approximate Information for One Serving
Nutrition Disclaimers
Number of total servings shown is approximate. Actual number of servings will depend on your preferred portion sizes.
Nutritional values shown are general guidelines and reflect information for 1 serving using the ingredients listed, not including any optional ingredients. Actual macros may vary slightly depending on specific brands and types of ingredients used.
To determine the weight of one serving, prepare the recipe as instructed. Weigh the finished recipe, then divide the weight of the finished recipe (not including the weight of the container the food is in) by the desired number of servings. Result will be the weight of one serving.
Did you make this recipe?
Please consider Pinning it!!