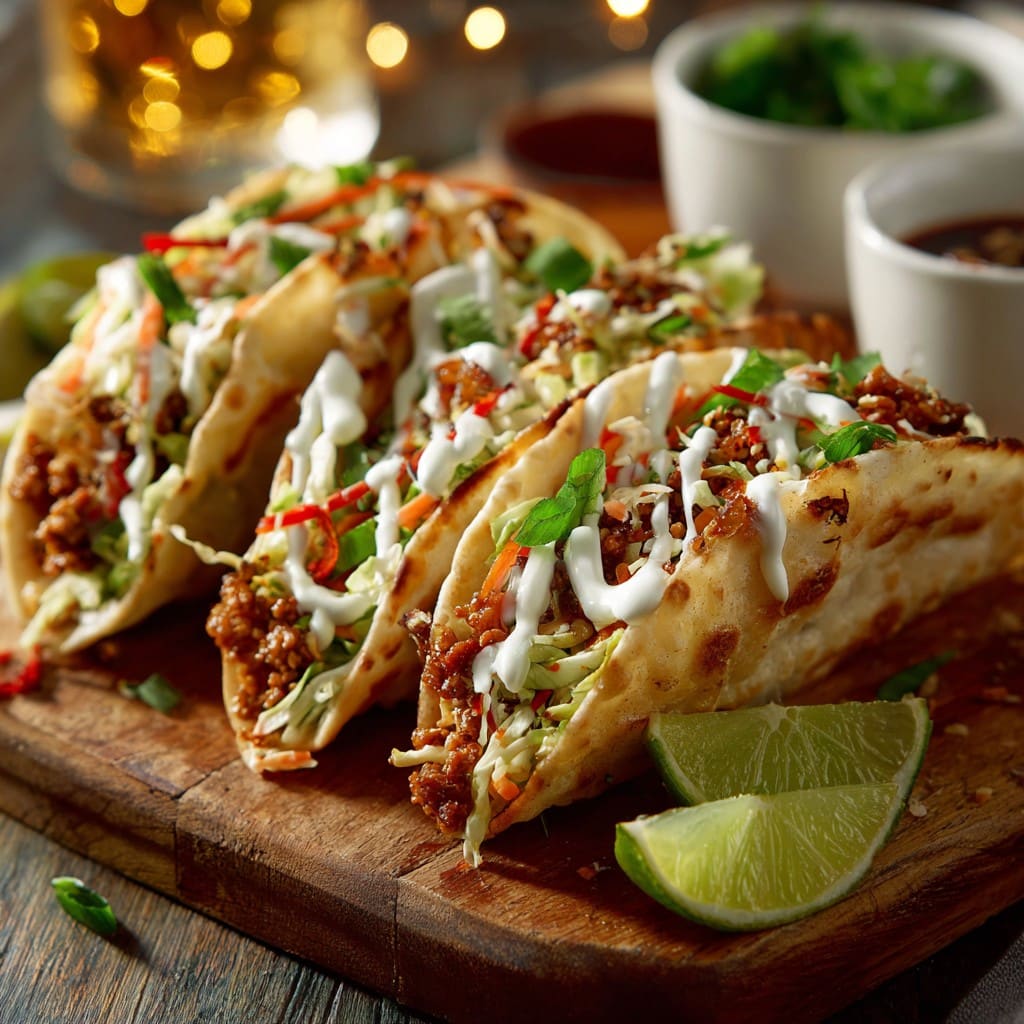
Speedy Smash Dumpling Tacos
Let Me Tell You About These Smash Dumpling Tacos…
Alright, so picture this: it’s Tuesday night, you’ve survived whatever Monday threw at you, and you want something fast, fun, and let’s be honest—not another boring sandwich. Enter Speedy Smash Dumpling Tacos. Actually, the first time I made these was pure desperation—I’d run out of tortillas, had some gyoza wrappers, and wanted tacos anyway. The result? Well, let’s just say the whole house smelled amazing and my kid (who’s usually allergic to vegetables, apparently) ate three. I may or may not have bribe-threatened extra dumpling taco filling for finished homework later. Oops.
Why You’ll Love This (Or At Least Find It Useful!)
I make these when time’s tight, stomachs are rumbling, and honestly, the fridge is looking a bit sad. My family goes crazy for this because they get to eat with their hands (why is that more fun?). I also love that you can load them up with random stuff lurking in the crisper. Plus, I once forgot to thaw any meat…and veggie smash tacos still totally worked. And if you’re the type who over-cooks dumplings until they fuse together (guilty), this is right up your alley.
What You’ll Need (Plus My Favorite Substitutions)
- 8-10 dumpling wrappers (gyoza ones are best—sometimes I use wonton skins, but they’re a bit smaller. Honestly, whatever’s in the freezer is fair game)
- 250g ground meat (pork is traditional in my place, but I’ve used beef, chicken, or even mashed chickpeas when my veggie cousin visits)
- 2 spring onions, finely chopped (or a small shallot, doesn’t matter if you forget; sometimes I do)
- 2-3 tablespoons soy sauce (my grandmother always insisted on Kikkoman, but store-brand is fine too)
- 1 thumb of ginger, grated (more or less as you like. If you’ve only got ground ginger in the back of the cupboard, that’s okay too)
- 1 clove garlic, minced (or a heaping spoon from the jar—no judgment)
- A handful of shredded cabbage or carrots (or whatever veg is threatening to wilt—seriously, last time I used leftover roasted broccoli, it was… interesting)
- Neutral oil for frying
- Sriracha, mayo, or your favorite sauce (optional but highly suggested)
Let’s Get Cooking – Directions (Casual Version)
- Mix up your filling: Toss your meat (or beans!) into a mixing bowl. Add spring onions, soy sauce, ginger, garlic, veggies—a bit of everything. Use your hands, it’s easier (and oddly satisfying). Don’t worry if it looks a bit… gloopy. That’s normal.
- Preheat your pan: Medium to high heat, splash in some oil. Non-stick is best but sometimes my old cast iron does the trick too—just oil it well.
- Assemble and smash: Take a gyoza wrapper, plop about a tablespoon of filling right in the center. Now here’s the fun bit: Press it flat—really squish it down—so the meat spreads almost to the edge. Kinda like a thin burger patty on a wrapper. Don’t stress if perfection isn’t happening.
- Sear and flip: Lay your smash tacos meat-side down in the hot pan. You’ll probably hear that lovely sizzle (music to my ears). Cook about 2-3 minutes until browned. Flip—carefully!—and do the other side until golden. My husband tried doing four at once once; big mistake. Stick to 2-3 max unless you’re trying for chaos tacos.
- Finish up: Lay them on a paper towel briefly if you’re feeling fancy. Then, top with sauces, extra veggies—whatever you like. This is where I usually sneak a bite before serving. (Quality control, right?)
Notes Spilled (Like I Sometimes Do)
- If the wrappers stick together in the package, I just peel them apart carefully or—on second thought—leave the mangled ones for my snack later.
- The smash part really helps with crispiness. Once I forgot and they puffed up weirdly—still tasty, but a bit doughy.
- Don’t go bonkers on the ginger unless you’re ready for a sinus-clearing experience.
Let’s Talk Variations (Some Hits, One Epic Miss)
- Tried adding kimchi once—super tasty if you like that zing.
- Swapped in leftover roast chicken—also amazing, just chop it up super fine.
- That time I used a sweet chili sauce in the meat: honestly, it tasted odd. Wouldn’t do that again, but maybe you have different taste buds!
Handy Equipment (But Don’t Stress If You Don’t Have It)
- Non-stick pan is easiest—though I’ve done it in a well-oiled cast iron and even a questionable sandwich press once (don’t ask!)
- A spatula for flipping, but a butter knife works if you’re gentle. No judgment here.
- If you don’t have a bowl to mix in, I’ve totally used a large mug. Not ideal, but desperate times…
Storing Leftovers (Doesn’t Happen Here Honestly)
If you miraculously have leftovers, pop them in the fridge in a container and they’ll last a day or two. Though honestly, in my house it never lasts more than a day! They taste surprisingly good cold, but I think they’re best reheated in a hot pan for a minute. Nuking them in the microwave is a bit sad but works if you’re hangry.
Serving These Up (Family Traditions and Oddities)
My favorite is piling these on a big platter with a mess of sliced scallions and a swirl of Kewpie mayo or, if I’m feeling bold, gochujang sauce. Kiddo likes theirs plain, spouse likes ‘em buried under slaw. We have a running joke that the last one is “chef’s privilege,” which basically means I get it.
Pro Tips From My Own (Sometimes Wobbly) Experience
- Don’t crowd the pan! I once tried rushing this step and regretted it because everything stuck and I had the world’s first dumpling pancake… Not fun to clean either.
- Actually, I find it works better if you make the smash part thinner than you think… They crisp up nicer that way.
- Don’t forget to taste the filling before smashing, though raw meat isn’t ideal. I usually take a tiny spoonful out, microwave for 10 seconds, quick taste and adjust.
FAQs (Because Folks Always Ask…)
- Can I use rice paper instead of dumpling wrappers?
Well, I mean, technically you can but they tend to go mushy. I saw it on TikTok once—it looked good, mine… not so much. - How do I keep the wrappers from tearing?
Let them come up to room temp for like 5 minutes—that usually does the trick. Or just patch them up with extra filling—a bit rustic, but tastes the same! - What sauce do you use?
Literally whatever’s open in the fridge! I like a little homemade dumpling sauce (I found some great ideas here) or just a squirt of classic Sriracha. Once used ranch—don’t tell my relatives. - Are these freezer-friendly?
I’ll be honest, never had the chance to try—everything gets eaten up! But my mate Becky froze a batch and says you can reheat them straight form frozen in a low oven. - Can I make these vegetarian?
Oh, for sure. I’ve done it with smashed chickpeas, grated tofu—actually, tofu’s my go-to if I want something lighter.
Just rambling a bit, but did you know some folks call these “taco dumplings”? Language is wild. Anyway, give these a whirl and let me know if you come up with a new version. Heck, next time I might try stuffing them with leftover curry!
Ingredients
- 300g ground pork
- 1 tablespoon soy sauce
- 2 teaspoons sesame oil
- 1 clove garlic, minced
- 2 green onions, thinly sliced
- 8 small flour tortillas
- 1/2 cup shredded cabbage
- 1/4 cup hoisin sauce
- Vegetable oil for frying
Instructions
-
1In a medium bowl, combine ground pork, soy sauce, sesame oil, minced garlic, and green onions. Mix until well blended.
-
2Divide the pork mixture into 8 equal balls. Heat a little vegetable oil in a skillet over medium-high heat.
-
3Place a pork ball onto the hot skillet and flatten with a spatula to form a thin patty. Cook for 2-3 minutes on each side until golden and cooked through. Repeat with remaining pork.
-
4Lightly warm the flour tortillas in a dry skillet or microwave.
-
5Assemble tacos by placing a smash dumpling patty on each tortilla. Top with shredded cabbage and drizzle with hoisin sauce.
-
6Serve immediately while hot and enjoy your speedy smash dumpling tacos.
Approximate Information for One Serving
Nutrition Disclaimers
Number of total servings shown is approximate. Actual number of servings will depend on your preferred portion sizes.
Nutritional values shown are general guidelines and reflect information for 1 serving using the ingredients listed, not including any optional ingredients. Actual macros may vary slightly depending on specific brands and types of ingredients used.
To determine the weight of one serving, prepare the recipe as instructed. Weigh the finished recipe, then divide the weight of the finished recipe (not including the weight of the container the food is in) by the desired number of servings. Result will be the weight of one serving.
Did you make this recipe?
Please consider Pinning it!!