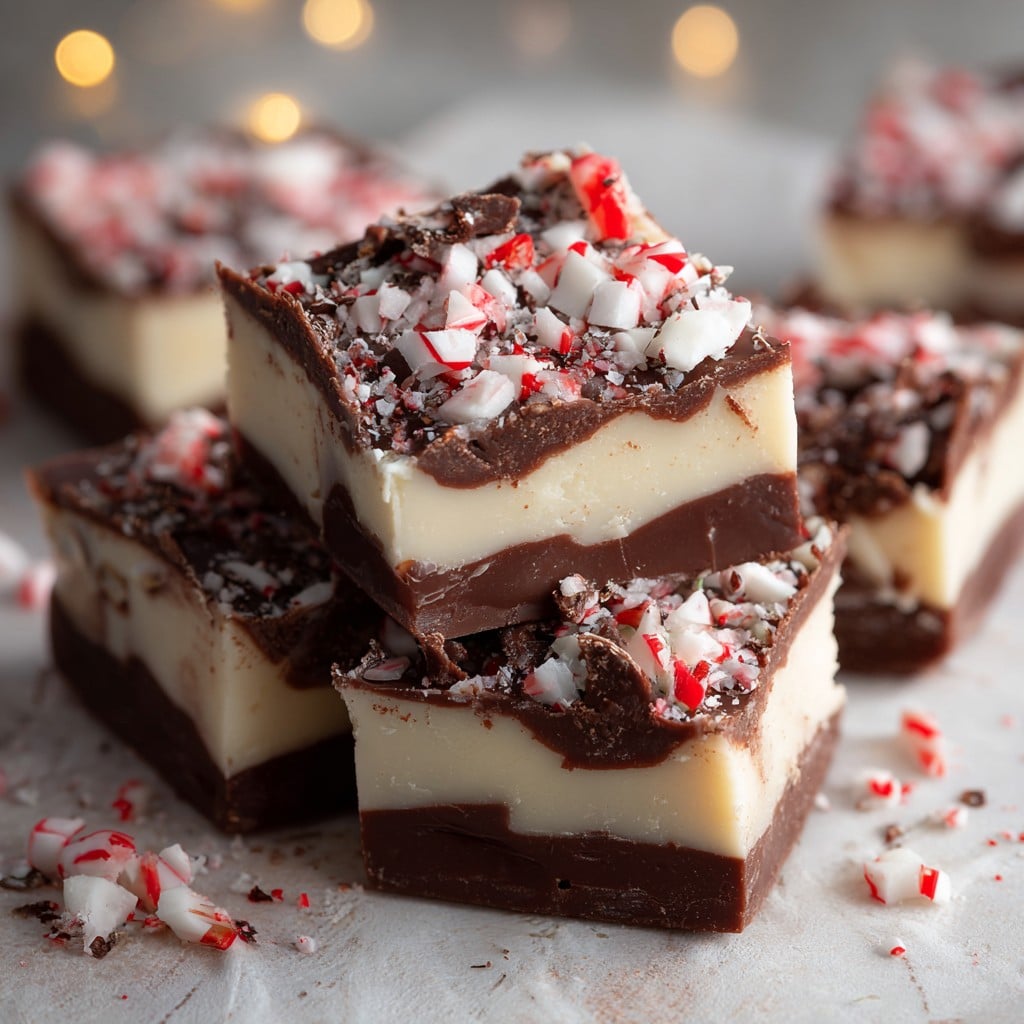
Peppermint Bark Fudge
Let Me Tell You About Peppermint Bark Fudge
Alright, so you know that moment when you realize there’s just a little too much chocolate in your pantry—and by ‘too much’ I mean, like, almost not enough for a good recipe but you try anyway? That’s how I first stumbled into making peppermint bark fudge. It was mid-December (picture: me in slippers that don’t match, kids arguing over who gets to lick the spoon, dog helping by catching any stray chocolate chips), and I wanted something a little bit fancy but easy enough so my brain could handle it. Anyway, my sister calls this ‘Christmas fudge in lazy mode,’ which is both accurate and slightly unfair. Works for any time though; no one’s policing fudge in July.
Why I Keep Coming Back to This Fudge
I make this peppermint bark fudge basically every year—usually on a Sunday night when I’m wishing the weekend was just *slightly* longer. My family goes mad for it because it vanishes in, I’d say, an embarrassingly short time (I mean, I’m not going to point fingers, but my son definitely sneaks an extra chunk every time he passes the fridge). It’s also a lifeline for those moments when someone volunteers you for a bake sale ten minutes before bedtime. Plus, if you mess up a layer, it somehow still turns out looking like a million bucks. Not that I ever mess it up, obviously. (Okay, I did once. Still edible.)
Stuff You’ll Need (Plus Random Substitutions)
- 2 cups quality semisweet chocolate chips (though I’ve used half dark and half milk when clearing out the pantry—tastes just as nice!)
- 1 can (14 oz) sweetened condensed milk (Eagle Brand is what my gran swore by, but honestly, store-brand hasn’t let me down yet)
- 1 teaspoon vanilla extract (the real stuff’s best, but if you’ve got imitation lurking in the cupboard, it’s not the end of the world)
- 1 cup white chocolate chips (I have, in a pinch, chopped up a leftover Easter bunny)
- 1/2 teaspoon peppermint extract (go easy—too much and it’ll taste like toothpaste, ask me how I know)
- Handful (about 1/2 cup) of crushed peppermint candies or candy canes (my kids do this bit, which is why sometimes it’s more like powder than “crushed”)
Here’s More or Less How You Make It
- Line an 8-inch pan with parchment or foil (I once forgot and regretted it fiercely—don’t skip this step or you’ll be chiseling fudge out for days).
- In a microwavable bowl, combine semisweet chocolate chips with half the can of condensed milk. Microwave in 20–30-second blasts, stirring every time, till melty and smooth. Add half the vanilla extract. (This is when I sneak a spoonful. Consider it quality control.)
- Spread this chocolate layer in your pan and do your best to make it even, but eh, no one’s measuring. Pop it in the fridge for about 10 minutes while you prep layer deux.
- Melt the white chocolate chips with the other half of the condensed milk—exact same microwave trick. Stir in the peppermint extract and the other half of vanilla. Here’s where I always panic, because sometimes the white chocolate goes a bit lumpy. Don’t panic. Stir like mad, and if it’s a little weird-looking, it sorts itself out when you pour.
- Pour (or spread) the white chocolate mix over the chilled chocolate bottom. Top right away with your crushed peppermint. If you forget and it sets, don’t kick yourself; just press it on as best you can—I once used a spatula after the fact, and it was… crunchy. But fine.
- Refrigerate until the whole thing sets up firm—at least two hours, but overnight is easier (and, like I said, I think it tastes better the next day). Cut into squares, triangles, whatever shapes your heart desires—who are we to judge?
Little Notes I Wish I’d Heard Earlier
- If you’ve only got bigger pans, just double it—though my fudge got thin as a pancake once, so be wary.
- One time the white chocolate seized and got grainy—turns out I just nuked it too long. Actually, melting it slowly works way better.
- Parchment paper is less annoying than foil for getting the fudge out, though in a pinch either will work. My cousin insists greased wax paper is magic, but I just found it sticky.
What Else Can You Try? (And What Not To…)
- Swapping peppermint for orange extract? Surprisingly good. But if you go for almond, it kind of just tastes odd—wouldn’t recommend, but hey, live and learn.
- I tried adding chopped pistachios once. Not bad! If you like a bit of crunch, definitely toss some in the white chocolate layer.
- Using butterscotch chips instead of white chocolate: I wanted it to work so badly. It did not work. Trust me, stick with the basics.
Equipment You’ll Probably Want (But If Not…)
So, I use a trusty old microwave (no fancy double boilers for me), a mixing bowl, and a spatula. If you don’t have a microwave (or it’s acting up, like mine did that one winter), just melt the chocolate slowly over a pan of barely simmering water—the old bowl-over-a-pot trick works a treat and honestly it feels a bit more hands-on. For crushing candy, my youngest just whacks them (still wrapped) with a rolling pin—I fully endorse gentle destruction!
How Long Does It Last? (A Hypothetical)
Okay, in theory, it’ll keep in an airtight container in the fridge for up to a week. In practice, it’s rarely still there after 24 hours in my house unless I hide it behind the cabbage—kids never look behind the cabbage. Oh, and freeze it if you really want it to keep. Defrost in the fridge or let it come to room temp on the counter.
By the way, I once found two pieces stuck together in the back of the freezer months later and it tasted, um, still pretty good. Wouldn’t serve to guests, though.
Serving It Up (And Our Random Traditions)
Honestly, Peppermint Bark Fudge is a bit of an anything-goes. I sometimes put out a plate with hot chocolate (the real stuff—King Arthur’s version is fab), or tuck pieces into holiday cookie trays for neighbors.
Sometimes, my daughter makes up little gift bags with ribbon for her friends (though somehow two or three “gift” pieces go missing in the process). Oh! And it’s amazing chopped over vanilla ice cream. Bit decadent, but it’s Christmas, right?
Things I’ve Screwed Up (So You Don’t Have To)
- If you rush the chilling, the layers kind of merge together and it becomes ‘marble fudge.’ Looks fun, but that’s not always the goal here.
- Don’t use cheap, waxy baking chips. I did once—it ended up tasting, um, bland and strangely greasy. Lesson learned.
- Be careful with the peppermint extract—a splash goes further than you’d think, unless you’re going for a recipe that could double as toothpaste (been there, not proud).
Your Top Questions—Answered by Someone Who’s Made All the Mistakes
- Can I make this ahead of time?
- Yup, actually I find it works better if it sits overnight; flavors meld. But keep it airtight or else it gets a little dried out.
- Is it gluten-free?
- Pretty much, as long as you make sure your chocolate chips are safe (some sneaky brands do stuff with flour—who knew? The Celiac Foundation’s tips helped me navigate this).
- Do I need a candy thermometer?
- Nope, not at all. The microwave does all the hard work, and you can eyeball everything. Plus, who can ever find that thermometer when they actually need it?
- Can I double the recipe?
- You can, but like I said up above—use a bigger pan or your fudge will get thinner. Or taller. Depending which pan you forget to use. Learned this the hard way.
- Can I use peppermint oil instead of extract?
- So, yes, but it’s much stronger. Maybe try half as much then add more if you need. It’s, honestly, very easy to overdo. I once made a batch that could have cleaned the sinuses out of a rugby team.
And just to go a bit off topic—did you ever notice how fudge recipes always say they’re ‘easy,’ but nobody mentions the washing up? Anyway, enough kitchen rambling. Hope you love this peppermint bark fudge as much as we do! Drop a line if you try experimenting—I’m always on the lookout for someone else’s happy accidents.
Ingredients
- 2 cups semisweet chocolate chips
- 1 can (14 oz) sweetened condensed milk, divided
- 1/4 teaspoon peppermint extract
- 2 cups white chocolate chips
- 1/2 cup crushed peppermint candies
- 2 tablespoons unsalted butter
- 1/8 teaspoon salt
- 1 teaspoon vanilla extract
Instructions
-
1Line an 8×8-inch baking pan with parchment paper and lightly grease it.
-
2In a microwave-safe bowl, combine semisweet chocolate chips, 1/2 can sweetened condensed milk, butter, salt, and vanilla extract. Microwave in 30-second intervals, stirring until smooth and melted.
-
3Pour the chocolate mixture into the prepared pan and spread evenly. Refrigerate for 20 minutes until set.
-
4For the top layer, in another microwave-safe bowl, combine white chocolate chips and remaining sweetened condensed milk. Microwave in 30-second intervals, stirring until smooth. Stir in peppermint extract.
-
5Spread the white chocolate layer evenly over the chilled chocolate layer. Sprinkle crushed peppermint candies on top, gently pressing them into the fudge.
-
6Refrigerate the pan for at least 1 hour or until fully set. Remove fudge from pan, cut into squares, and serve.
Approximate Information for One Serving
Nutrition Disclaimers
Number of total servings shown is approximate. Actual number of servings will depend on your preferred portion sizes.
Nutritional values shown are general guidelines and reflect information for 1 serving using the ingredients listed, not including any optional ingredients. Actual macros may vary slightly depending on specific brands and types of ingredients used.
To determine the weight of one serving, prepare the recipe as instructed. Weigh the finished recipe, then divide the weight of the finished recipe (not including the weight of the container the food is in) by the desired number of servings. Result will be the weight of one serving.
Did you make this recipe?
Please consider Pinning it!!