One Pan Lemon Pepper Yogurt Chicken and Rice
Let Me Tell You About This One Pan Wonder…
You know those nights when the thought of washing more than one dish makes you want to just eat cereal in your pajamas (or maybe that’s just me)? Well, that’s exactly how One Pan Lemon Pepper Yogurt Chicken and Rice crashed into my dinner routine. I made it once by accident when I was short on time and, honestly, even shorter on patience. My husband took one bite and immediatly demanded to know why I’d been hiding this from him like some kind of culinary secret agent. And would you believe it – my picky teenager went back for seconds. Now it’s in our dinner rotation, right up there with Tuesday tacos and whatever weird pasta combo I dream up when the fridge is empty.

Why You’ll Love This (Or at Least Why I Do)
I pull this recipe out when I need something honest-to-goodness simple but I don’t want anyone asking, “is this takeout?” My family goes absolutely bonkers for this because it’s creamy from the yogurt and just zingy enough with lemon pepper to feel fresh in your mouth (plus there’s only ONE PAN… which means no mountain of dishes glaring at me from the sink).
To be real, I’ve had my fair share of dinner fails, but this one? Even when I get distracted and forget it for a few minutes, it almost always comes out right. The rice soaks up all the chickeny, yummy juices, and I don’t even have to make a side. Sometimes I make it just so I can eat the leftovers straight out of the fridge while standing at the counter (shhh, don’t tell anyone!).
What You Need (And What I Use When I’m Out)
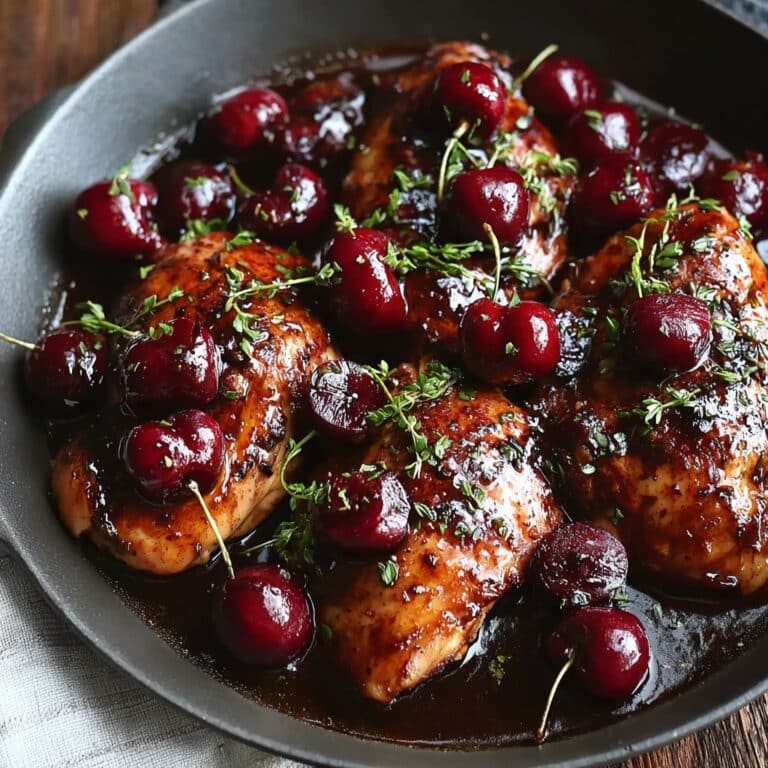
- About 4 chicken thighs (bone-in is juicier, but if you only have breasts, that totally works—just don’t blame me if it’s a bit less juicy)
- 1 heaping cup Greek yogurt (full fat if you’ve got it; sometimes I just use plain regular yogurt and nobody notices)
- Juice and zest of 1 lemon—or, honestly, I use bottled lemon juice if the lemons in my fruit bowl start looking like shriveled goblins
- 1 teaspoon lemon pepper seasoning (if you don’t have this, grind together some black pepper and use a bit more lemon. Way easier than a last-minute dash to the shop)
- 2 cloves garlic, smashed (I use the jarred stuff when I’m feeling lazy, grandma definitely would NOT approve)
- 1 cup long-grain white rice (basmati smells great, but jasmine works a treat too)
- 2 cups chicken broth (cube or homemade, up to you—sometimes I just use hot water and a spoon of bouillon powder, I know…)
- Handful of parsley, roughly chopped (it’s just for the green—you can basically skip it)
- 2 tablespoons olive oil or butter (or whatever oil you happen to have closest)
- Salt, to taste
How to Make It, With All My Usual Side Notes
- Marinate the chicken: In a big-ish bowl, mix the yogurt, lemon zest, juice, lemon pepper, garlic, a sprinkle of salt, and a little glug of olive oil. Toss in the chicken and roll it around until it’s kind of slathered (a word my son hates, but it fits!). Let it sit for at least 20 minutes if you can. I rarely do more than that unless I get distracted and forget.
- Brown the chicken: Get a big oven-safe skillet or pan (I use my battered cast iron but anything with a lid will do). Heat a little olive oil; arrange the chicken skin-side down. Let it sizzle until good and golden—should take about 5-7 minutes. Turn them over and give the flip side a minute or so too, but don’t sweat it if one piece is stubborn and sticks. Happens to me every time.
- Add the rice and broth: Move the chicken to the side (or a plate if your pan’s not big enough—sometimes I just start stacking stuff to save time). Pour the rice into the chickeny pan, give it a quick stir so it soaks up all the lovely browned bits, then pour over all your broth. Nestle the chicken pieces back on top. Now’s when you can scatter that parsley if you’re feeling fancy.
- Bake: Stick a lid (or sheet of foil if you’re desperate) on the pan and shove it into a preheated oven at 180°C (that’s 350°F if you’re across the pond) for about 30 minutes. Remove the lid/foil and bake another 10-15 minutes until the rice looks fluffy and the edges are just kissed with golden crispy bits. This is where I usually sneak a taste, and scold myself for it being too hot. Every time.
- Rest, then serve: Drag the pan out (watch out—handles hotter than you’d think) and let the whole thing sit for 5-10 minutes. Sometimes I cover it back up because I’m convinced it keeps it moister, but who really knows? Then call everyone to the kitchen and hope they don’t eat straight from the pan (like my lot).
Notes I Wish I’d Known Sooner
- If you forget to marinate, it’s still good, just not as zingy. Actually, I find it works best with at least a short rest in the yogurt, but desperate hunger always wins out some nights.
- Skin-on chicken really does taste richer here, but if you need to go skinless, add a splash more olive oil when browning.
- Once I didn’t have lemon at all, so I threw in a dash of apple cider vinegar and a tiny pinch of sugar—not exactly the same, but no one mutinied.
Variations (Aka “Experiments I’ve Actually Tried”)
- Swapped the rice for orzo—it was maybe a bit stodgy, but some people like that. If you’re one of those, have at it!
- Added spinach under the chicken halfway through baking. Turned out nice and healthy-looking, but tasted like the green side of nothing, so maybe add some salt to the leaves if you try it.
- Tried with plain yogurt and a swig of hot sauce instead of lemon pepper—came out a little odd, not gonna lie. Kids didn’t love it but I kind of did, in a weird way.
Equipment (But Actually, You Probably Have Enough)
- Large oven-safe skillet or deep pan—honestly, I’ve done this in my biggest regular frying pan with a sheet pan as a lid. No need to get the fanciest gear out.
- If you don’t have a lid, foil works just fine (mine never quite seals right, but close enough).
- If your oven’s tiny, just go stove-top though you might need to stir a little more and keep a closer eye on things.
How I Store the Leftovers (But Rarely Need To)
Sling any leftovers into an airtight container once it’s cooled (never lasts more than a day at my place, but theoretically good in the fridge for 2-3 days). Actually, I think it tastes even better cold the next day—though that might just be because I can eat it with a spoon with zero effort. If you’ve got more than you’ll eat, it freezes okay, but the rice can get a bit soggy and honestly, it’s not nearly as exciting after the freezer.
Serving Ideas (Or: What My Family Does)
I usually plonk the whole pan in the middle of the table and make everyone serve themselves (less work for me!). But if I’m feeling proper, a little pile of salad on the side or some crusty bread to mop up the yogurt-lemon dribble is nice. My cousin insists on a heap of pickled onions—you do you.
What I Wish I’d Known About This Recipe
- Don’t be tempted to pack the pan with rice—if you use more, it won’t cook through. I once tried to double the rice and ended up with crunchy bits and a heart full of regret.
- Get your oven hot first. I once skipped preheating, and it just didn’t puff up right. Technically, you can still eat it, but it’s not as fluffy.
FAQ (Or: Yes, I Do Get Asked These Things)
- Can I use brown rice?
Yeh, you could—just add like 10-15 extra minutes, and maybe a splash more broth so it doesn’t turn out tooth-breaking hard. Sometimes I just don’t bother though, because my lot are impatient. - Does this work with chicken breast?
Yes, but it ends up a little less juicy. Don’t skip the yogurt in that case—it helps. - Could I make this dairy free?
Sort of—swap in coconut yogurt and use olive oil instead of butter. Different flavor, but not bad, actually! - How spicy is it?
Not especially, but if you want heat, add a teensy pinch of chili flakes. Or don’t, and just watch your kids eat without spitting. - Help! My rice is still hard. What did I do wrong?
Oh, that old chestnut. Usually means it didn’t get enough liquid or the oven was too cool. Splash in some hot broth and cover again for 10 min—should fix it.
If you make this and it comes out weird, don’t worry, happens to the best of us. Also, a totally random aside, but isn’t it odd that parsley always comes in enormous bunches instead of the three sprigs you actually need? I end up freezing it, then ignoring it for months. Anyway—happy cooking!
Ingredients
- 4 boneless skinless chicken thighs
- 1 cup plain Greek yogurt
- 2 tablespoons lemon juice
- 1 tablespoon lemon zest
- 1 1/2 teaspoons freshly ground black pepper
- 1 teaspoon garlic powder
- 1 teaspoon dried oregano
- 1 teaspoon salt
- 1 cup long grain white rice
- 2 cups low-sodium chicken broth
- 2 tablespoons olive oil
- 2 tablespoons chopped fresh parsley (for garnish)
Instructions
-
1Preheat oven to 400°F (200°C).
-
2In a bowl, mix Greek yogurt, lemon juice, lemon zest, black pepper, garlic powder, oregano, and salt.
-
3Coat the chicken thighs thoroughly with the yogurt marinade. Allow to marinate for at least 10 minutes (up to overnight for best flavor).
-
4In a large oven-safe skillet or pan, heat olive oil over medium heat. Sear the chicken thighs for 2-3 minutes per side until browned, then remove from pan and set aside.
-
5Add rice to the pan and stir to coat in the remaining oil and marinade. Pour in chicken broth and bring to a simmer.
-
6Nestle the seared chicken thighs on top of the rice. Cover the pan with a lid or foil and bake for 30-35 minutes, or until the rice is tender and chicken is cooked through. Garnish with parsley and serve.
Approximate Information for One Serving
Nutrition Disclaimers
Number of total servings shown is approximate. Actual number of servings will depend on your preferred portion sizes.
Nutritional values shown are general guidelines and reflect information for 1 serving using the ingredients listed, not including any optional ingredients. Actual macros may vary slightly depending on specific brands and types of ingredients used.
To determine the weight of one serving, prepare the recipe as instructed. Weigh the finished recipe, then divide the weight of the finished recipe (not including the weight of the container the food is in) by the desired number of servings. Result will be the weight of one serving.
Did you make this recipe?
Please consider Pinning it!!