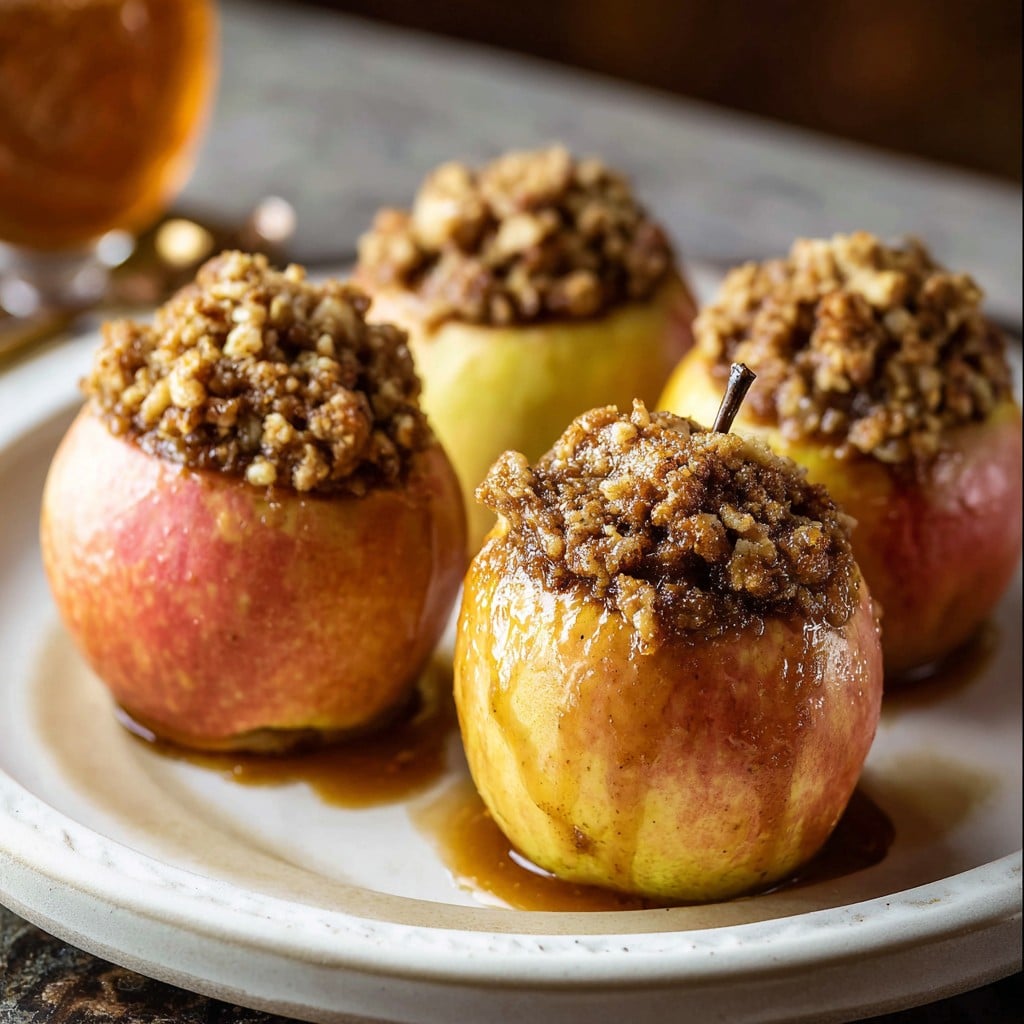
Maple Crumble Baked Apples: A Cozy, Fuss-Free Treat
Catching Up Over Maple Crumble Baked Apples
So, let me tell you about this recipe—if you want your kitchen to smell like the best possible Sunday evening, this is it. Honestly, Maple Crumble Baked Apples are the kind of thing I make when I want something dessert-ish but don’t feel like making a huge mess (or when I’ve got apples rolling dangerously around in the fruit bowl, ha). I remember making this for my very skeptical brother, who was sure he’d miss the ‘crust’ from pie—but after his third helping, I was like, well, guess not.
Also, not to get too soppy, but my gran used to stick a handful of oats into basically everything, so maybe that’s why these baked apples just feel like a hug to me. And if you do accidentally burn the crumble topping a little, just call it ‘caramelized’ and laugh it off. Works every time.
Why You’ll Probably Love These Apples (Like I Do)
I make these when I’ve got guests coming and not a lot of time—nobody’s ever been disappointed. My family goes a bit wild for them because they’re that perfect in-between: not too heavy (so there’s always room for seconds) and not so sweet that they make you want to nap. Plus, I finally stopped trying to make fancy pastry from scratch…the crumble’s where it’s at. (Confession—once I tried store-bought pie dough, just out of sheer laziness, and, well, let’s say… oof. Crumble is definitely the way to go.)
Gather Your Stuff: Ingredients
- 4 big-ish baking apples (Granny Smith for tartness, or Honeycrisp if you want sweet—and sometimes I just use whatever’s lurking in the fruit drawer)
- 3 tablespoons maple syrup (If I run out, a mix of honey and a bit of brown sugar is fine)
- 2 tablespoons melted butter (my gran swore by salted, but honestly, either’s good)
- 1/2 cup rolled oats (quick-cook works if that’s all you’ve got, but old-fashioned gives it more chew)
- 1/4 cup flour (I’ve swapped in almond flour once or twice—nice nutty taste, but it clumps a bit more)
- 1/3 cup chopped pecans or walnuts (skip if you’ve got a nut allergy or just not a fan—pumpkin seeds are an OK swap)
- 1/2 teaspoon cinnamon (or more, basically I eyeball it)
- Pinch salt (if your butter’s unsalted—see above for gran’s rules, though…)
- Optional: a few raisins or dried cranberries, if you like things a touch more festive
Directions—Or, How I Actually Make Maple Crumble Baked Apples
- Preheat your oven to 180°C (350°F) and grab a baking dish. (If you don’t have one, I’ve lined a cake tin with foil in a pinch.)
- Wash your apples and core them; I use a sharp paring knife, but if you’ve got an apple corer, you’re living the dream. Hollow out enough for the yummy stuff, but don’t cut it all the way through—that’s just messy, been there.
- Stir up the oats, flour, melted butter, maple syrup, cinnamon, nuts, and that tiny pinch of salt in a bowl. (This is where I usually sneak a taste—a little quality control never hurt anybody.) If the mixture’s a bit dry, splash in a dash more butter or syrup. If it’s too gloopy, handful more oats.
- Spoon the crumble into (and on top of) each apple. Actually, fill them right up—let a bit spill over, more is better here.
- Settle the apples in the baking dish, then splash a tablespoon or two of water in the bottom (this keeps them juicy—they go dry otherwise, trust me!).
- Bake for 35-40 minutes, or until your apples slump slightly and the topping smells like a dream. Don’t worry if some apple juice bubbles out, that’s half the appeal.
Bits and Bobs I’ve Picked Up (Recipe Notes)
- Actually, I find softer apples like Fuji work anyway, they just fall apart and become, well, more rustic. Which I pretend is fancy.
- If you use really big apples, you need a bit longer—add 5-10 minutes and poke with a knife to check.
- Once, I got fancy and added a touch of ground ginger. Wasn’t bad, but a little goes a long way (unless you really like ginger).
If You Want to Experiment (Variations)
- Swapped pecans with sunflower seeds once, for a nut-free batch—texture’s a little odd, but still nice munch.
- Once, I got ambitious and tried stuffing with caramel candies. Way too sweet. Wouldn’t really recommend; maybe just drizzle caramel after.
- Chopped dark chocolate mixed into the crumble? Oh yes—especially for late-night snacks.
What If You Don’t Have… (Equipment Chat)
- No apple corer? I just use a small spoon and a bit of patience—takes longer, but it’s worth it.
- No fancy baking dish? Honestly, a cake pan lined with parchment has saved me before.
- I saw this nifty trick for using a muffin tin, too, if you want the apples upright.
How Long Will These Even Last? (Storage)
Okay, so technically, these keep well in the fridge for up to 3 days (covered), but honestly, in my house, they never survive past breakfast the next day. You can reheat in the oven or zap them in the microwave (still tastes great, but you lose that just-baked texture).
How We Eat Them: Serving Ideas
I usually plop one on a plate and add a scoop of vanilla ice cream (almost melts before you sit down), but I’ve also tried pouring over a bit of double cream or even greek yogurt in a pinch. On holidays, we pretend it’s breakfast and nobody argues.
Things I’ve Learned the Hard Way—Pro Tips
- I once tried rushing the crumble together without letting the butter melt properly—ended up with odd clumps that never browned. Take a sec to melt it, honestly.
- Don’t skip the water in the bottom of the pan, or you’ll get sad dried-out apples, not juicy ones. Learnt this the hard way (was a bit grumpy about it).
Wait, But What If…? (FAQ)
- Can I make these vegan? Yep! Swap the butter for coconut oil (or honestly, any mild oil); maple syrup’s naturally vegan. Had a friend do this and couldn’t really tell the difference.
- What apples work best? Sometimes people ask me this a lot—Granny Smith if you want tart, but honestly, anything but Red Delicious. Those just sort of melt away (not in a good way).
- Do I have to peel the apples? Nope! The skin keeps them together—a few folks take them off, but the skin’s what makes the whole thing hold up. Less washing up, too.
- How sweet are these? Not as sweet as pie, more like an amped-up snack. You can always add more syrup after (kind of like pancakes—everyone has their own opinion, right?).
- Could I just microwave these? Actually, you could (I’ve tried on a really tired weekday), but you won’t get the toasty topping. For time-saving, though, it works. Here’s a good guide I referenced once—serious eats explanation.
By the way, if you want to geek out about the best apples for baking, King Arthur Baking has a great article—even I learnt a thing or two.
Ingredients
- 4 medium apples (such as Honeycrisp or Granny Smith)
- 1/2 cup old-fashioned rolled oats
- 1/4 cup all-purpose flour
- 1/4 cup chopped pecans
- 1/4 cup pure maple syrup
- 3 tablespoons unsalted butter, melted
- 2 tablespoons brown sugar
- 1/2 teaspoon ground cinnamon
- 1/4 teaspoon salt
Instructions
-
1Preheat the oven to 350°F (175°C). Lightly grease a baking dish.
-
2Core the apples and hollow out the centers, leaving the bottoms intact. Arrange the apples upright in the prepared baking dish.
-
3In a medium bowl, mix together the oats, flour, chopped pecans, brown sugar, cinnamon, and salt.
-
4Add the melted butter and maple syrup to the crumb mixture. Stir until evenly combined.
-
5Spoon the maple crumble mixture evenly into each apple, gently pressing down.
-
6Bake for 35 minutes, or until the apples are tender and the crumble is golden. Cool slightly before serving.
Approximate Information for One Serving
Nutrition Disclaimers
Number of total servings shown is approximate. Actual number of servings will depend on your preferred portion sizes.
Nutritional values shown are general guidelines and reflect information for 1 serving using the ingredients listed, not including any optional ingredients. Actual macros may vary slightly depending on specific brands and types of ingredients used.
To determine the weight of one serving, prepare the recipe as instructed. Weigh the finished recipe, then divide the weight of the finished recipe (not including the weight of the container the food is in) by the desired number of servings. Result will be the weight of one serving.
Did you make this recipe?
Please consider Pinning it!!