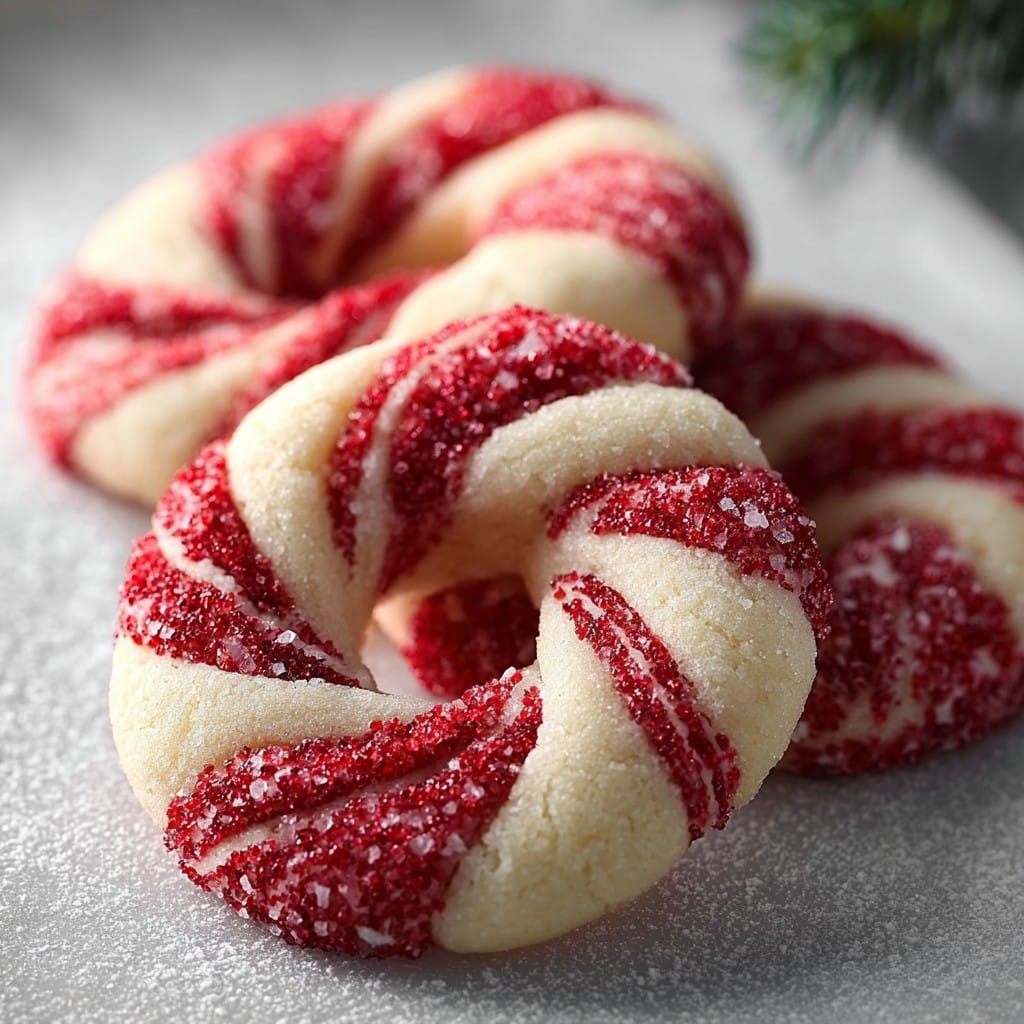
Magical Candy Cane Cookies
Let’s Talk Cookies: My Quirky Adventure with Candy Canes
If you’ve ever wondered who actually eats those leftover candy canes after the holidays, well – it’s me. Or rather, it’s my cookies. I remember one December, absolutely knackered after wrestling Christmas lights for hours (they won that round), my niece begged for something ‘fun and magical.’ I glanced at a sad pile of broken candy canes, and bam — these cookies were born. They’re not posh, but by golly, they do the job. Plus, turning a plain dough into these swirly, pepperminty treats is an instant mood-lifter. Oh, and you get to bash candy like you’re five again, which is oddly cathartic after a long day.
Why These Cookies Need to Happen in Your Kitchen
I make these whenever Christmas is barreling toward me and I need something kid-friendly that isn’t too fussy. My family goes a bit bonkers for these, honestly. It’s partly the nostalgia (my dad claims they remind him of being a kid in rural Cornwall, but I swear he’s just after the sugar). And partly because they look a tad fancy, but you don’t need a pastry degree to pull them off. (Full disclosure: I’ve absolutely made these because I «accidentally» bought way too many candy canes. I once thought I’d try skipping the chilling step—spoiler, don’t.)
What You’ll Need to Gather
- 2 1/2 cups all-purpose flour (sometimes I use a cup of whole wheat – it’s earthier, but my niece frowns at it)
- 3/4 cup unsalted butter, room temperature (my gran swore by Lurpak but, mate, use what’s in the fridge)
- 1 cup white sugar (caster sugar works, too, if you have it hanging around)
- 1 large egg
- 1 tsp vanilla extract (I usually eyeball it, to be honest. Sorry, Grandma!)
- 1/2 tsp peppermint extract (optional if you want classic, but I like that tingle)
- 1/2 tsp salt
- Red food coloring (gel works better for me, liquid just kinda washes out)
- Candy canes, about 5 or 6, crushed (or those round peppermint candies; basically whatever’s left in your sweet drawer)
How To Make ‘Em: The Wibbly-Wobbly Steps
- Cream butter and sugar together in a big bowl until it looks light – when in doubt, keep mixing. (This is where I usually sneak a taste. Is that bad?)
- Toss in the egg, vanilla, and if you’ve got it, peppermint extract. Mix again, don’t rush, the batter should look all nice and glossy here.
- Stir in flour and salt until everything’s nice and dough-like. I swap to a wooden spoon at this point; my hand mixer once tried to walk right off the counter. If it’s looking a bit dry, maybe add just a splash of milk. Or don’t — I mean, you know your dough.
- Now comes the fun bit. Split the dough in half. Set one half aside. To the other, add a few drops of red food coloring and knead it in (gloves save your hands, but honestly, I just go pink for a day or two — battle scars!).
- Chill both pieces in the fridge for at least 30 mins. But, I once forgot them overnight; dough still worked, go figure.
- Ready? Pinch off a bit from each color, roll into ropes (like those playdough snakes), about yay long (8 inches?), and twist them together. Curve into a candy cane shape. They don’t have to be perfect, promise.
- Space them out on a lined baking tray. Sprinkle with smashed up candy cane bits (don’t get too aggressive, or they’ll melt into weird puddles — ask me how I know).
- Bake at 350°F (about 175°C) for 10–12 minutes. They should be set but not browned; check the bottoms if you’re nervous.
- Cool for a bit, but I always eat one warm. Like, why not?
Pitfalls and Oddball Discoveries
- Actually, chilling the dough is more important than I first thought. Skipping it made my cookies spread like pancakes!
- Too much peppermint = toothpaste city. Go easy unless you’re very into that vibe.
- If your red is looking sad, try a little more coloring. Or just call them ‘pastel festive cookies.’ Creative license solves everything.
Experiments and Odd Combinations
I tried swapping the peppermint for orange extract once — ehhh, not a winner, tasted too much like chewing vitamins (not recommended). But chocolate chips instead of crushed candy canes? Now you’re talking. If you’re feeling wild, one time I even rolled the ropes in popping candy. The kitchen was a crime scene, but my nephew thought it was magic.
No Fancy Gear? No Worries
You don’t need anything wild — just a bowl, spoon, baking tray. I lost my rolling pin once, so I used an old water bottle to roll the dough. Worked just as well! If you haven’t got parchment, just grease the tray up with a bit of butter. For bashing the candy, a sandwich bag and a frying pan does the trick (good for stress, too).
Stashing Cookies (If You Can Resist!)
Keep them in an airtight tin for up to 3–4 days. Though, honestly, in my house they’re gone by sunrise… Leftovers do freeze fine too, but the candy bits go a bit sticky after a week. I think these actually taste even better the next day — the flavors kinda blend and mellow out.
How We Like to Eat ‘Em
We usually put these out with mugs of steaming hot chocolate (here’s my obsession with the King Arthur Baking hot chocolate recipe), or sometimes as a late-night snack after watching rubbish holiday films. My mum loves dunking hers in her morning coffee — says it’s the only way to start Boxing Day.
Mistakes Turned Lessons (Trust Me, I’ve Made Them!)
- I rushed the chilling once, and — yep, regret. The dough was so soft it almost climbed off the tray.
- Don’t double the peppermint unless you know everyone’s into it. It gets, uh, intense.
- Putting loads of candy cane on top looks pretty, but the sugar caramelizes fast. I now just sprinkle a little, then add more once they cool if I want extra crunch.
Some Real-Life Q&A — The Curious Cookie Edition
- Can I use margarine instead of butter? You can, but the flavor’s not quite the same — butter’s hard to beat, but go for what you’ve got.
- Is a stand mixer needed? Nope – a wooden spoon and some elbow grease does it. If yours has vanished into the cupboard caves, don’t worry.
- Why did my cookies go flat? Oh, classic! Either the butter was too soft, or the dough skipped chilling. Actually, try chilling the shaped cookies before baking — that helped me loads.
- Can I freeze the dough? Yes, absolutely. I wrap it in clingfilm and chuck it in the freezer, good for a month or so. Pretty handy when you remember at 10 p.m. your kid’s bake sale is tomorrow.
- Where did you get your candy canes? This year, I got some on Wilko; they’re cheap and cheerful. Any brand will do, honestly.
Quick unrelated side note — did you know most rolling pins you find in English shops are less than a tenner? Doesn’t stop me using a wine bottle anyway. It just… feels right.
If you give these Magical Candy Cane Cookies a whirl, drop me a message or tag your photos. I may not be Mary Berry, but I do think cookies are better when a little personality (and chaos) sneaks in!
Ingredients
- 2 1/2 cups all-purpose flour
- 1/2 teaspoon baking powder
- 1/4 teaspoon salt
- 1 cup unsalted butter, softened
- 1 cup granulated sugar
- 1 large egg
- 1 teaspoon peppermint extract
- 1 teaspoon vanilla extract
- Red food coloring
Instructions
-
1Preheat the oven to 350°F (175°C) and line two baking sheets with parchment paper.
-
2In a medium bowl, whisk together the flour, baking powder, and salt.
-
3In a large bowl, beat butter and sugar until light and fluffy. Add the egg, peppermint extract, and vanilla extract; mix well.
-
4Gradually mix in the dry ingredients until a soft dough forms. Divide the dough in half. Tint one half with red food coloring.
-
5Roll a teaspoon of each dough into ropes and twist them together. Curve the top to form a candy cane shape and place on baking sheets.
-
6Bake for 10-12 minutes until edges are set. Let cool on baking sheets before transferring to a wire rack.
Approximate Information for One Serving
Nutrition Disclaimers
Number of total servings shown is approximate. Actual number of servings will depend on your preferred portion sizes.
Nutritional values shown are general guidelines and reflect information for 1 serving using the ingredients listed, not including any optional ingredients. Actual macros may vary slightly depending on specific brands and types of ingredients used.
To determine the weight of one serving, prepare the recipe as instructed. Weigh the finished recipe, then divide the weight of the finished recipe (not including the weight of the container the food is in) by the desired number of servings. Result will be the weight of one serving.
Did you make this recipe?
Please consider Pinning it!!