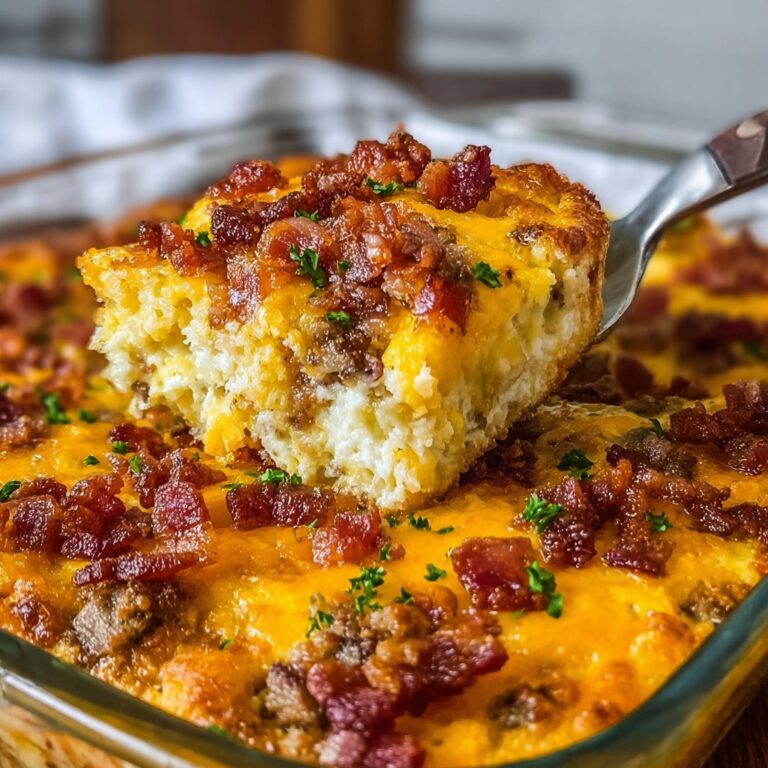
High Protein Hamburger Helper
Let Me Tell You About This Hamburger Helper
You know those recipes you come back to again and again? This high protein Hamburger Helper is totally one of mine. Honestly, the first time I made it, I was just trying to use up a pound of ground beef before it turned the corner (who hasn’t been there, right?)—my friend Sarah had come over and, long story short, we both had seconds before we even considered setting the table. Now it’s basically my go-to when life’s a bit bonkers and I want to feel like I’ve given myself a good meal, but don’t want a mountain of dishes glaring at me afterwards. Plus, it gives me that nostalgic, boxed-dinner comfort, but wayyy more protein and you know, it’s kinda homemade. And if you’re wondering, yes—the leftovers can taste even better (if you don’t accidentally eat them all straight from the pan…)

Why I Keep Making This (And Probably Will Forever)
I make this when I’ve had one of those days—the kind where you forgot your coffee in the microwave and the cat threw up on your backpack. (Story for another time.) My family goes absolutely bananas for this, especially my little one who’s convinced it’s “real restaurant food.” And it’s super forgiving: one time I fully spaced and used chickpea pasta, and you know what? Still tasted great. Also, this is the only dinner that hasn’t triggered a “Ugh, not again” from my teenager in months, which, trust me, is a minor miracle around here.
Gather These Ingredients (But Don’t Freak If You’re Missing Something)
- 1 pound (about 450g) lean ground beef or turkey (when I’m feeling fancy, sometimes I’ll even throw in half beef, half turkey—totally not necessary, but whatever floats your boat)
- 1 small onion, chopped (sometimes I leave it out if I’m in a serious rush; nobody’s perfect)
- 2 cloves garlic, minced (or a big ole spoonful of garlic paste—you do you; my gran swore by that weird jar stuff)
- 2 cups beef broth (or chicken broth in a pinch; water with a bouillon cube actually works too, if you forgot to shop)
- 1 can diced tomatoes (mine are 14oz but honestly, a bit more or less doesn’t matter)
- 2 tablespoons tomato paste (but if you skip this accidentally, ehh, you’ll live)
- 2 cups dry whole wheat pasta shells or elbows (I just grab whatever’s handy—penne works in a pinch, or even little bowties if you’re feeling whimsical)
- 1 cup cottage cheese or plain Greek yogurt (for the extra protein—creamed cottage cheese texturally kinda melts in, promise)
- 1/2 cup shredded cheddar (I usually just sort of…guess here, more is rarely a problem!)
- 1 teaspoon smoked paprika (or regular sweet if that’s what you’ve got—sometimes I just skip it if I’m out—this is not the end of the world)
- Salt and pepper to taste (the only real rule, I suppose)
How I Actually Make It (With All the Little Moments in Between)
- First, grab your biggest nonstick skillet or a deep-ish saucepan if you only have that (I’m always losing pans, don’t ask). Get it hot over medium-high, then toss in the ground beef and onion. Break it all up with a wooden spoon, and brown it until you can’t see much pink. (This is where I usually sneak a taste if I’m honest, but only if the beef’s actually cooked enough!)
- Dump in the garlic and give everything a quick stir, about 30 seconds (don’t let it brown too much, burnt garlic is just sadness in a pan).
- Pour in your broth, the can of tomatoes (juice and all), tomato paste, and paprika. Use a spatula to scrape up any brown bits—those are flavor! (If it looks kind of soupy? That’s normal.)
- Stir in your dry pasta, and let it all come up to a gentle boil. Then turn the heat down to a simmer, and put on a lid, if you’ve got one lying around that fits. Let it cook, stirring here and there so nothing sticks, until the pasta’s al dente—usually 10-12 minutes for whole wheat shells, but it’s more about texture than the timer in my book.
- This is where it gets all creamy: kill the heat, and mix in your cottage cheese or yogurt, and the cheddar. It’s gonna look a little odd at first—but it always does! Stir like you mean it and watch it go all cheesy and dreamy. Taste for salt and pepper, and adjust ’til it makes you smile.
Notes I Learned The Hard Way
- If you use Greek yogurt, add it after the pan’s off the heat, or you’ll get a weird curdled look (not the good kind of cottage cheese lumpy!).
- I tried switching brands of cheddar one time and, actually, it didn’t seem to matter as much as I thought it would. Proves you don’t need the fancy stuff.
- Once, I used canned mushrooms for extra veggies, but next time I’ll sauté them first—the flavor’s just…better that way.
If You Want to Tinker—Here’s What Worked (and What Didn’t)
- Add frozen peas or chopped spinach near the end—surprisingly painless way to sneak in greens. My youngest never even noticed.
- Chickpea or lentil pasta for even more protein—makes it a bit nuttier, but not in a bad way.
- I once tried ground chicken. The flavor was fine but the texture…ehh, a bit weird for me; maybe you’ll like it, but I’m not so sure.
- Shredded mozzarella works if you’re out of cheddar, but beware—it’s much oozier.
What You Need in the Kitchen (Sort of)
- A big skillet with a lid (though once I accidentally used my soup pot—worked just fine, honestly)
- Wooden spoon (or honestly, the back of a spatula if that’s all you find—sometimes I do)
- Measuring cups or just eyeball it—sometimes I swear I taste-test more than anything
How to Store (If You Actually Have Leftovers)
It keeps in the fridge, airtight container, 2-3 days—though, honestly, in my house it never lasts more than a day! (I think it gets even better after sitting, but that’s just me.) I wouldn’t recommend freezing this—sometimes it goes a bit weird—but if you have to, make peace with a little graininess when you reheat.
How I Like to Serve Mine
We serve this piled in deep bowls, usually with a side of pickles or a simple green salad (no joke, my neighbor adds a dollop of ketchup and says it’s the best bite). Sometimes I sprinkle on extra shredded cheese, or—if we’re feeling wild—a bit of hot sauce. Oh, and there’s a running joke at my table that nobody gets up unless they’ve finished what’s in their bowls. It’s half-tradition, half-bribery…
Things I Wish I’d Known the First Time (Aka Pro Tips)
- I once tried rushing the pasta—crunchy wasn’t the surprise I was hoping for; give it the full 10-12 minutes.
- Don’t skimp on mixing after adding the dairy; if you just toss it in and hope for the best, the texture goes a bit odd (learned that one the hard way, haha).
- Actually, I find it works better if you let it rest, off the heat, for a couple minutes before serving. Not essential, but y’know, it’s nice.
FAQs — Because Yes, People Have Actually Asked Me These
- Can you make this gluten free?
Yep! Gluten free pasta totally works; just watch the cook time since it can mush up fast. Or, frankly, swap in rice if you’re okay with the texture change. - Is there a way to make it dairy free?
Sure thing—dairy free cheese shreds and plain plant yogurt blend in fine. The flavor’s a little different, but, I mean, if it gets dinner on the table, who’s judging? - Can I double the recipe?
Of course! Use a big enough pan though—don’t do what I did and try to squeeze a double batch into a regular skillet. That was a mess, and my dog didn’t even bother with the floor scraps. - How do you reheat it?
I just nuke it in the microwave with a splash of broth, or put it back on the stove over low; sometimes I snack on it cold, no shame. - What’s the best pasta shape?
Honestly? Elbows or shells are my fave, but use whatever’s hiding at the back of your cupboard. Just avoid anything too huge—less chance of ‘em sucking up all the juice! - How do you make this look fancy?
Haha—herbs on top (parsley if you’re feeling posh), a sprinkle of paprika, maybe a drizzle of olive oil? Or just eat it straight from the pan when nobody’s judging.
Oh, and before I forget—if you end up with an adventure of your own making this, I wanna know. I’m convinced every cook adds their own twist, whether they mean to or not! Happy cooking, mate.
Ingredients
- 1 lb lean ground beef (93% lean or higher)
- 1 cup whole wheat elbow macaroni
- 2 cups low sodium beef broth
- 1 cup low fat cottage cheese
- 1/2 cup shredded reduced fat cheddar cheese
- 1 cup unsweetened Greek yogurt
- 1/2 medium onion, diced
- 2 cloves garlic, minced
- 1 teaspoon paprika
- 1/2 teaspoon salt
- 1/2 teaspoon black pepper
- 1 tablespoon olive oil
Instructions
-
1Heat the olive oil in a large skillet over medium heat. Add the diced onion and cook for 2-3 minutes until softened. Stir in minced garlic and cook until fragrant.
-
2Add the lean ground beef to the skillet. Cook, breaking it up with a spatula, until browned and cooked through. Drain any excess fat if needed.
-
3Stir in paprika, salt, and black pepper. Add the whole wheat elbow macaroni and beef broth to the pan. Bring to a boil, then reduce heat, cover, and simmer for 10-12 minutes until pasta is tender.
-
4Lower the heat and stir in cottage cheese and Greek yogurt until well combined and creamy.
-
5Sprinkle shredded cheddar cheese over the skillet. Cover and cook for 1-2 minutes, until cheese has melted. Stir to combine and serve immediately.
Approximate Information for One Serving
Nutrition Disclaimers
Number of total servings shown is approximate. Actual number of servings will depend on your preferred portion sizes.
Nutritional values shown are general guidelines and reflect information for 1 serving using the ingredients listed, not including any optional ingredients. Actual macros may vary slightly depending on specific brands and types of ingredients used.
To determine the weight of one serving, prepare the recipe as instructed. Weigh the finished recipe, then divide the weight of the finished recipe (not including the weight of the container the food is in) by the desired number of servings. Result will be the weight of one serving.
Did you make this recipe?
Please consider Pinning it!!