Healthy Air Fryer Churro Bites: My Go-To Snack Recipe
So, Here’s How I Fell for Air Fryer Churro Bites
Hey, friend! Ever tried making churros at home? Disaster. At least mine was. I once set off the smoke alarm trying to deep fry the real deal. That was fun (it was not). But here’s the magic: these healthy air fryer churro bites skip all the oil but still do the crunchy–fluffy thing we’re after. I started making these on a particularly gloomy Saturday because, honestly, I just needed snacks. And now my niece requests them every time she comes over, which probably means I’ll never get a Saturday nap again. But worth it.
Why You’ll Love This (Take It from Me)
I make this when I want something sweet but don’t want to wrestle with a pot of splattering oil. My family goes crazy for these because they have that cinnamon-sugar hit – but you can actually eat a bunch without feeling like you need a nap. Actually, my brother once called them “mini donuts that don’t make you feel dodgy.” That’s high praise coming from him, considering he thinks anything ‘healthy’ is code for flavorless. Oh, and I love that everything gets tossed in the air fryer. That’s my kitchen sidekick now; just don’t tell my oven.
What You’ll Need (and a Couple Switch-Ups)
- 1 cup flour (I usually use plain, but my friend Kelly swears by whole wheat – it’s a bit nuttier, but try both!)
- 1/2 tsp baking powder (my gran used to say it was optional, but honestly, just put it in)
- 1/4 tsp salt
- 1/4 cup Greek yogurt (full-fat is creamier, but the low fat works in a pinch – I’ve even accidentally used vanilla once, honestly not bad)
- 2 tbsp melted unsalted butter (sub in coconut oil if you’re feeling fancy, but that’s me half the time when I run out of butter)
- 1/3 cup milk (any milk, honestly – almond milk’s fine if that’s your jam)
- 1 tsp vanilla extract (splash more if you’re heavy handed, I won’t tell)
- For coating: 1/4 cup sugar + 1 tsp cinnamon (big tip: brown sugar gives a toastier flavor, but the regular white kind is just classic)
Let’s Do This: Directions (with My Tangents)
- Start by mixing the flour, baking powder, and salt in a bowl. If it clumps, break it up with a fork (or with your hands, because why not?)
- Stir in the Greek yogurt, melted butter, milk, and vanilla. Use a spoon at first but just give in and squish it together with your hand. It’ll look scraggly and weird at this point—that’s fine. This is where I usually sneak a taste. No one can stop me.
- Once it comes together in a messy ball, cover and let it rest about 10 min. I’ll be honest, I forget and it sits for longer half the time. Doesn’t matter too much.
- Preheat your air fryer to 375°F (190°C) if it likes being preheated. Mine’s an old clunker and takes forever.
- Pinch off bits of dough (ping-pong ball size – but honestly, eyeball it). Roll gently so they’re round-ish (perfection not required). Lay them out on a bit of parchment or straight into your air fryer basket—just keep them from sticking all over.
- Spritz or brush lightly with oil (this makes them a little crispier). You don’t HAVE to, but it’s worth the extra two seconds.
- Air fry for about 8 minutes – shake or flip halfway. They’re ready when golden and fluffy. If a few of them join forces and stick together, just pull them apart when they cool.
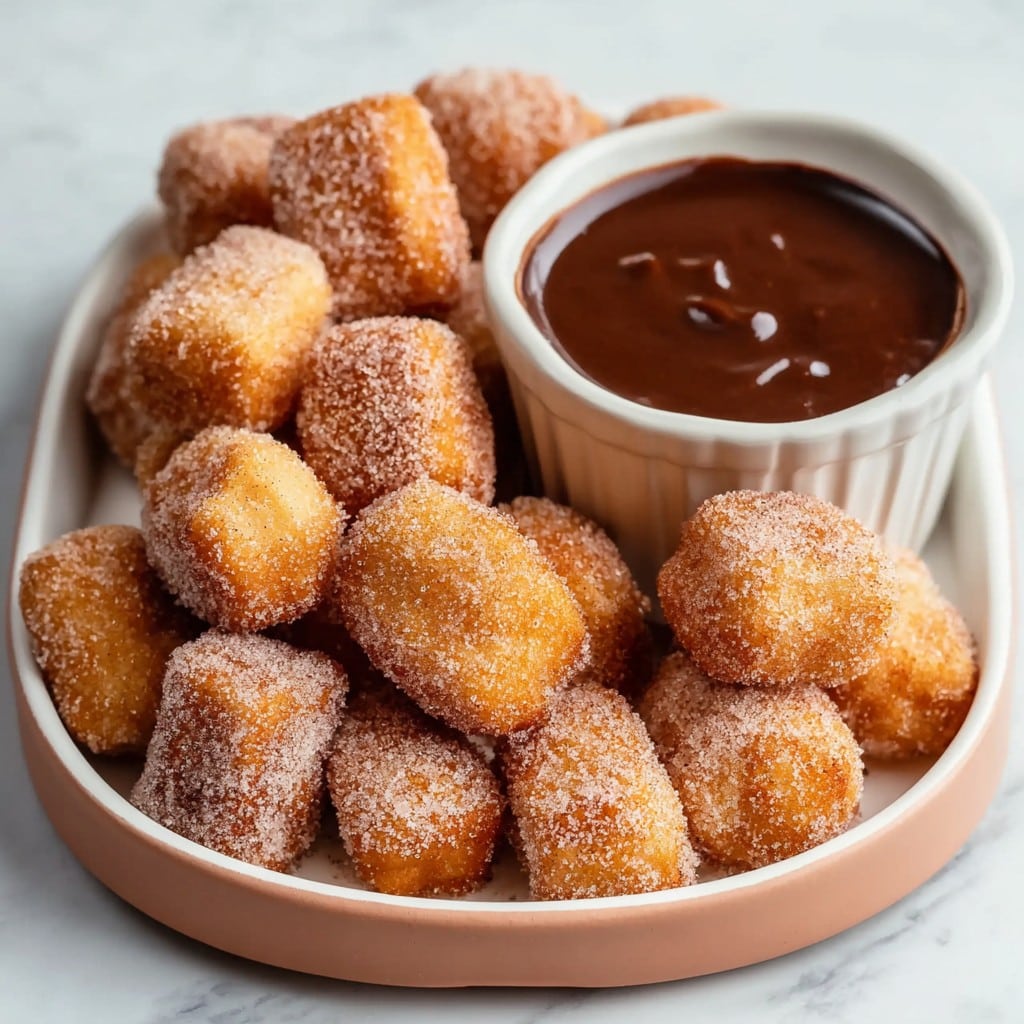
- Mix your sugar and cinnamon in a shallow bowl. As soon as those bites leave the air fryer, toss them in. The melted butter helps the sugar stick, but if you forgot to butter, just press more sugar on. Works out.
Notes from My Kitchen Experiments
- If the dough seems too sticky, just add a spoonful of flour. If it’s too dry, a splash more milk. Dough is always a bit of a diva.
- I once doubled the cinnamon in the coating and, surprise, my hands smelled like Christmas for hours. Would do again.
- These do taste nice warm, but honestly, I think this tastes better the next day after the flavors settle (assuming you have leftovers—big if!)
Things I’ve Tried (and One Not-So-Great Variant)
- Swapping the Greek yogurt for plain skyr wasn’t bad, kind of chewier though.
- I tried whole spelt flour once but, mate, that batch was basically air fried bread. Not recommended unless you like hearty, dense things (and my teeth couldn’t deal).
- If you want them vegan, coconut yogurt and vegan butter work, but they do change the texture a bit—still tasty but just different, if that makes sense.
What Gear You’ll Need (or Not)
Obvious, you’ll need an air fryer. But my mate Tina, when hers broke, did these in a regular oven at 400°F for a bit longer (around 15 min or so) and they turned out fine, maybe a bit less crispy but nobody complained. Parchment paper’s handy if you’re a chronic over-baker like me, otherwise skip it and clean later.
How to Store (You Probably Won’t Need This Info)
Pop any leftovers in an airtight container on the counter. Good for a day or two, maybe up to 3—though honestly, in my house these never last more than a day! If you want to keep them longer, quick zap in the microwave brings them back to life. But only just, don’t nuke them to oblivion.
How I Like to Serve These (Trust Me)
We usually have these with hot chocolate or, if it’s brunch, a little bowl of Greek yogurt for dunking (surprisingly good). Once, my nephew asked for some peanut butter for dipping; weirdly tasty. I don’t know why, but churro bites and cartoon reruns go together like peas and carrots round here.
Things I Learned the Hard Way (Pro Tips!)
- Don’t pack the air fryer basket too full—once I tried to squeeze in a double batch and ended up with a churro pancake. Not ideal.
- Let them cool a minute before tossing in sugar—burnt my fingertips more than once. Patience isn’t my strong suit, but here it counts!
- If you rush the mixing, you’ll get tough churro bites. Actually, I find it works better if you go slow and gentle, even if you’re hungry.
Those Random FAQs Folks Actually Ask Me
- Can I freeze these churro bites? Well, you can, but I wouldn’t… they come back kinda dry and odd. Best eaten fresh.
- How do you make the sugar stick? It needs a bit of melted butter or oil. Or just roll them when hot – but really, don’t skip the fat.
- Could I stuff them? Sure! Nutella, Biscoff, or even some berries shoved inside works. I tried marshmallows once, though, and let’s just say the clean up was epic.
- I don’t have an air fryer, can I use a toaster oven? Yep! Watch the timing, though. They brown faster, so keep an eye out or you’ll have charred morsels.
- Aren’t these just donut holes? Maybe, but I call them churro bites because, honestly, it sounds more fun and they’ve got that cinnamon vibe. So who’s counting?
One Last Sidetrack (Because Why Not?)
Honestly, every time I make these, it reminds me of strolling through Madrid—not that I’ve been, but I’ve seen enough travel food blogs to get the general idea (check out Serious Eats if you want the OG Spanish churro recipe). Or if you want, you can peek at RecipeTin Eats’ air fryer version, but I’m biased; I still think mine’s simpler and, well, more fun. Now go make these! And save me a few, yeah?
Ingredients
- 1 cup whole wheat flour
- 1 teaspoon baking powder
- 1/4 teaspoon salt
- 1/2 cup unsweetened almond milk
- 2 tablespoons coconut oil, melted
- 1 large egg
- 1/4 cup coconut sugar
- 1 teaspoon ground cinnamon
- Olive oil spray
Instructions
-
1In a medium bowl, whisk together whole wheat flour, baking powder, and salt.
-
2In another bowl, mix almond milk, melted coconut oil, and egg until smooth.
-
3Combine wet and dry ingredients to form a soft dough. Roll dough into 1-inch balls.
-
4Preheat the air fryer to 350°F (175°C). Lightly spray the churro balls with olive oil spray and arrange in a single layer in the basket.
-
5Air fry for 10-12 minutes or until golden brown, shaking the basket halfway through.
-
6While warm, roll churro bites in a mixture of coconut sugar and ground cinnamon. Serve immediately.
Approximate Information for One Serving
Nutrition Disclaimers
Number of total servings shown is approximate. Actual number of servings will depend on your preferred portion sizes.
Nutritional values shown are general guidelines and reflect information for 1 serving using the ingredients listed, not including any optional ingredients. Actual macros may vary slightly depending on specific brands and types of ingredients used.
To determine the weight of one serving, prepare the recipe as instructed. Weigh the finished recipe, then divide the weight of the finished recipe (not including the weight of the container the food is in) by the desired number of servings. Result will be the weight of one serving.
Did you make this recipe?
Please consider Pinning it!!