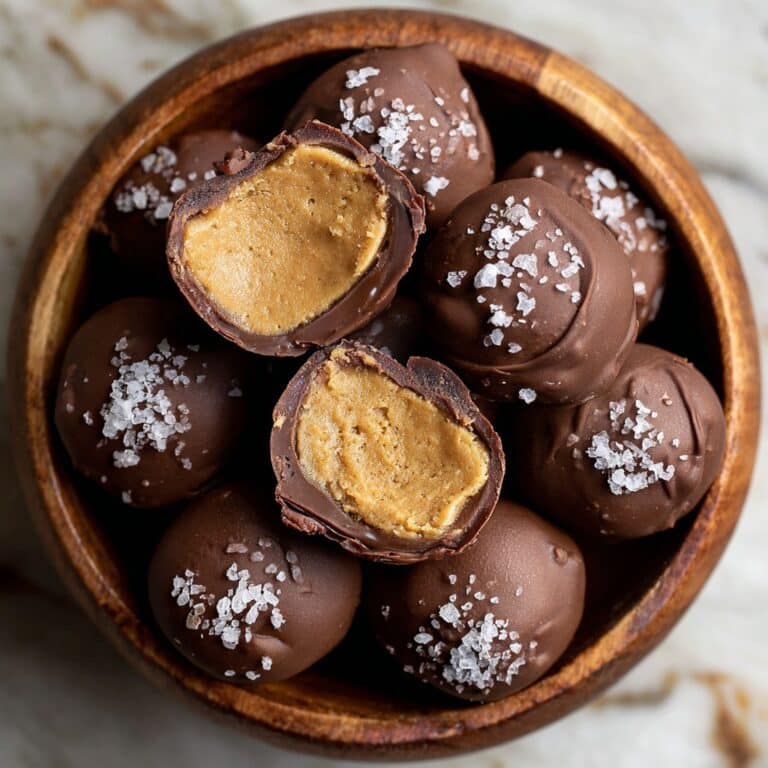
Gingerbread Truffles
Sit Down for a Tale: How I Fell for Gingerbread Truffles
Alright, so picture this; it’s mid-December, the house smells like every cookie spice you can think of, and I’m knee-deep in wrapping paper shreds (the cat’s idea of fun, not mine). A snowstorm had rolled in, and I was craving something festive but dead simple — and that’s when Gingerbread Truffles saved the day. Actually, my mate Lisa gets the credit… she brought over a tub of these once and after my third (okay, fourth) I demanded the recipe. Or bribed her with mulled wine. But look, these truffles have stuck with me ever since. And now I’m handing the secret over, tripping over my words and all.
Why You’ll Love This Lazy Little Treat
I make this whenever I can’t face rolling out dough or firing up the oven, which, let’s be honest, is more often than I’d care to admit. My family goes mad for these at Christmas (the plate’s empty before dinner), but I mean, they’re so dead easy I’ve even made them in July — just for the heck of it. Sometimes the messy coating annoys me — don’t get me started on cocoa powder on my jumper — but it’s worth it for that first bite: creamy, crunchy, spicy, and just the right amount of sweet. If you hate fiddly desserts, these are your new best mate.
What You’ll Need (and a Few Cheeky Swaps)
- 250g ginger biscuits/cookies (I usually grab McVitie’s if I’m in the UK, but any crunchy ginger snap will do — I’ve even used Digestives with a bit of extra ginger powder tossed in)
- 100g cream cheese (full-fat tastes best, trust me, but I’ve snuck in light cheese in a pinch)
- 1 tablespoon golden syrup (or honey if the cupboard’s bare; I’ve tried maple syrup and it’s not half bad either)
- 1/2 teaspoon ground cinnamon (basically, whichever brand you’ve got lurking at the back)
- 1/4 teaspoon ground allspice — don’t stress if you’re missing it, I sometimes just go wild with extra cinnamon
- A pinch of nutmeg (freshly grated is grand, but here’s a secret: I rarely bother)
- 150g white chocolate for coating (just the supermarket stuff; though my gran swears by Green & Blacks)
- Optional: cookie crumbs, sprinkles, or a dusting of cocoa for rolling
How to Actually Get These on the Table
- Bash the ginger biscuits into fine crumbs – I chuck mine into a zip bag and whack with a rolling pin. Or the bottom of a mug if the rolling pin’s hiding. A food processor’s handy but not vital.
- Mix the crumbs with cream cheese, syrup, and all your spices. Use a spoon at first, but honestly, hands work best. It’s a bit sticky; don’t panic. If it’s too soft, chill the dough for half an hour — I sometimes get impatient but it does help.
- Roll into balls. Or odd blobs if you’re me (life’s too short for perfect spheres). Maybe 1 inch across? I honestly just eyeball it. This is when I sneak a taste, usually just to “check the texture” (okay, I have no self-control).
- Stick them on a plate, then pop in the freezer for 10-20 minutes. They coat easier when cold — not rock solid, just a bit firmer. I usually forget them for half an hour and that’s fine too.
- Melt the white chocolate gently. Either microwave in short bursts or do the bowl-over-a-pot trick. Don’t let it burn; the smell’s tragic. If you end up with seized choc (been there), add a splash of coconut oil to fix it — works like magic!
- Dunk each ball in chocolate using a fork or one of those fancy dipping tools. Or two forks if you’re like me and can’t find the proper gadget. Let excess drip off, then roll in cookie crumbs or sprinkles if you like. Place on parchment.
- Let set in the fridge about 20 mins. That’s if they make it that far; my youngest usually nabs one when they’re still a bit gooey.
Things I Learned the Odd Way (Notes)
- Don’t skip chilling the dough, even if you’re in a rush. It really helps keep the balls together, I’ve learned the hard way (messy, messy kitchen… I speak from experience)
- If the mix feels too soft, add more cookie crumbs. Or just embrace the stickiness. No shame.
- I once tried using dark chocolate outside — it looked fancier, but frankly, didn’t taste as festive. Up to you though
Variations That I’ve Fumbled My Way Through
- Swap out the cream cheese for mascarpone if you’ve got some — makes it a little richer. But last time, I added too much and it went a bit gloopy (learn form my mistakes!)
- Tried a splash of orange zest? Game changer. If you love Terry’s Chocolate Orange…
- I got fancy and did half with a dark chocolate shell. Looked good but, honestly, not my jam – but hey, maybe it’ll work for you!
No Fancy Gear? No Drama (Equipment)
You need a bowl, a spoon, and something to smash cookies. I mean, a food processor’s slick but I’ve managed with a plastic bag and rolling pin, so you definitely don’t need to splash out. Oh, and a fork for dipping unless you feel like living dangerously and using your fingers (I won’t judge either way!)

How to Store (If They Last That Long…)
Pop them in an airtight tub and stash in the fridge. Supposedly keeps 4-5 days, though honestly, in my house it barely lasts more than a day, tops. Theoretically, you can freeze them — just defrost in the fridge overnight, though the white choc sometimes gets a bit streaky. Still tastes banging though.
Serving ‘Em Up (My Way)
I like to pile them up on a plate with a bit of extra ginger biscuit dust for good luck (my mum insists this makes them “look professional” — not sure, but I love the crunch). Sometimes I sneak them into a dessert board with fruit and nuts — great for lazy get-togethers. Bonus points with a mug of mulled wine (highly recommend the recipe on BBC Good Food — haven’t found better!).
Pro Tips: Tales of Oops Moments
- I once tried to double the recipe but dumped everything in at random – learned the hard way that you want to mix the dry with the wet or it goes weirdly lumpy. Just saying, follow the order!
- If you rush the chocolate coating (been there!) they’ll end up streaky or spotty. Actually, letting the truffles chill properly first is worth the patience.
FAQ (Questions I Get Hassled With!)
- Do I really need cream cheese?
- Eh, you can swap for mascarpone or even vegan cream cheese, but the tangy flavour is kind of key in my eyes.
- Can I use fresh ginger?
- Not really for this; stick with the ground stuff — trust me, I tried fresh once and it was odd. Gave me a weird crunchy bite.
- What if I haven’t got white chocolate?
- Use milk or dark, it’s your party, honestly! Just expect a different vibe. I did this for the Sally’s Baking Addiction version and no one complained.
- Why are my truffles sticky to roll?
- More crumbs needed or just chill them a bit longer. Or lick your fingers more. (Kidding! Sort of.)
Digression alert: Last time I made these, I got distracted watching Great British Bake Off and my cat tried to swipe a truffle while I wasn’t looking. So, guard your snacks unless you want mysterious missing truffles! Oh, and by the way, if you need another wicked holiday treat, these peppermint bark instructions are tried-and-true — can’t recommend enough.
Ingredients
- 1 1/2 cups gingerbread cookies, finely crushed
- 4 oz cream cheese, softened
- 2 tbsp powdered sugar
- 1/2 tsp ground cinnamon
- 1/4 tsp ground ginger
- 1/8 tsp ground nutmeg
- 8 oz white chocolate, melted (for coating)
- 2 tbsp crushed gingerbread cookies (for garnish)
Instructions
-
1In a mixing bowl, combine the crushed gingerbread cookies, cream cheese, powdered sugar, cinnamon, ginger, and nutmeg until a smooth dough forms.
-
2Scoop out small portions of the mixture and roll into 1-inch balls. Place on a baking sheet lined with parchment paper.
-
3Refrigerate the truffle balls for at least 20 minutes to firm up.
-
4Dip each chilled truffle into the melted white chocolate, coating completely, and return to the parchment-lined sheet.
-
5Sprinkle with crushed gingerbread cookies while the coating is still wet. Chill until set before serving.
Approximate Information for One Serving
Nutrition Disclaimers
Number of total servings shown is approximate. Actual number of servings will depend on your preferred portion sizes.
Nutritional values shown are general guidelines and reflect information for 1 serving using the ingredients listed, not including any optional ingredients. Actual macros may vary slightly depending on specific brands and types of ingredients used.
To determine the weight of one serving, prepare the recipe as instructed. Weigh the finished recipe, then divide the weight of the finished recipe (not including the weight of the container the food is in) by the desired number of servings. Result will be the weight of one serving.
Did you make this recipe?
Please consider Pinning it!!