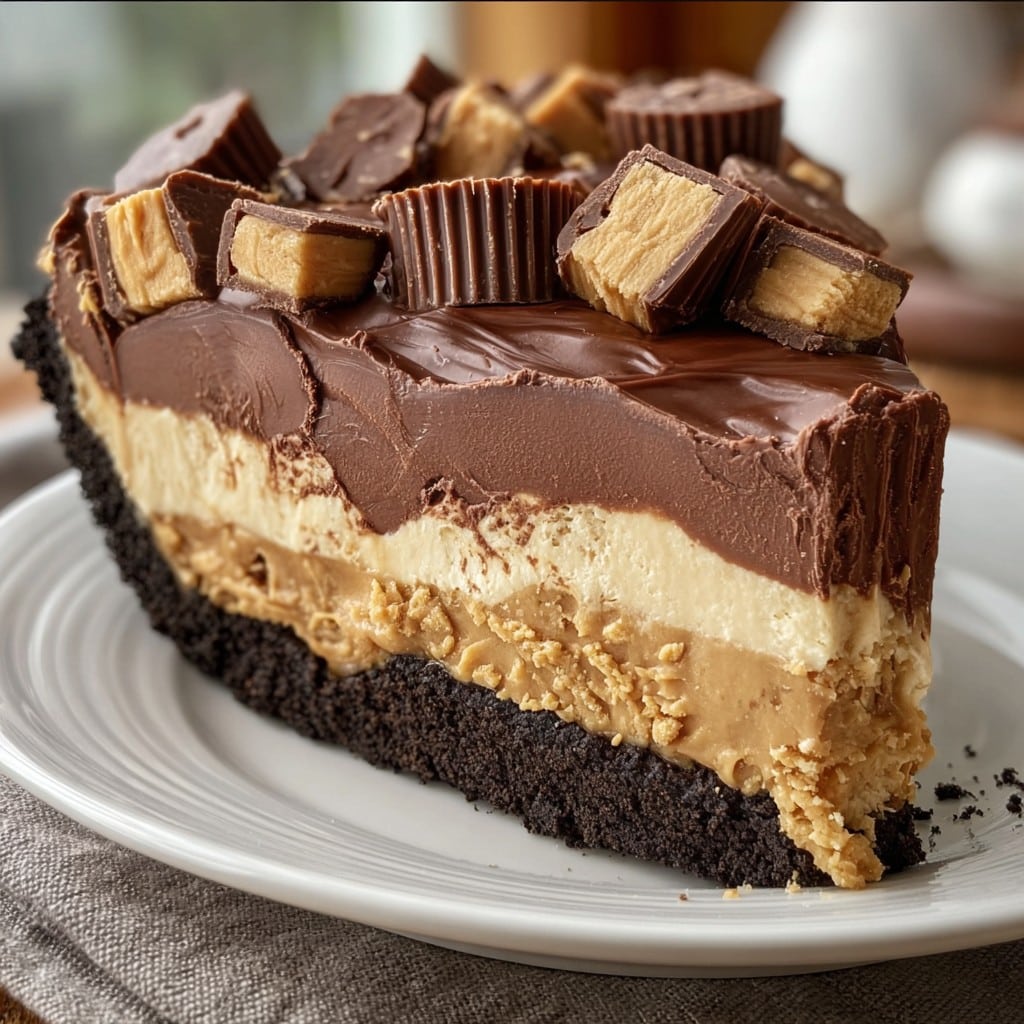
Giant Reese’s Peanut Butter Cup Pie: My Go-To Indulgent Treat
First up: Why am I making a Giant Reese’s Peanut Butter Cup Pie?
Okay, real talk—this pie started off as a dare from my cousin, who once insisted, “Why don’t you just make the candy bar GIANT instead of buying desserts?” Fair enough, so here we are. The smell of peanut butter and melted chocolate around the house takes me straight back to post-Halloween feasts as a kid (– and admittedly, a few sticky fingers after I swore I washed up). If you ask my partner, this is my signature “didn’t feel like turning on the oven but want to impress everyone” party trick, though, between us, sometimes my ganache comes out lumpy. But honestly? That’s half the fun. If you’ve got a sweet tooth and a soft spot for nostalgia, pull up a chair.
Why You’ll Love Making This
I make this when I want to see everyone’s eyes go comically wide (you know, like in cartoons). My family goes wild for it because, let’s face it: it’s all the best bits form a Reese’s cup, but at a scale that feels just a little bit unhinged. (If you’ve ever had a rough week and needed a chocolate fix, you’ll get it.) My only complaint? Sometimes the peanut butter filling sticks to my hand, but I’ve learned to call that the chef’s sample.
Let’s Talk Ingredients (with real-life swaps!)
- 10 oz (about 2.5 cups) semi-sweet chocolate chips (Sometimes I’m out, so I just use whatever chocolate bars I can find, chopped up!)
- 1.5 cups creamy peanut butter (Grandma would only use Skippy, but, honestly, use whichever you like – no one has broken the pie yet!)
- 1 cup powdered sugar (Sometimes I forget to sift it. It’s still good.)
- 1/2 cup unsalted butter, melted (Salted is fine too if you want things a bit more savory.)
- 1 teaspoon vanilla extract (Real or fake? No one notices, I promise.)
- Pinch of salt
- Optional: A handful of salted peanuts, crushed – for crunch. Or don’t. I do about half the time, depending on what’s left in the cupboard.
How to Make the Giant Reese’s Peanut Butter Cup Pie (Casually Speaking)
- First, get a 9-inch pie pan or a springform pan. Don’t have one? I used a deep cake tin once, and it was, um, rustic, but it worked.
- Melt about two-thirds of your chocolate, either in a double boiler or (truth: I use the microwave in 30-second bursts, stirring each time). Drizzle in a little coconut oil if you like it glossy, but only if you have it.
- Pour the melted chocolate into the bottom of your pan. Tilt it around until the bottom’s covered. Give the sides a bit of love too (I swirl the pan and call it exercise for my arms). Pop it all in the fridge for about 15-20 minutes, or until it’s pretty firm. Or if you get distracted and leave it for an hour, that’s fine, just actually remember it this time.
- Meanwhile, mix together the peanut butter, powdered sugar, melted butter, vanilla, and salt. You want it thick, like Play-Doh almost. If it looks too loose, add a smidge more sugar. If too stiff, a splash of milk works (I’ve also used coffee cream once, totally by accident, but it was delicious!)
- Plop the peanut butter mix right over your chilled chocolate layer, and gently push it out to the edges – I use my hands because, honestly, a spatula just makes things harder. Sneak a taste here; it’s almost required.
- Melt up the rest of your chocolate chips the same way you did before, then pour it over to cover all the peanut butter. If you want to go wild, swirl a few lines with a fork so it looks fancy (or just dump it, which is what I do 90% of the time).
- Toss it back in the fridge for at least an hour, two if you can stand to wait. I always get impatient and poke at the side to check if it’s set – small cracks are normal, don’t stress it.
Some Notes from All My Experiments
- If you forget to line your pan with parchment, it’s not the end of the world. You’ll just have to, uh, gently pry it out (I use a butter knife and just tell people it’s a “rustic edge”).
- Don’t leave the butter out for hours on a hot day. I did that once, it totally separated in the filling. Still edible, just not as pretty.
- This actually tastes better the next day, in my opinion, if you can somehow manage not to eat it all at once.
Variations I’ve Tried (Some Winners and a Miss)
- I once swapped in Biscoff spread for half the peanut butter—super delicious, but a bit softer, so chill it longer.
- Used dark chocolate instead of semi-sweet. It was a hit with the coffee crowd (including me!).
- Tried making it dairy-free with margarine and coconut oil instead of butter—the crust got a little soft, to be honest, but my vegan friends were happy.
- Once, thinking I was clever, I tried a marshmallow layer. It slid everywhere, so, um, don’t recommend unless you want a (very sticky) science project.
What You’ll Need (and What to Use If You Don’t Have It)
- 9-inch pie dish or springform pan (Or, as mentioned, any deep-ish round dish. If it holds pie, it works!)
- Mixing bowls—one medium, one large. Or a big salad bowl. Whatever.
- Spatula. Or honestly, just use a big spoon if you’re not being precious.
- Microwave or double boiler for melting chocolate. In a pinch, a small saucepan over very low heat will do (but watch it like a hawk, chocolate burns so easily!).
How to Store This (But Will You Even Need To?)
Keep it covered in the fridge—I just put a plate on top most days. In theory, it’ll keep up to five days, but, though honestly, in my house it never lasts more than a day! Oh, and I once tried freezing a slice; it was surprisingly good as an ice cream-y bite.
How I Serve Up My Giant Reese’s Peanut Butter Cup Pie
At birthdays, we serve with a big whack of whipped cream. Or, for the proper overkill, a scoop of vanilla ice cream and an extra drizzle of chocolate syrup (it’s honestly so rich you could just cut tiniest slivers, but we never do). My little nephew likes his with a tiny dusting of cocoa powder—no idea where he picked that up!
Things I’ve Learned. (Sometimes the Hard Way)
- Don’t try to slice it straight from the fridge. I once tried rushing that and regretted it because it shattered into chocolate shards. Let it sit at room temp for 10–15 minutes first.
- Actually, I find it helps to dip your knife in hot water before cutting—it’ll glide right through. Saves on embarrassment when guests are watching.
FAQ: Answering the Random Questions I Get
- Can I use crunchy peanut butter?
- Yup! It’ll just be… crunchier (shocking, I know). I did this once when I ran out of creamy. Good in a pinch.
- Help, my chocolate seized!
- Been there. If it looks grainy and clumpy, try stirring in a splash of vegetable oil—it sometimes rescues it. Otherwise, just embrace the texture. No one’s judging here.
- How do I make it vegan?
- Use vegan chocolate, dairy-free butter, and a plant-based peanut butter (most are anyway). There are loads of tips at Minimalist Baker—if you want to explore vegan desserts.
- Could I halve this for a smaller crowd?
- Sure thing. Use a tartlet pan or even muffin tins for minis (a bit fiddly, but fun). The ratios don’t have to be perfect; just make sure the chocolate coats the bottom and top.
- Where did you first hear about this recipe?
- Oh, I saw a video on Tasty ages ago. Mine’s less polished (and a lot messier). But honestly, that’s my style anyway!
Random note (total digression): While you’re waiting for this to chill, check out Serious Eats for other wild desserts. Some days, I get sucked into reading about the science behind baking and almost forget I have chocolate setting in the fridge.
So, that’s the Giant Reese’s Peanut Butter Cup Pie. Big, brash, a little bit unruly. But a total showstopper—I hope you have a laugh making it, and more making a mess eating it. If you end up with chocolate on your shirt (guilty), you did it right.
Ingredients
- 2 cups chocolate wafer cookie crumbs
- 1/2 cup unsalted butter, melted
- 1 1/2 cups creamy peanut butter
- 1 cup powdered sugar
- 1/4 cup unsalted butter, softened
- 1 teaspoon vanilla extract
- 2 cups semi-sweet chocolate chips
- 1/2 cup heavy cream
- 1/4 teaspoon sea salt (optional)
Instructions
-
1In a medium bowl, combine chocolate wafer cookie crumbs and 1/2 cup melted butter. Press the mixture evenly into the bottom and up the sides of a 9-inch pie dish. Place in the freezer while preparing the filling.
-
2In a large bowl, beat together creamy peanut butter, powdered sugar, softened butter, and vanilla extract until smooth and fluffy.
-
3Spread the peanut butter mixture evenly over the chilled cookie crust. Smooth the top with a spatula and return to the freezer for 15 minutes.
-
4In a microwave-safe bowl, combine chocolate chips and heavy cream. Heat in 30-second increments, stirring until the chocolate is melted and glossy.
-
5Pour the chocolate ganache over the peanut butter layer and spread evenly. Sprinkle sea salt on top, if desired.
-
6Chill the pie in the refrigerator for at least 2 hours before slicing and serving.
Approximate Information for One Serving
Nutrition Disclaimers
Number of total servings shown is approximate. Actual number of servings will depend on your preferred portion sizes.
Nutritional values shown are general guidelines and reflect information for 1 serving using the ingredients listed, not including any optional ingredients. Actual macros may vary slightly depending on specific brands and types of ingredients used.
To determine the weight of one serving, prepare the recipe as instructed. Weigh the finished recipe, then divide the weight of the finished recipe (not including the weight of the container the food is in) by the desired number of servings. Result will be the weight of one serving.
Did you make this recipe?
Please consider Pinning it!!