Fudgy Chewy Browkies (Brookies): My Homemade Recipe Adventure
So, Here’s the Story Behind My Browkies…
I’ll be real with you: the first time I made Fudgy Chewy Browkies (Brookies) was because I couldn’t choose between brownies or cookies (also, I had a bit of a chocolate craving on a rainy Tuesday). My nephew calls them ‘browkies’—so that’s what stuck. One time, I tried to pass them off as a birthday cake. Didn’t quite fool anyone, but nobody complained…because, well, did you ever meet a person who’s mad about chocolate and buttery cookie in one bite? Me neither.
Fun fact: I once dropped half the pan on the floor, and, not a proud moment, but… I picked a few off the top. 5-second rule, right? Anyway, here’s how I actually make them when I’m not distracted by podcasts and the dog.
Why I Keep Making These (And Why You’ll Probably Want To)
I make this when I’m feeling torn—or when my family is. (Don’t you love people who can’t make up their minds?) I’ve been bribing my kids with browkies for years, and the fact that nobody ever turns them down says something. They’re just gooey enough for me (sometimes too gooey for my mother, who likes her cookies ‘more proper’), but that’s the fun of it. Also, when I forgot to set a timer once and pulled them out a bit early, they were even fudgier, and now that’s how I always do it. Lesson learned, thank you forgetfulness! If you’re ever stuck for dessert for a picky group, these are a safe bet—even the neighbor who claims to only eat ‘healthy’ desserts goes in for seconds, but maybe that’s just because she’s polite. Or maybe because these work some kind of chocolate magic.
What You’ll Need (With My Little Swaps & Secrets)
- 1/2 cup (115g) unsalted butter (I’ve used salted in a pinch—just skip the extra salt then)
- 1 cup dark chocolate chips (milk chocolate works too; I mix leftover Easter candy sometimes, don’t tell anyone)
- 1 cup brown sugar (Granulated is okay, but the brown gives it that caramel touch. Grandma swore by Muscovado, but honestly, whatever’s in your cupboard will do.)
- 2 large eggs (jumbo works, probably. Once I used 1 egg and a splash of milk… didn’t love it, but it’ll work if you’re low.)
- 1 tsp vanilla extract (The real stuff is best, but, you know, the fake stuff is fine for a Tuesday.)
- 3/4 cup all-purpose flour (If you’ve only got self-raising, just skip the baking soda below)
- 1/4 cup unsweetened cocoa powder (Dutch-process or natural—haven’t noticed a big difference except price!)
- 1/4 tsp baking soda (or none if your flour is self-raising, see above)
- 1/2 tsp salt
- 1/2 cup mini chocolate chips (or chopped up chocolate—chunks are great too)
- For the cookie part—
- 1/2 cup (115g) unsalted butter, softened
- 1/2 cup brown sugar (or white if you like your cookies snappier, I suppose)
- 1/3 cup granulated sugar
- 1 large egg
- 3/4 tsp vanilla extract
- 1 1/4 cup all-purpose flour
- 1/2 tsp baking soda
- 1/2 tsp salt
- 1 cup chocolate chips (or walnuts, or whatever’s lurking at the back of the pantry)
Here’s How It Goes Down (My Real Life Browkie Method)
- Preheat your oven to 350°F (180°C). Grease or line a 9×9-inch pan. Small pro tip: I’ve used a rectangular tin when I can’t find my square one; works fine—just check it a little early.
- Start with the brownie batter. Melt the butter and dark chocolate together in the microwave (short bursts—burnt chocolate is sad). Stir until it’s shiny. Sometimes I whisk like a lunatic if I’m grumpy, don’t worry about lumps at this stage.
- Add the sugar, eggs, and vanilla to your chocolatey goo. Whisk again—should look glossy and a bit like it would make you sick if you ate it, but you’ll want to try. (This is where I sneak a taste. I know, I know—raw eggs.)
- Gently fold in flour, cocoa, soda, and salt. Stop when you can’t see flour—overmixing = sadness. Stir in those mini chocolate chips just because.
- Spread batter into the pan—don’t worry if it’s thick. Get it as even as you can with the back of a spoon; perfection is highly overrated. Now, set that aside.
- Now the cookie part: Cream softened butter with both sugars until sort of fluffy. I use a wooden spoon because I dislike extra washing up. Add your egg and vanilla, beat again (use some elbow grease). Fold in flour, soda, salt, then finally the chocolate chips (walnuts too if you’re channeling your inner fancy baker).
- Drop spoonfuls (or hunks—depends how rustic you’re feeling) of cookie dough all over the brownie base. If there are gaps, who cares? (The cookie bits spread out, promise.)
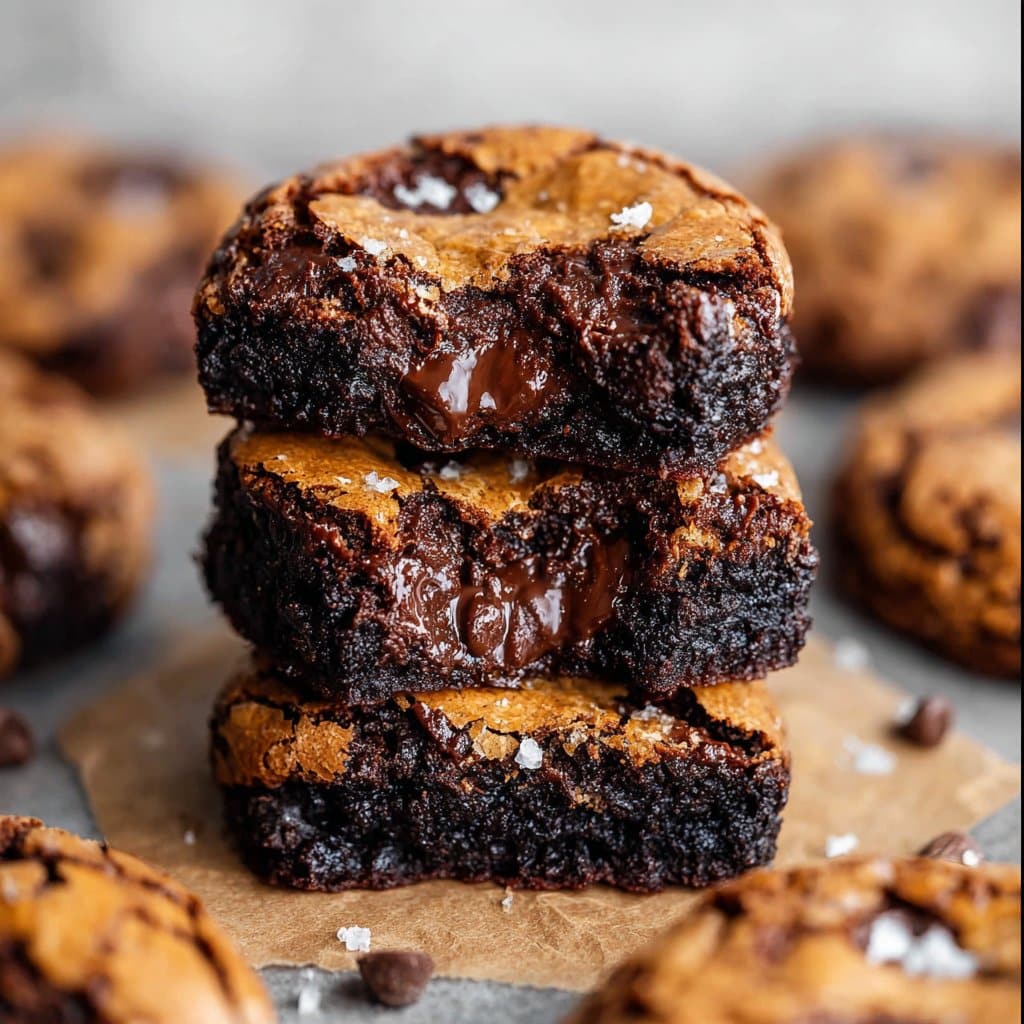
- Bake for 27-33 minutes. I start peeking at 25. The edges will look set and the middle—sort of wobbly and sunken (I like it that way, but more baking means less fudgy—totally your call). A toothpick in the center might come out with some goo, that’s perfect.
- Let cool. Or, if you can’t wait, cut into messy squares and risk burning your tongue. Sometimes I eat them with a fork out of the pan because I’m classy like that.
Notes That’ll Save You Some Headaches
- If you chill the dough first, it’s easier to handle—but who’s got time for that?
- Actually, I find it works better if you under-bake slightly. Next day, they’re somehow even fudgier (if any survive that long… rare in my kitchen!).
- Once I tried to use coconut oil instead of butter—didn’t hate it, but they tasted way coconutty. Just so you know.
- If the cookie dough seems dry, add a tiny splash of milk or coffee (yes, coffee makes chocolate better. There, I said it!)
Experiments (Some Worked, Some Didn’t…)
- White chocolate chips—lovely, but I missed the dark stuff.
- Pecans instead of walnuts—honestly, not my favourite, but my uncle says I’m wrong.
- Tried swirling caramel in once. Messy and weird, but, hey, not inedible.
What You Actually Need (And What You Can Skip)
- Mixing bowls (you really just need two—one for each batter, but if, like me, you misplace one, do the brownie in a saucepan after melting.)
- 9×9 baking pan—I used to own a fancy one, but now it’s a £3 deal from the supermarket. Or use a rectangular dish, just check the bake time.
- Wooden spoon or electric mixer for the cookie dough. Or just a fork if you’ve got strong arms (almost works as well, promise!)
- An oven—no way around this, really. Not tried air frying, but that’s a project for another rainy day.
Where Do You Store These (If You Have Any Left)?
Technically, you could keep them in an airtight container at room temp for about 3 days. Honestly? Never lasted more than a day in my house. If you really want them warm the next day, 10 seconds in the microwave and bingo—gooey again!
Serving Up Browkies: My Kinda Traditions
I sometimes cut them small for lunchboxes (makes me feel like a supermum). My brother insists it’s best served with vanilla ice cream—classic, I know, but he’s not wrong. If you want to be extra, try them chilled straight from the fridge. Honestly, I think they taste better the next day, but maybe that’s just me.
Pro Tips (AKA, Lessons from a Browkie Disaster or Two)
- Don’t rush the cooling. I once hacked into them straight out of the oven and ended up with a gooey puddle (still ate them though).
- Never use a hot glass dish straight out of the oven. Cracked one once. It was, well, a shambles and my partner still laughs about it.
- I tried to swap all the sugar for stevia once. Let’s just say… don’t bother. Life’s too short.
Some Real FAQs (Because People Actually Ask Me These)
- Can I freeze these browkies? Yes, you can freeze cut squares—just wrap in cling film. I think the texture is a bit less chewy once defrosted, but still legit tasty.
- Do I need fancy chocolate? Nope. Store brand is fine. If you want to splurge, Lindt 70% is ace, but so is that stuff you get at Tesco, just don’t overthink it.
- Can you make it gluten free? Actually, I have gone rogue with a 1:1 gluten free flour blend and it worked out well enough. Wasn’t quite as chewy, but not bad at all!
- Brownie base too cakey? Try cutting back a smidge on the flour, or bake 2–3 minutes less. Or leave it and call it ‘cake-browkies.’
- Where’d you learn to make these? Mix of YouTube recipes, late night Pinterest binges (see Sally’s Baking Addiction—she gets it spot on!), and accidental kitchen efforts over the years.
- Bake it all in one go? Yes, you layer both batters then bake just once! No need for separate trips.
And, er, if you end up with chocolate on your face and your jeans by the end of all this, welcome to the club. If I forgot anything (probable), ping me or check out Serious Eats’s take on brookies for backup ideas. Happy browkie-ing!
Ingredients
- 1 cup all-purpose flour
- 1/2 cup unsalted butter, melted
- 1 cup granulated sugar
- 1/2 cup brown sugar, packed
- 2 large eggs
- 1/2 cup unsweetened cocoa powder
- 1 tsp vanilla extract
- 1/2 tsp baking soda
- 1/2 tsp salt
- 1 cup semi-sweet chocolate chips
Instructions
-
1Preheat oven to 350°F (175°C). Grease and line an 8×8 inch baking pan with parchment paper.
-
2In a medium bowl, whisk together the melted butter, granulated sugar, and brown sugar until well combined.
-
3Add eggs and vanilla extract. Mix until smooth.
-
4Sift in the flour, cocoa powder, baking soda, and salt. Stir until just combined.
-
5Fold in the chocolate chips. Spread the batter evenly in the prepared pan.
-
6Bake for 28-32 minutes, or until the top is set and a toothpick inserted comes out with a few moist crumbs. Cool before slicing.
Approximate Information for One Serving
Nutrition Disclaimers
Number of total servings shown is approximate. Actual number of servings will depend on your preferred portion sizes.
Nutritional values shown are general guidelines and reflect information for 1 serving using the ingredients listed, not including any optional ingredients. Actual macros may vary slightly depending on specific brands and types of ingredients used.
To determine the weight of one serving, prepare the recipe as instructed. Weigh the finished recipe, then divide the weight of the finished recipe (not including the weight of the container the food is in) by the desired number of servings. Result will be the weight of one serving.
Did you make this recipe?
Please consider Pinning it!!