French Onion Chicken Bowls: My Cozy, Cheesy Weeknight Go-To
Alright, Let’s Talk About These Bowls (And Maybe a Bit More)
You know those nights when you want something hearty, a little fancy, but honestly, you just don’t want to spend hours in the kitchen? That’s me most Tuesdays (and the odd Friday when I’m trying to avoid takeout again). The first time I cobbled together these French Onion Chicken Bowls, I was just trying to use up a pile of onions that were looking a bit tired in my veggie drawer. Turns out, it’s basically like the love child of French onion soup and creamy chicken—plus, you get to eat it with a spoon and a fork. My cousin one called it “restaurant-worthy”, but he’ll eat anything with gooey cheese so take that with a grain of salt. By the way, did I ever tell you about the time I used the wrong cheese and my husband still insisted it tasted like a bistro meal? Anyway, let’s get into why this is a repeating star at my dinner table.
Why You’ll Love This (In My Totally Unprofessional Opinion)
I usually whip this up when it’s cold or drizzly out; somehow the sizzle of onions makes the whole house feel snuggly, no fancy candle required. My family goes absolutely bonkers for the melted cheese top (who wouldn’t, right?), and the best part is you don’t even need perfect onions; those slightly wrinkly ones? Toss ‘em in, no judgment here. The real fun is in how the flavors come together—rich onion, juicy chicken, and that cheesy cap. (I’ll admit, caramelizing onions used to drive me a bit nuts. Patience is not usually my thing, but now I just put on a podcast and zone out for 20 minutes. Actually makes it kind of meditative after a while! Until the cat yells at me for dinner, anyway.)
The Ingredients (Feel Free to Mess Around Here!)
- 4 medium yellow onions (I’ve used red ones in a pinch—works fine, slightly sweeter)
- 2 tablespoons butter—sometimes I sub in olive oil if I’ve run out (shhh, don’t tell my French auntie)
- 1 tablespoon olive oil
- 3–4 garlic cloves, minced (honestly, I just toss in a handful; who measures garlic?)
- 1 pound boneless, skinless chicken breasts (or thighs if you like dark meat better; thighs are juicier)
- 2 teaspoons fresh thyme (dried works in winter, about 1 teaspoon)
- Salt and a good twist of black pepper
- 1/2 cup dry white wine (or chicken stock if you don’t do wine. I did apple juice once—odd, but not terrible)
- 2 cups chicken broth (any store brand does the trick—I know people go wild for homemade, but who actually has it ready?)
- 1 tablespoon Worcestershire sauce (optional, but it adds oomph)
- 1 cup shredded Gruyère (Swiss, Emmental, or even mozzarella if desperate—my grandmother would probably faint, but hey)
- 1 cup shredded mozzarella or provolone (use that boring bagged cheese if you need)
- Handful of croutons or a chunk of stale bread (if you’re fancy, slice a little baguette up—otherwise, even a hotdog bun will do in a pinch)
Here’s How I Throw It Together
- Slice the Onions: Peel and thinly slice your onions. Don’t stress about perfect rings, just try not to lose a finger in the process. I usually get teary here—onions get me every time; if you know a trick, please share it!
- Get Caramelizing: Put a big skillet or Dutch oven on medium-low heat. Melt butter and olive oil (if your pan is a bit small, just do this in batches). Toss in the onions, sprinkle with a slap of salt, and stir now and again for 20–25 minutes. They get all jammy and brown; if they look a little burnt early on, turn the heat down. This is the bit I sneak a taste, and then complain when I run out of onions for the recipe. Classic me.
- Add Garlic & Herbs: Chuck in minced garlic and thyme, stir for a minute—honestly, this is where my kitchen smells like a bistro. So good.
- Brown the Chicken: Shove the onions to the edge (or take out most if your pan is crowded). Season chicken with some salt and pepper, add it to the pan. Sear on both sides (about 3–4 minutes per). If it sticks, let it be—it’ll release when it’s good and ready. If you ever panic that it’s looking pale, just trust the process.
- Deglaze & Simmer: Pour in the wine (or stock). Scrape the brown bits from the bottom—this is where real flavor hides. Let the wine bubble for a minute. Then stir back in the onions if you took them out, add the chicken broth and Worcestershire sauce. Bring to a gentle simmer, cover, and let everything get friendly for 10–15 minutes (check if chicken’s done—no pink inside).
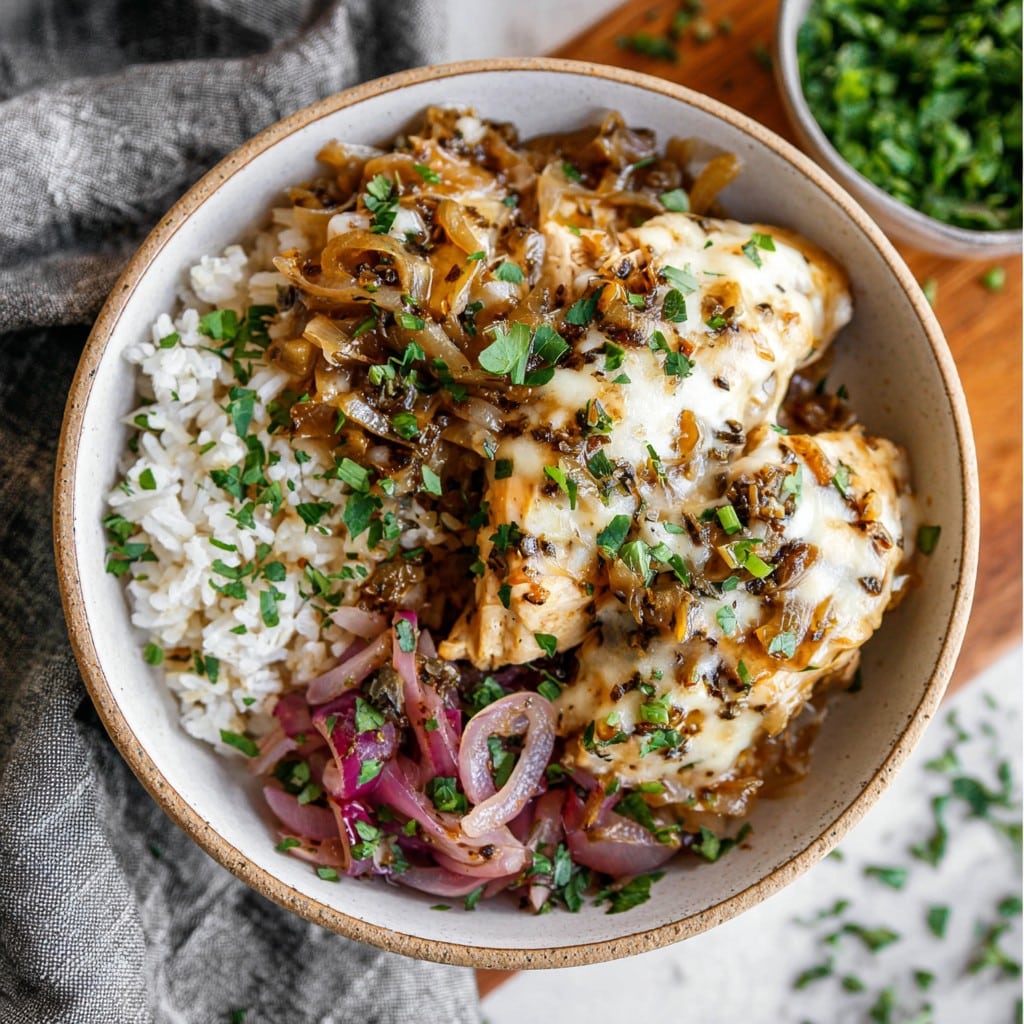
- Get Cheesy: Preheat your broiler/grill if you have one; otherwise, a hot oven will do. Spoon your chicken and onion mixture into oven-safe bowls (or just keep it all in the big pan if you can’t be bothered). Top with bread/croutons, then pile on the cheese. Stick under the broiler until bubbly and gold. (Set a timer… I once totally charred mine while scrolling my phone; lesson learned!)
- Let Cool a Minute: It’s nuclear-lava hot straight from the oven. I always burn my tongue because I’m impatient; maybe you’re smarter than me.
Notes from My Many Mess-Ups
- Actually, I find thicker slices of onion hold up better after baking. I used to slice super thin, but things just vanished.
- If you want extra chicken, double the meat, but don’t skimp on onions!
- Sometimes I use leftover rotisserie chicken. Just skip straight to the broth step and heat it through.
- Oh, and don’t stress over exact cheese blends. I once mixed five random cheeses from my fridge, and everyone loved it.
Little Experiments and Not-So-Great Ideas
- Once, I used beer instead of wine. Don’t. It tasted like chicken soup at a frat party. Not in a good way.
- I’ve made it with mushrooms (yum), and it gets the dish extra earthy. Toss in a handful with onions if you’re a fan.
- Veggie twist: swap chicken for white beans or hearty roasted cauliflower. Actually turns out pretty cozy.
Do You Even Need Fancy Tools?
Okay, yes, a heavy-duty skillet or Dutch oven makes this easier, but I’ve used a wonky old sauté pan, and it turned out just fine—just keep an eye on burning. Broiler is awesome for the cheese, but if you lack one (like I did in my college flat), just stick ‘em under a hot oven and squint at the top till it bubbles.
Storing & Reheating This Bad Boy
Supposedly, it keeps for 3–4 days in the fridge, tightly covered. (Honestly, in my house, it never lasts more than a day.) I think it tastes even better the next day, after things cozy up even more. Reheat gently—don’t nuke it, or the chicken gets rubbery.
How I Like to Serve French Onion Chicken Bowls
You can get fancy with a bright green salad—arugula is great—or just do what I do and serve with crusty bread on the side for extra dipping. My family sometimes demands a little Dijon at the table (don’t ask, they’re weird like that). Oh! One cousin tried it with a cold pilsner. Totally worked.
My Can’t-Believe-I-Didn’t-Know-This Tips
- I once tried to rush the onion-cooking step and just got greasy, half-burned onions; don’t be me, let it ride low and slow.
- On second thought, if you don’t like really sweet onions, pull them off heat a bit sooner—they get sweeter the longer they cook.
- If your cheese isn’t bubbling, move the bowls up closer to the broiler, but watch like a hawk—cheese goes from golden to incinerated in seconds.
FAQ—Real Questions, Honest Answers
- Can I make this dairy-free? Sure thing! Use olive oil instead of butter, and go for your fave non-dairy cheese—just expect it won’t get quite as melty. (Some brands do a better job; check out this easy vegan mozzarella—I tried it once and wasn’t mad at it.)
- Do I need to use Gruyère? Nah; I usually grab what’s closest. Cheddar gives it a fun twist, too.
- Is there a slow cooker version? Actually, yes! Just do the onions on the stove, toss everything in the slow cooker, and let it go on low 4 hours. Finish with cheese in oven so it crisps up. (I followed this basic slow cooker idea once and winged it from there.)
- Can I freeze it? Sort of. If you freeze before adding bread/cheese, it comes out better. The cheese turns a bit weird after, not gonna lie!
- I hate cleaning up—is this a pain? Not at all, really. Only like two pans unless you go crazy with extra toppings. (I leave my caramelized bits to soak overnight. So much easier than scrubbing right away.)
If you’re looking for great oven-safe bowls, I love these stoneware bowls here. Or, just raid your cupboard for mismatched mugs, like I did last week (no one noticed but me).
Ingredients
- 2 large boneless skinless chicken breasts, sliced
- 3 large yellow onions, thinly sliced
- 3 tablespoons unsalted butter
- 2 cloves garlic, minced
- 1 teaspoon dried thyme
- 4 cups low-sodium beef broth
- 1 tablespoon all-purpose flour
- 1 cup shredded Gruyere cheese
- 4 slices crusty baguette
- Salt and black pepper, to taste
- 1 tablespoon olive oil
Instructions
-
1Preheat oven to 375°F (190°C). Season sliced chicken breasts with salt and pepper.
-
2In a large skillet over medium heat, melt butter and olive oil. Add sliced onions and cook, stirring frequently, until deeply caramelized, about 20-25 minutes.
-
3Add garlic and thyme to the onions. Sprinkle flour over, stir to coat, then slowly pour in beef broth, scraping browned bits from the pan.
-
4Add chicken slices to the skillet and simmer for 10 minutes until cooked through and the sauce has thickened slightly.
-
5Divide the chicken and onion mixture among 4 oven-safe bowls. Top each serving with a slice of baguette and a generous sprinkle of Gruyere cheese.
-
6Place bowls on a baking sheet and bake for 10 minutes, or until cheese is bubbly and golden. Serve hot.
Approximate Information for One Serving
Nutrition Disclaimers
Number of total servings shown is approximate. Actual number of servings will depend on your preferred portion sizes.
Nutritional values shown are general guidelines and reflect information for 1 serving using the ingredients listed, not including any optional ingredients. Actual macros may vary slightly depending on specific brands and types of ingredients used.
To determine the weight of one serving, prepare the recipe as instructed. Weigh the finished recipe, then divide the weight of the finished recipe (not including the weight of the container the food is in) by the desired number of servings. Result will be the weight of one serving.
Did you make this recipe?
Please consider Pinning it!!