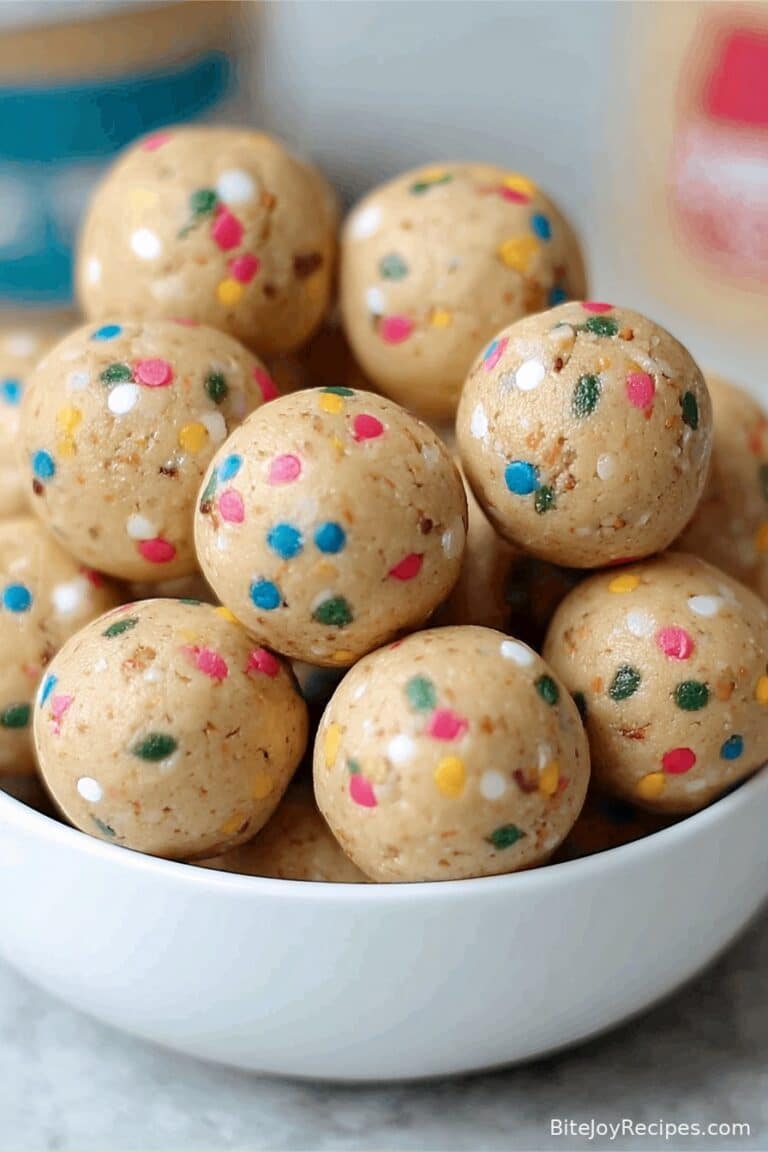
Healthy Granola Cookie Dough Bars
A Little Cookie Bar Nostalgia (with a Whiff of Oats)
Alright, so here’s a not-so-secret confession: sometimes I’d rather eat cookie dough than baked cookies. Who’s with me? Anyway, that’s where these Healthy Granola Cookie Dough Bars come in. I first cobbled these together on a Saturday afternoon when I was feeling snacky but also moderately responsible. No fancy story—just a craving and a handful of half-opened pantry bits. Little did I know, my kids would legit steal these straight out of the pan before they cooled. (Cheeky monkeys!)

Why I Keep Making These (a.k.a. Why You’ll Love This)
I make these cookie dough bars when I want something banging but kinda healthy (ish). They’re basically my secret weapon when I’ve got a million things on and need a pick-me-up that won’t send me into a sugar coma by 3pm. My family goes crazy for them because apparently anything that looks or sounds like cookie dough disappears in seconds around here. And let’s be honest, sometimes I want the granola flavor without the whole ‘chewing on rocks’ ordeal.
There’s also almost zero oven drama (because last time I used the oven, I, erm, burned toast), so these are my fallback “snack rescue” plan. But, hey, if you leave out the chocolate chips, nobody’s judging, but, like, why?
Let’s Talk Ingredients (Substitutions = Sanity)
- 1 3/4 cups rolled oats (You can use quick oats if that’s all you find at the back of your cupboard – just a little less chewy!)
- 3/4 cup creamy nut butter (peanut, almond, or even sunflower seed when we run out)
- 1/3 cup pure maple syrup (I’ve subbed honey in a pinch—still delish; Grandma always said only real maple, but frankly who’s got the budget?)
- 1/2 cup almond flour (Oat flour works too—no one noticed, except that one time it was a tad crumbly)
- 1/3 cup mini chocolate chips (Regular ones totally work, or raisins if you’re feeling virtuous, but I’ve never actually tried that)
- 1 tsp vanilla extract (the real stuff if you can, but honestly even the fake stuff does the trick)
- Pinch of sea salt (I sometimes go heavy handed—up to you)
How to Make These (My Way, with a Few Detours)
- Line an 8×8 inch pan with parchment paper. Or use foil if, like me, you haven’t got parchment left (it sticks a bit, but whatever).
- In a big bowl, mix the rolled oats, almond flour, and sea salt together. Don’t sweat if a few oats fly out—happens to me every time.
- Now, in a microwave-safe bowl (or on the stovetop if you prefer old-school), warm the nut butter and maple syrup together until just runny—about 20–30 seconds. Stir in the vanilla while it’s still warm.
- Pour the sticky mixture over the oats combo and stir it all up until everything is coated and it looks kinda like, well, cookie dough. Don’t worry if it’s a bit sticky at this stage—resist the urge to add more flour (I did it once, total regret—dry city!).
- Fold in most of the chocolate chips. I save a generous handful for the top—personal preference, but you do you.
- Press the mixture into your lined pan. I usually just use my hands (clean, promise), but a spatula works. Scatter the rest of the chocolate chips on top; gently press in so they stay.
- Pop the pan in the fridge for at least 2 hours. Or if you’re in a hurry, freeze for 40 minutes. But be careful—too cold and they’re a pain to slice (been there, chipped a knife once!).
- Lift out the slab and cut into bars—makes about 12, or 16 if you’re dainty. This is the bit where I can’t resist nibbling the edges (baker’s rights?).

What I’ve Learned from Making These (Notes)
- Once, I tried to use only quick oats, and it was a softer texture—actually not bad, but not as “granola-y.” Lesson learned: both work.
- Be patient with the chilling time. I’ve rushed it before—giant gooey mess. Live and learn.
If You’re Brave, Try These Variations
- Swap the nut butter: Sunflower seed butter works if you’re nut-free. Cashew butter tastes fancy but is a bit pricier.
- Add-ins: I’ve thrown in toasted coconut flakes and pumpkin seeds—my husband liked it, my kids did not. Proceed at your own risk.
- Protein powder: I once tried a scoop for a post-gym snack. Tasted like gym socks, but maybe I picked the wrong powder.

Gear You’ll Need (and Some Lazy Fixes)
- 8×8 inch pan (I’ve used a loaf pan—just cut chunkier bars)
- Parchment paper (Foil works, but fair warning—it’s stickier)
- Mixing bowls (I make do with one big bowl when I can’t be bothered washing up)
- Stirring spoon or spatula (clean hands totally allowed here!)
Storing These Bars (But Honestly, Good Luck)
These keep in the fridge for up to a week—stored in an airtight container. Or in the freezer for longer. Although, in my house, they mysteriously vanish in under 24 hours. Coincidence? I think not.
How We Serve ‘Em at Home (Suggestions Just for You)
- With coffee in the morning—total breakfast shortcut.
- Afternoon snack straight from the fridge. My son dunks them in milk. I like them with a dollop of Greek yogurt (is that weird?).
- Stacked up on a tray for picnic treats—once they traveled in my purse… slightly squished, but still good!
Pro Tips and Lessons Form My Blunders
- Don’t rush the chilling step, or they’ll fall apart. I was impatient once (or thrice), and learned the hard way—crumbs everywhere.
- If it’s too sticky to press in the pan, wet your hands first. Or use a sheet of baking paper to smoosh it down—so much less messy.
- Actually, I find it works better if you cut them straight from the fridge. Room temp = tendency for “mysteriously disappearing ends” (aka me nibbling).
FAQ (Because You Actually Asked!)
- Can I make these gluten-free? Yep! Oats and almond flour are gluten-free, but just check your oats haven’t played tag with wheat in a factory somewhere.
- Any way to make this lower sugar? Sure, try halving the maple syrup (they’ll be firmer). Or use sugar-free syrup, though I think it tastes odd—maybe you’ll love it?
- Could I bake these for crunchy bars? Honestly, I tried once. They got a bit too tough, but if you’re feeling adventurous, go low and slow in the oven, maybe 325°F for 10-12 minutes. Just watch ’em!
- What if I don’t have almond flour? Blitz some oats in a blender (oat flour, basically). That works. Wheat flour—nope, it tastes raw.
- Can my toddler eat these? Short answer: I think so, but watch for chunky chocolate bits or sticky nut butter if your kiddo’s still tiny.
Well, that’s everything I can think of (for now), friend. Hope you make these—and if you find a way to keep them around longer than a day, please tell me your secret!
Ingredients
- 1 3/4 cups rolled oats
- 3/4 cup creamy nut butter (peanut, almond, or sunflower seed)
- 1/3 cup pure maple syrup
- 1/2 cup almond flour
- 1/3 cup mini chocolate chips
- 1 tsp vanilla extract
- Pinch of sea salt
Instructions
-
1Line an 8×8 inch pan with parchment paper. Or use foil if, like me, you haven’t got parchment left (it sticks a bit, but whatever).
-
2In a big bowl, mix the rolled oats, almond flour, and sea salt together. Don’t sweat if a few oats fly out—happens to me every time.
-
3Now, in a microwave-safe bowl (or on the stovetop if you prefer old-school), warm the nut butter and maple syrup together until just runny—about 20–30 seconds. Stir in the vanilla while it’s still warm.
-
4Pour the sticky mixture over the oats combo and stir it all up until everything is coated and it looks kinda like, well, cookie dough. Don’t worry if it’s a bit sticky at this stage—resist the urge to add more flour (I did it once, total regret—dry city!).
-
5Fold in most of the chocolate chips. I save a generous handful for the top—personal preference, but you do you.
-
6Press the mixture into your lined pan. I usually just use my hands (clean, promise), but a spatula works. Scatter the rest of the chocolate chips on top; gently press in so they stay.
-
7Pop the pan in the fridge for at least 2 hours. Or if you’re in a hurry, freeze for 40 minutes. But be careful—too cold and they’re a pain to slice (been there, chipped a knife once!).
-
8Lift out the slab and cut into bars—makes about 12, or 16 if you’re dainty. This is the bit where I can’t resist nibbling the edges (baker’s rights?).
Approximate Information for One Serving
Nutrition Disclaimers
Number of total servings shown is approximate. Actual number of servings will depend on your preferred portion sizes.
Nutritional values shown are general guidelines and reflect information for 1 serving using the ingredients listed, not including any optional ingredients. Actual macros may vary slightly depending on specific brands and types of ingredients used.
To determine the weight of one serving, prepare the recipe as instructed. Weigh the finished recipe, then divide the weight of the finished recipe (not including the weight of the container the food is in) by the desired number of servings. Result will be the weight of one serving.
Did you make this recipe?
Please consider Pinning it!