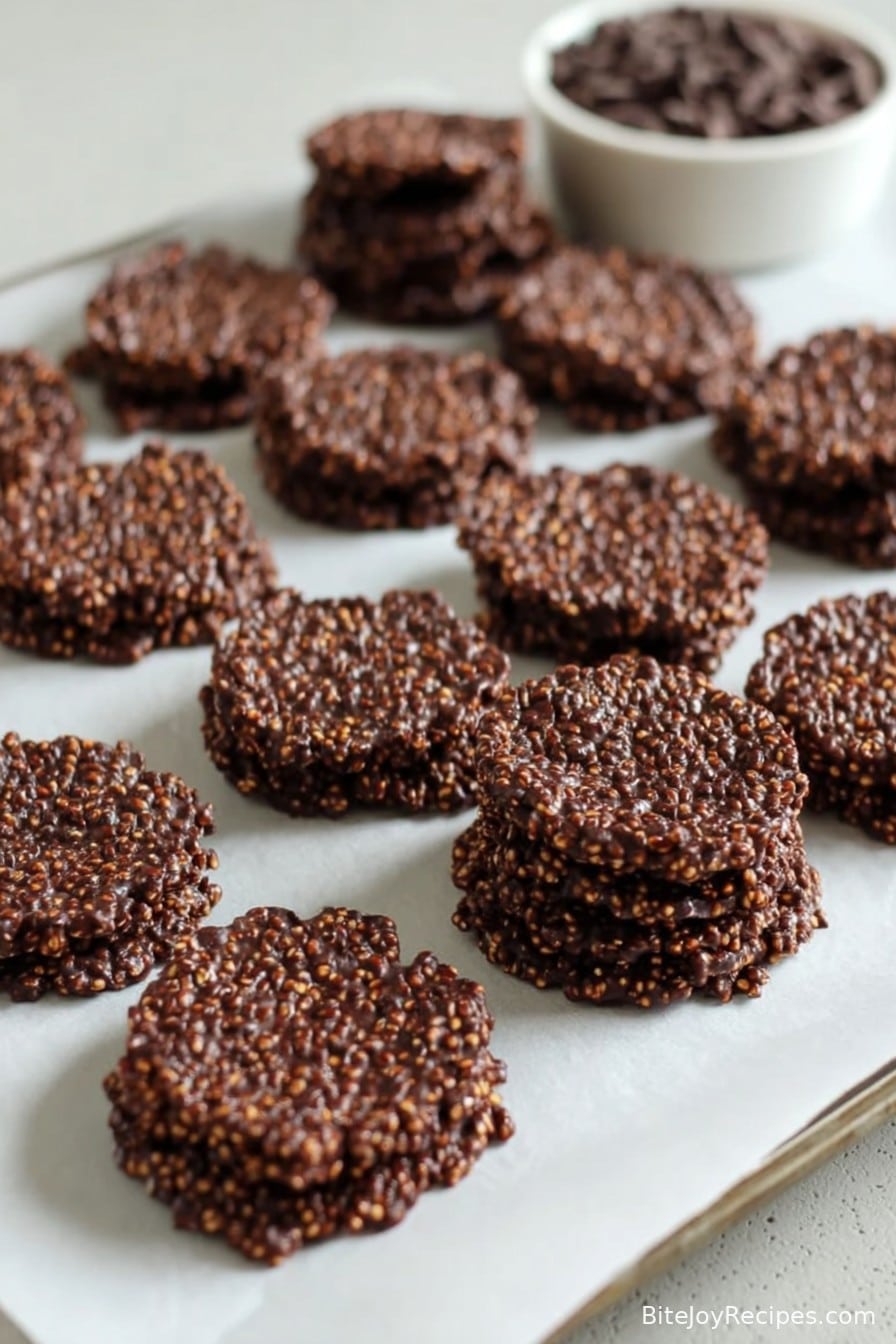
3-Ingredient Dark Chocolate Quinoa Crisps
Let’s Chat: Why I’m Obsessed With These Crisps
Alright, let me tell you—3-Ingredient Dark Chocolate Quinoa Crisps sort of happened by accident. (Well, unless you consider late-night snack cravings “planning.”) I was raiding the pantry after a long day and basically mashed together what I could find. It was one of those kitchen moments where you’re like, “Eh, worst case I just eat the chocolate straight.” But they turned out awesome—and now, whenever I make them, I remember that time I almost melted the chocolate so badly it turned grainy. Rookie move, right? (Honestly, who hasn’t done that at least once?)
Anyway, these have become a snack staple around here. Sometimes I think my family just humors my “healthy treat” experiments, but these go missing faster than you can say quinoa.
Why You’ll Love This (Or Maybe Wonder What On Earth I’m Doing)
I make this when I want something sweet but don’t feel like measuring a dozen things. My sister says she “doesn’t trust quinoa in desserts,” but the crunch won her over. (And look, if I can get my snack-obsessed teenager to put down chips for these, there’s gotta be something good going on.)
They’re also perfect for those days when you just can’t be bothered with oven mitts, you know? No fussing, minimal cleanup—unless you knock over the quinoa bag like I did once, in which case, hello, vacuum cleaner.
What You’ll Need (And What I’ve Subbed In A Pinch)
- 1 cup dark chocolate chips (I like 70%, but honestly, I’ve used milk chocolate when I ran out, and nobody complained. My grandmother always picked Ghirardelli, but the store brand does the trick.)
- 1/2 cup puffed quinoa (Sometimes I use puffed rice if I’m out of quinoa—the texture’s a bit less hearty, but it still snaps.)
- 1/4 teaspoon sea salt (I once used flaky Maldon salt and felt so fancy. Table salt works in a pinch, but go easy.)
Here’s How I Actually Do It (Recipes, But Not Too Rigid)
- First, line a baking tray with parchment paper. (I sometimes skip this, but then I need to chisel the crisps off the tray—learn from my mistakes.)
- Melt your chocolate chips in a microwave-safe bowl. Zap them for 30 seconds, stir, then do 20-second bursts till smooth. (If you forget and blast them for a full minute, it’ll clump; don’t panic, just add a smidge of coconut oil… actually, it works okay.)
- Stir in the puffed quinoa, making sure it’s evenly coated—this is where I start “tasting” accidentally. If it looks weirdly lumpy, don’t stress. That’s normal.
- Scoop tablespoon-ish mounds onto your prepared tray. Sometimes I use two spoons; other times, I just glop it on with my hands if nobody’s watching. Sprinkle sea salt over the top (or, if you forget, just toss it on after they’ve set—no biggie).
- Pop the tray in the fridge for at least 30 minutes. (Unless you need it right now, then freezers work too. They won’t be as set, but who’s judging?)
Notes From My Many, Many Attempts
- Overmixing the quinoa can crush it a bit. I actually kind of like some pieces soft, but if you want all-out crunch, mix gently.
- Don’t use wet utensils. Trust me—one damp spoon and your chocolate will seize faster than you can say “oops.”
- Let the crisps warm up a tad before eating if you keep them in the fridge; otherwise, your teeth get a rude awakening. (Totally learned that the hard way—ow!)
I Tried These Variations and Here’s What Happened
- Adding a splash of vanilla extract—honestly, lovely.
- Stirred in some chopped roasted almonds once for crunch; that batch was gone instantly.
- Once, I tried sticking dried fruit in. Uh, not my brightest moment. As it turns out, chewy raisins don’t really belong here. Live and learn.
What If I Don’t Have… (Equipment Stuff)
- Don’t have a microwave? A saucepan and a heatproof bowl (double boiler style) works—just keep the heat gentle. (But then you have to wash another pot. I mean, who has the patience?)
- No baking tray? Honestly, a dinner plate lined with parchment is fine. Shape gets a bit wonky, but it’s all about that crunch anyway.
How I Store These (But Good Luck With Leftovers)
I keep them in an airtight container in the fridge. Supposedly they last up to a week. But honestly, in my house, if they make it past the first 24 hours, I’m suspicious someone’s stashed them somewhere sneaky.
How I Like to Serve or Eat These (A Little Ritual, I Guess)
I love scooping a few on top of some vanilla ice cream. My cousin crumbles them into yogurt—which sounds fancy but is basically breakfast dessert, yeah? Sometimes for midnight snacks, I just eat them straight cold, right out the tin. Guilt levels: extremely low.
If I Had to Share a Few “Pro” Tips (Or: Tales From When I Messed This Up)
- Once, I didn’t let the chocolate cool at all before stirring in the quinoa, and it got kind of soggy. Now, I wait 45 seconds and life is better.
- I thought freezing would save time, but once left them in too long and they went a bit brittle. Probably best to just be patient (hard, I know).
FAQ Time – Questions From Friends (And My Mum)
- Can I use regular cooked quinoa?
Ah, no—tried it once and, uh, you end up with a sort of chewy, chocolatey mess. Puffed quinoa only! - How much salt is too much?
Depends if you love that salty-sweet crunch. I’d say go easy at first. But hey, if you overdo it just call them “gourmet.” - Do these ship well if I want to send as a gift?
Not really! They tend to stick together or melt if it’s warm. If you do it anyway, use loads of wax paper between layers and cross your fingers. - Is this recipe gluten-free/vegan?
Should be! Just watch the chocolate brand—some sneak in milk, which is cheeky if you ask me. - Can I double (or triple) the batch?
Yep! The only tricky bit is finding enough flat space in your fridge. Once, I tried layering them and regretted it. They glued together into a single massive disk—my family called it the “choc-quinoa frisbee.”
Now, on a not entirely related note—anyone else get distracted while these chill and suddenly realize they’ve cleaned the entire pantry? Or is that just me?
Ingredients
- 1/2 cup uncooked quinoa
- 1 cup dark chocolate chips (at least 70% cacao)
- 1 tablespoon coconut oil
- 1 teaspoon vanilla extract
- 1 pinch sea salt, for sprinkling
- 1 tablespoon honey or maple syrup (optional, for extra sweetness)
- 1/4 cup chopped nuts (optional, such as almonds or hazelnuts)
Instructions
-
1Rinse and drain the quinoa, then toast it in a dry skillet over medium heat for 5-7 minutes, stirring frequently, until golden and crispy.
-
2In a microwave-safe bowl or over a double boiler, melt the dark chocolate chips with coconut oil, stirring until smooth.
-
3Stir in the toasted quinoa, vanilla extract, honey or maple syrup (if using), and half of the optional chopped nuts into the melted chocolate until well combined.
-
4Drop spoonfuls of the mixture onto a parchment-lined baking sheet, shaping into small rounds. Sprinkle each with sea salt and any remaining nuts.
-
5Refrigerate for 15 minutes or until the crisps are set. Serve chilled or at room temperature.
Approximate Information for One Serving
Nutrition Disclaimers
Number of total servings shown is approximate. Actual number of servings will depend on your preferred portion sizes.
Nutritional values shown are general guidelines and reflect information for 1 serving using the ingredients listed, not including any optional ingredients. Actual macros may vary slightly depending on specific brands and types of ingredients used.
To determine the weight of one serving, prepare the recipe as instructed. Weigh the finished recipe, then divide the weight of the finished recipe (not including the weight of the container the food is in) by the desired number of servings. Result will be the weight of one serving.
Did you make this recipe?
Please consider Pinning it!!