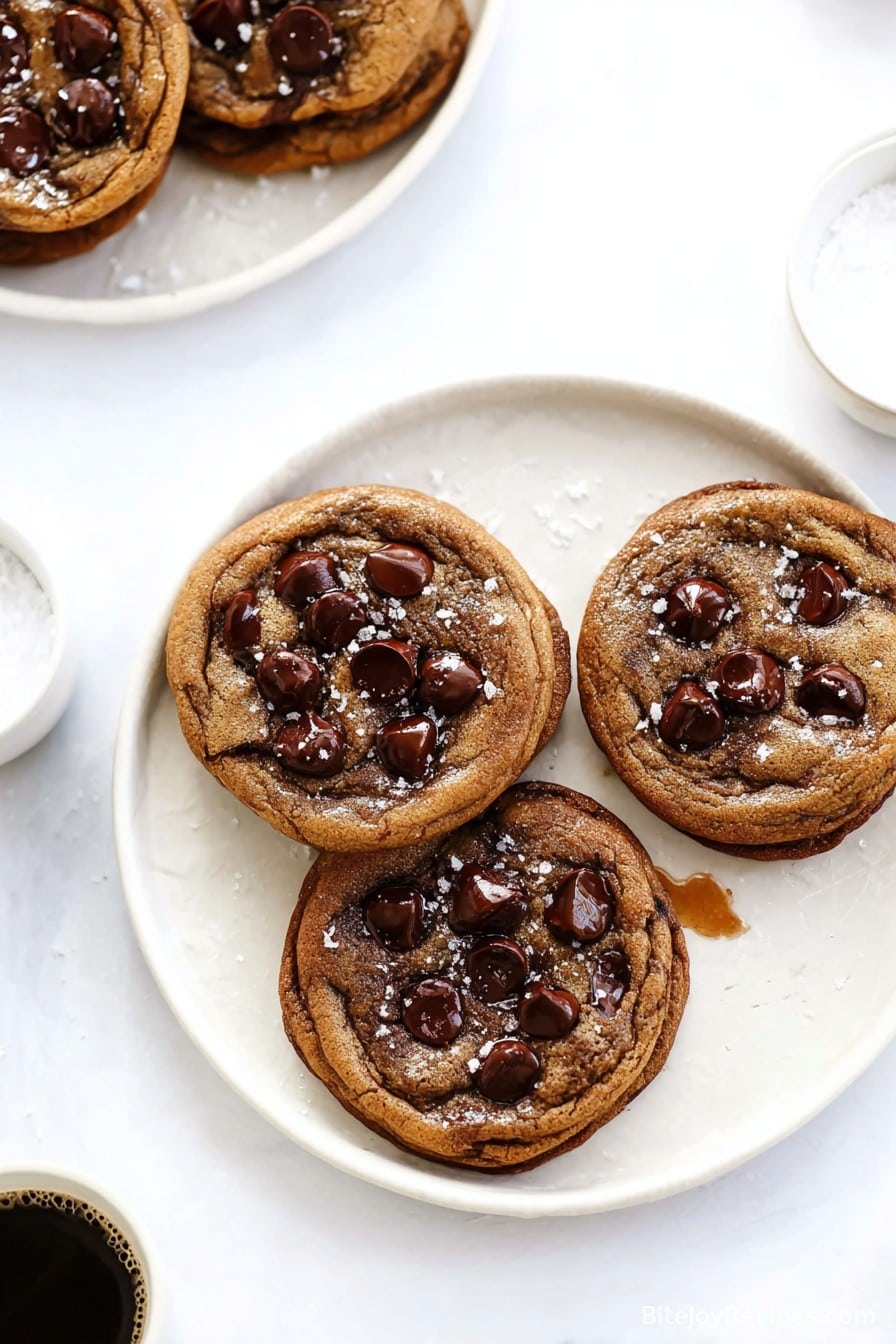
Espresso Chocolate Chip Cookies
Let’s Chat About Espresso Chocolate Chip Cookies
I still remember the first time I made these espresso chocolate chip cookies—mostly because I managed to drop half the bag of chocolate chips on the kitchen floor, and the dog pounced on them before I could say “Oi, leave it!”. My obsession with coffee (yes, even in my desserts) has made these cookies a regular in our home, whether it’s a gray Tuesday or I need a snack for a Netflix binge. And trust me, I’ve tested enough variations to start an unofficial cookie club (wouldn’t that be a treat?).
Why You’ll Love This Coffee-Infused Cookie
I make this when I’m craving that hit of caffeine but don’t really want another cup of joe—honestly, my family goes nuts for these because the espresso adds this round, slightly grown-up flavor that balances the chocolate so… well, it just works. (Although, fair warning, if you’re not a coffee fan, you might want to halve the espresso. My uncle swears he can taste it from the next room, but he’s dramatic.)
And you know, I used to get annoyed by cookies spreading weirdly or coming out pale—took some trial and error (batches got eaten anyway, good or bad), but now the process is mostly smooth sailing.
Gather Your Ingredients (Swaps and Comments Included)
- 1 cup unsalted butter (softened—though I’ve totally melted it in the microwave by accident and it still worked)
- 1 cup brown sugar (I’ve mixed light and dark, both are decent)
- 1/2 cup white sugar
- 2 large eggs (didn’t have eggs once; subbed flax meal, not the same, but still good if you’re in a pinch)
- 2 1/2 cups all-purpose flour (my gran insisted on Gold Medal, but really anything goes—tried with bread flour once and the cookies puffed up like little clouds)
- 1 1/2 tsp baking soda
- 3/4 tsp fine salt
- 2 heaping tsp espresso powder (or instant coffee, but the flavor’s not as deep)
- 1 cup semisweet chocolate chips (sometimes I use a big ol’ handful of chopped dark chocolate instead—rough edges = more surprise chocolate bits)
- 1/2 cup walnuts or pecans (honestly, totally optional; my kids pick them out anyway)
- 1 tsp vanilla extract (if you’re fancy, real vanilla paste is lush, but no pressure)
How I Make These Cookies (With Odd Detours)
- Preheat that oven to 350°F (175°C). Line your trays with parchment (a lifesaver for lazy dishwashers like me) or just grease them, if you’re feeling adventurous.
- In a big mixing bowl, mash together the softened butter and sugars. I use my ancient hand mixer, but elbow grease works too—think of it as a mini workout.
- Add in those eggs, one by one, and mix til smoothish. Oh, and drop in the vanilla. It should kinda look like… well, gloopy cake batter. Don’t panic if it’s not picture-perfect.
- This is where the espresso powder comes in—sprinkle it over the wet batter and watch it dissolve. Sometimes I even stir it straight into the eggs. Does it matter? Probably not.
- Next, sift in the flour, baking soda, and salt. If you don’t have a sifter, just use a fork to break up any flour clumps (yes, I’ve forgotten this step and lived to tell the tale).
- Fold in your chocolate chips and whatever nut situation you’ve got going. This is usually where I sneak a taste—er, for quality control, obviously (don’t tell the raw egg police).
- Scoop tablespoonfuls onto your tray. Leave a bit of space, these cookies do spread. Unless, weirdly, some days they don’t—baking is a mystery sometimes.
- Bake 9–11 minutes. Watch for the edges to look golden but insides are still a bit squishy. They firm up as they cool!
- Let them cool on the tray a couple of minutes, then move to a rack—or just eat one warm, I won’t judge.
Things I’ve Learned (Sometimes the Hard Way)
- If you let the dough rest in the fridge for an hour (or overnight), the flavor really comes alive. But hey, sometimes patience is not on the menu.
- Melting butter in the microwave will give chewier cookies; just don’t let it sizzle, unless you’re after accidental toffee cookies. (Did that once. Would not recommend.)
- Every oven is different—mine’s a bit tempermental, so I check at 8 minutes just to be safe.
What Else Can You Try? (Stuff That Worked, Stuff That Didn’t)
I’ve replaced espresso powder with a cooled shot of real espresso for a ‘whoa that’s strong’ flavor. Good, but your dough might get a tad sticky—add a touch more flour.
Tried a batch with white chocolate and macadamia nuts; tasted a bit too sweet for my liking, though my neighbor down the road thought it was “grand.” Raisins instead of chocolate chips? Just don’t. That’s a lesson best left un-repeated.
What If You Don’t Have the “Right” Equipment?
Can’t find your mixer? No worries—a sturdy spoon and some enthusiasm does the trick. No cooling rack? Just spread the cookies out on a clean tea towel instead. MacGyvering is half the fun sometimes.
How Do I Keep Them Fresh? (I Mean, If They Last…)
Pop leftovers in an airtight tin or zipper bag; they’ll last three, maybe four days if you’re disciplined (not me, though, they usually vanish faster than I can say “I’ll have just one more”).
Best Ways to Serve (Or Sneak) Espresso Cookies
Honestly, my favorite way is with a cold glass of milk, while the cookies are still a bit warm. Or if it’s early, I dunk one in my morning cup of coffee—not the most traditional breakfast, but life’s too short. Sometimes, for a little razzle-dazzle, I serve these after dinner with a dusting of cinnamon, or a scoop of vanilla ice cream if we’re feeling posh. Oh! And my teenage son will smush two together with peanut butter in the middle… not for the faint of heart, but impressive dedication.
Things I Wish I’d Known Sooner
- Don’t overbake! I tried blasting through a batch at too high a temp once. Ended up with hockey pucks (tasted burnt, not the vibe).
- If your ingredients aren’t room temp, things can go weirdly lumpy. But on second thought, it still tastes good, so don’t lose sleep over it.
- Be generous with the chocolate—more is MORE. Trust me.
FAQ (Pulled Straight Out of My Inbox… or Texts)
- Can I use decaf espresso powder? Yes, you can! If you want the flavor not the buzz, decaf works a treat.
- Why are my cookies flat as pancakes? Aha, this one’s common. Too much butter or warm dough maybe. Stick the dough in the fridge 30 mins (I sometimes forget and just bake anyway, still good, just flatter).
- Do I need to use nuts? Nope! Skip them if you want or throw in seeds, or dried fruit (if you’re feeling wild). Though like I mentioned, raisins kinda ruin the mood here.
- Can I freeze the dough? Yep. Scoop it onto a tray, freeze, then bag them up for future you. Extra handy for surprise guests (or midnight cravings).
- Where do you get good espresso powder? I always get mine here: King Arthur Baking. Not sponsored, just genuinely like it.
If you’re still reading and haven’t wandered off to start a book or something, thanks for sticking with my ramble. If you end up making these, let me know how you tinker with them – everyone’s got their own secret twist, right? Happy baking!
Ingredients
- 2 1/4 cups all-purpose flour
- 1 cup unsalted butter, softened
- 1 cup brown sugar, packed
- 1/2 cup granulated sugar
- 2 large eggs
- 2 tbsp instant espresso powder
- 1 tsp vanilla extract
- 1 tsp baking soda
- 1/2 tsp salt
- 2 cups semi-sweet chocolate chips
Instructions
-
1Preheat the oven to 350°F (175°C) and line two baking sheets with parchment paper.
-
2In a medium bowl, whisk together the flour, baking soda, salt, and instant espresso powder.
-
3In a large bowl, beat the butter, brown sugar, and granulated sugar together until light and fluffy. Add eggs one at a time, mixing well after each addition. Stir in the vanilla extract.
-
4Gradually mix the dry ingredients into the wet ingredients until just combined. Fold in the chocolate chips.
-
5Scoop tablespoonfuls of dough onto the prepared baking sheets, spacing them about 2 inches apart.
-
6Bake for 10-12 minutes or until the edges are golden brown. Let cookies cool on the baking sheet for 5 minutes before transferring to a wire rack to cool completely.
Approximate Information for One Serving
Nutrition Disclaimers
Number of total servings shown is approximate. Actual number of servings will depend on your preferred portion sizes.
Nutritional values shown are general guidelines and reflect information for 1 serving using the ingredients listed, not including any optional ingredients. Actual macros may vary slightly depending on specific brands and types of ingredients used.
To determine the weight of one serving, prepare the recipe as instructed. Weigh the finished recipe, then divide the weight of the finished recipe (not including the weight of the container the food is in) by the desired number of servings. Result will be the weight of one serving.
Did you make this recipe?
Please consider Pinning it!!