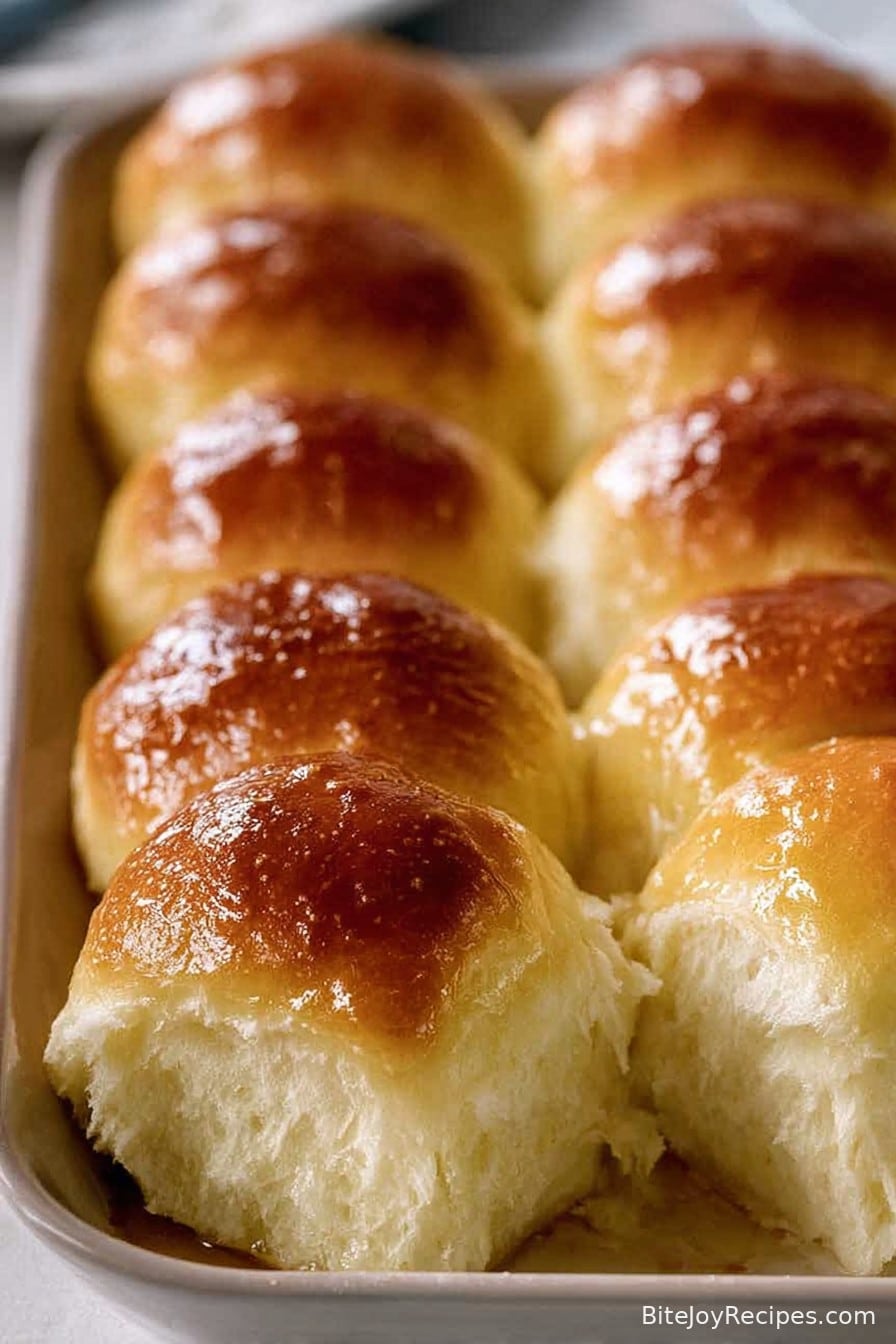
Irresistible Gluten-Free Dinner Rolls
Let Me Tell You About These Gluten-Free Dinner Rolls…
Okay, so you know when you bite into a warm bread roll and suddenly you’re back at your nan’s kitchen table and she’s poking fun at your hair? Well, these Irresistible Gluten-Free Dinner Rolls are exactly that for me. I mean, except for the hair commentary. I first tried making these during a “let’s-all-go-gluten-free” phase that my sister started – I figured I’d end up with dry pebbles. But, surprise surprise, even my bread-loving dad asked for thirds. (Admittedly, he may just be polite. But he did ask for the recipe, and that’s telling!) Anyway, let’s get stuck in—before I remember how many times I’ve cleaned flour off the ceiling.
Why You’ll Love This Recipe (Probably More Than You Think)
I usually whip these up when we’ve got friends over and someone pipes up about being gluten-free (it happens more than you’d think). My family goes bananas for these because they’re so pillowy—like little edible clouds. Honestly, I’ve tried rolls that taste like cardboard… these aren’t them. When I’m feeling lazy (which is often), I toss everything in the mixer and cross my fingers. Also, I used to get annoyed at the sticking dough, but now I just embrace the chaos with an extra dusting of flour. Besides, if you ever taste-tested gluten-free rolls from the supermarket, you’ll get why I bother making my own!
What You’ll Need (with My Two Cents)
- 2 cups gluten-free all-purpose flour blend (I typically grab King Arthur, but Bob’s Red Mill is grand too. My aunt swears by a homemade blend, but honestly that’s more effort than I’m willing to expend most days.)
- 1/4 cup tapioca starch (If you can’t find it, I’ve subbed cornstarch in a pinch. Texture’s a smidge different, but still works.)
- 1 packet instant yeast (about 2 1/4 teaspoons—the little envelopes. Active dry works too, but you’ll have to proof it. Not my favourite, but it does the trick.)
- 3/4 cup warm milk (Dairy-free is fine—I sometimes use oat milk, and it’s just as fab.)
- 2 tablespoons sugar (Brown or white. I once ran out and used maple syrup. Not terrible!)
- 1/4 cup unsalted butter, melted (Coconut oil if I’m feeling tropical, or just lazy and out of butter.)
- 2 large eggs (Room temp. I mean, I usually forget, so I just roll them around in warm water for a couple of mins.)
- 1 teaspoon salt (Or, if you like it salty, a heaping teaspoon. No judgment.)
- Extra flour for dusting (Because the dough is kinda clingy.)
How I Usually Make These (With a Few Bumps Along the Way)
- Whisk together the flour blend, tapioca starch, sugar, yeast, and salt in a big bowl. (Or sometimes just dump it all in if I’m distracted—works, but gets lumpy. Whisking is better.)
- In another jug, stir your warm milk, melted butter, and eggs. (There’s probably a proper reason for this. I just like seeing the butter swirl.)
- Slowly add the wet to the dry. Mix with a spoon or spatula at first (if you’re bold, hands work… sticky warning), then I usually switch to an electric mixer. You want a soft, thick batter—not as solid as typical bread dough. Don’t freak if it’s gloopy. It’s meant to look weird, promise.
- Cover with a tea towel and let it rise in a warm spot for 1 hour. It should get puffy—sometimes I stick it by the heater or even in a (switched-off, obviously) microwave. If it doesn’t rise much, don’t panic. Just let it be a bit longer.
- Dust your hands with flour and grease up a 9-inch round pan. Scoop dollops of dough—about a heaping tablespoon each—into the pan, spacing them like lumpy marbles. You’ll get roughly 9 rolls.
- Let them rest for 20 minutes while the oven heats (375°F /190°C). I usually tidy the kitchen, but mostly just scroll my phone.
- Bake 22–26 minutes, until golden and eating-hot. The aroma is ridiculous. I always sneak a bite at this point and burn my tongue. Every. Single. Time.
- Brush with more melted butter (optional, but not really optional for me), sprinkle a smidgen of flaky salt if you like, and let ‘em cool just a bit. Then attack ‘em.
Notes From My (Somewhat Messy) Kitchen
- The dough is stickier than regular bread—don’t try to form perfect rolls by hand. Just plop and embrace their knobbly charm.
- Actually, I find it works better if you use slightly less flour on humid days—or maybe that’s just my drafty kitchen… hard to say.
- If you make these vegan, you need a bit more baking powder for lift. I once forgot it, and the rolls came out like hockey pucks (still tasty, just…different!)
If You Fancy Switching Things Up—Here’s What I’ve Tried
- Herby: Throw in a handful of chopped chives or parsley before baking—proper fancy and SO good with soup.
- Vegan trial: Swapped eggs for flax eggs. Texture changed—less fluffy, but still edible (wouldn’t win any awards, if I’m honest).
- Sweet option: Sprinkle cinnamon sugar on top pre-bake. Weirdly addictive, like a not-quite-cinnamon roll.
- Disaster alert: Adding grated cheese sounded genius; it sank to the bottom and glued to the pan. Maybe next time…
Useful Stuff to Have… But Here’s My ‘Plan B’
- Electric mixer—makes life easier, but I’ve absolutely made these with a big wooden spoon and some elbow grease. Just expect a slightly achier arm (or call it a workout).
- 9-inch round pan—I’ve used a roasting tin when the round one was MIA; shape doesn’t fuss me.
- Bowl, tea towel, and a spatula. Basic is fine. If your spatula breaks, a butter knife works in a pinch. Ask me how I know.
Will They Keep? (Not That They Last Long Round Here)
Store cooled rolls in an airtight tin or tub on the counter. They’re honestly at their best the first day but remain decent toasted the next (pop them under the broiler, and it’s like a brand-new treat). I think they freeze pretty well too, though honestly, in my house it never lasts more than a day so I can’t swear to it. Heating them up again—microwave for 10–20 seconds—brings back the softness.
How We Gobble Them Up at Home
These rolls are my go-to when we’ve got stew or chili simmering. My cousin dunks them in curry (odd combo, but don’t knock it till you’ve tried it). Sometimes I slice them open and slather on butter with a bit of honey—proper comfort food. Now and then, when I’m feeling wild, a bit of Nutella sneaks in. That’s probably against some culinary rule, but so be it.
If I Could Go Back—My Hard-Learned ‘Pro’ Tips
- Don’t rush the rise! I once tried to shortcut by popping them straight in the oven; they ended up dense as a brick. Be patient, or you’ll regret it (I did).
- Don’t be stingy with the butter brushing at the end, unless you enjoy dry rolls (which—why?).
- Resist over-flouring your worktop. I always think “oh just another handful” and then—poof!—dry, crumbly rolls.
Folks Keep Asking Me… (So Here’s What I Tell Them)
- Can I use only one type of gluten-free flour? Well, you can, but the texture might suffer. The blend really helps. If you’re curious, Minimalist Baker explains blends better than I ever could.
- Why did my rolls turn out dense? Usually a yeast issue—old packet, water too hot, rushed rise. Also, maybe a heavy hand on the flour. Or the dough was grumpy that day; who knows?
- Can I make these ahead? Yep! Mix and shape, then fridge overnight. Bake the next day, a few mins longer. Tastes even better, I reckon. Some people pre-bake and reheat; King Arthur actually gives a nifty timeline.
- Why do my rolls taste bland? Add a pinch more salt or even a bit more sugar. Honestly, everyone’s tastebuds are wonky on different days.
- Can I freeze them? In theory yes; in practice, I always eat the batch. But the freezer hasn’t ruined anything I’ve tried so far. Just defrost, then revive in the oven or toaster.
Phew. That was longer than I expected. Oh, hilarious story—last time I made these, the cat jumped up and stole a half-finished roll. Maybe it’s my baking, or maybe he’s just a carb fiend. Either way, there you go: gluten-free dinner rolls the whole family (pets included?) will fight over. Enjoy, and let me know if you find a better hack!
Ingredients
- 2 1/2 cups gluten-free all-purpose flour blend
- 1 packet (7g) instant yeast
- 1/4 cup granulated sugar
- 1 tsp salt
- 1 cup warm milk (dairy or non-dairy)
- 1/4 cup unsalted butter, melted
- 2 large eggs, room temperature
- 1 tbsp olive oil (for greasing)
Instructions
-
1In a large mixing bowl, combine gluten-free flour blend, instant yeast, sugar, and salt.
-
2In a separate bowl, whisk together warm milk, melted butter, and eggs until smooth.
-
3Pour the wet ingredients into the dry ingredients and mix well until a sticky dough forms.
-
4Grease a 12-cup muffin tin or baking pan with olive oil. Divide the dough evenly among the cups.
-
5Cover the pan and let the rolls rise in a warm place for 30 minutes. Preheat oven to 375°F (190°C).
-
6Bake for 25 minutes or until the rolls are golden brown on top. Cool slightly before serving.
Approximate Information for One Serving
Nutrition Disclaimers
Number of total servings shown is approximate. Actual number of servings will depend on your preferred portion sizes.
Nutritional values shown are general guidelines and reflect information for 1 serving using the ingredients listed, not including any optional ingredients. Actual macros may vary slightly depending on specific brands and types of ingredients used.
To determine the weight of one serving, prepare the recipe as instructed. Weigh the finished recipe, then divide the weight of the finished recipe (not including the weight of the container the food is in) by the desired number of servings. Result will be the weight of one serving.
Did you make this recipe?
Please consider Pinning it!!