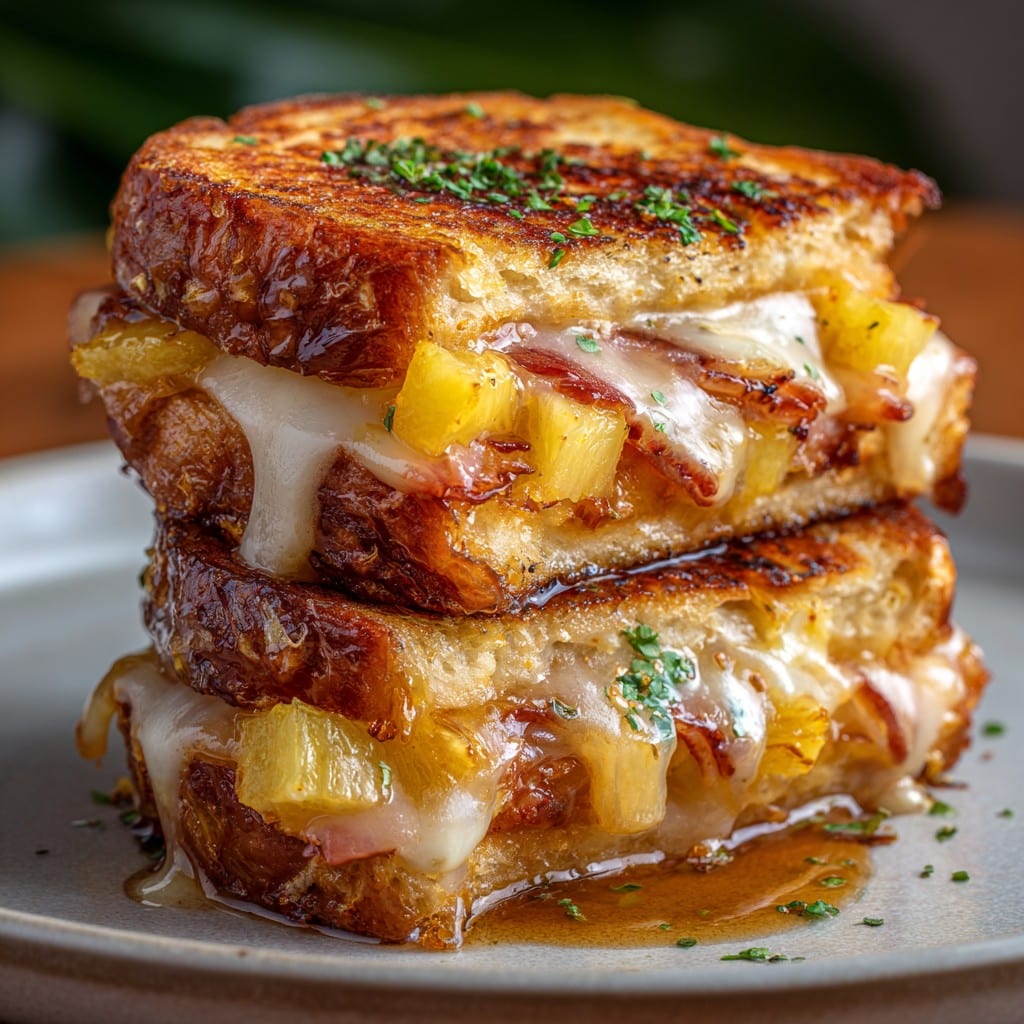
This Hawaiian Roll Mini Grilled Cheese: Easy, Gooey Fun for Snack Time
So Here’s the Story—Mini Grilled Cheese Magic
You ever get hit with a craving that just comes outta nowhere? Like it’s not even lunchtime but I’m standing at the fridge, reassessing my life—do I want sweet or salty, big or just a nibble? That’s how this recipe was born, honestly. One rainy Sunday, my cousin and I were watching those old paranormal TV shows and arguing about what to eat. We had a leftover package of Hawaiian rolls, some cheese odds and ends (pretty sure there was a suspicious bit of Havarti in there?), and bam: mini grilled cheese experiment time. And honestly, we never looked back. Plus, there’s something about grilled cheese that brings me back to after-school snacks my mum made; only now I get to make ‘em way more buttery and, let’s face it, less nutritionally balanced.
Why You’ll Love These Little Cheesy Pillows
I make these when I’ve got a bunch of cheese around and, um, not a lot of ambition. But you know when friends randomly come over (especially that one guy who eats everything, you know the one—hi, Marco!), this is what I throw in the oven. My family goes a little bananas for them, and, not gonna lie, I’ve eaten five in a row while ‘taste testing.’ Also: they’re a breeze compared to real-deal grilled cheese—no time standing over a skillet hoping you don’t burn them (been there, too many times, ugh). And if you’re the dunking sort, they’re even better in tomato soup—check this classic tomato soup I love.
What You’ll Need—And a Few Shortcuts
- 1 package (12 rolls) of Hawaiian sweet rolls (but, honestly, those Aldi “Sweet Rolls” work just fine—my grandma would never approve but hey…)
- 8 slices good melty cheese—cheddar’s a go-to, but I sometimes use Monterey Jack or throw in whatever’s lurking in the cheese drawer
- 2–3 Tbsp butter, softened (Sometimes I cut corners and use margarine, it’s not a crime, I swear.)
- 1/2 tsp garlic powder (Or don’t. Sometimes I forget altogether, and it’s still great.)
- Optional: sprinkle of dried herbs like parsley or basil. (Basil is my fancy mood.)
- Pinch of salt—though, I tink most cheeses offer quite enough already!
Let’s Make Magic: How to Whip These Up
- Preheat your oven to 350°F, or whatever your oven says is 350 (mine’s always a bit off).
- Using a bread knife or, honestly, anything that’ll cut (carefully), slice the whole loaf of Hawaiian rolls in half horizontally—like you’re making a big sandwich. Don’t separate the rolls yet; it’s less of a mess this way.
- Layer your cheese slices evenly over the bottom half—get greedy, let some hang over the edge, you’ll thank yourself later. Sometimes I sneak in a thin layer of ham or turkey… but then, it’s a different game!
- Pop the top half of the rolls back on.
- Mix softened butter with the garlic powder (if using). This is where I usually drop a bit on the counter—don’t stress. Smear it all over the tops—get into those corners. Sprinkle on herbs if you’re feeling it.
- Transfer the whole thing to a baking sheet. Line it with parchment for less scrubbing later. Learned that the hard way.
- Bake 12–15 minutes, till golden brown and melty. Overbake and you’ll get cheese lava—still good, really. If the top starts to brown too fast, tent with foil, or just turn the oven down a tad. It happens.
- Let it sit for a minute, then yank apart (kitchen tongs help) and serve. But, careful—molten cheese is no joke. I sometimes forget, every time.
Some Notes I’ve Picked Up (the Messy Way)
- If you use pre-shredded cheese, it melts a bit strange—probably that anti-caking stuff. Not the end of the world, just, you know, a heads up.
- I always mean to add a thin tomato slice before baking. I only remember half the time and, honestly, it makes it soggy. So never mind, maybe skip that idea.
- The bottoms sometimes crisp more than the tops, which I kinda like, but if you don’t, double pan it. Learned on the third try!
Variations I’ve Played With (Some Worked, Some Didn’t!)
- Swap in sliced jalapenos and pepper jack for a spicy version. My brother loved it; my dogs did not.
- Brushed the top with honey… weirdly tasty, but probably not everyone’s cup of tea.
- Once tried crumbled feta and spinach. Not bad, but feta doesn’t melt – turns all crumbly and, well, kinda odd when you want gooey goodness.
If You Don’t Have Fancy Equipment…
I use a serrated bread knife for slicing, but honestly, if you’ve only got a big ol’ chef’s knife, that’ll do. No parchment? Foil’s fine. Or if you’re like me and out of both, straight on the pan works too—just soak it after (learned how to get cheese off pans here).
How Do You Store These? (If They Last!)
Okay, I’ve actually managed to have leftovers once—toss them in a container and refrigerate. I think they’re fine for about two days, but honestly, in my house, they never survive past breakfast the next day. If they get a bit hard, ten seconds in the microwave does wonders.
Serving—What Do You Eat With These?
Classic move: dunk these in whatever tomato soup you have on hand (canned or homemade, I’m not picky). Or serve with a handful of chips and some pickles. At family game nights, we’ll just pile ‘em on a board with grapes and apple slices—looks like I tried way harder than I did.
Hard-Earned Tips (aka, Learn From My Mistakes)
- I rushed the butter part once—still tasted fine, but the tops went all dry and pale. Actually, I find it works better if you slather on more butter than you think is proper.
- Don’t slice the rolls into separate pieces before baking. Tried that—my oven looked like a dairy crime scene.
- Give it that little minute out of the oven so the cheese sets a smidge. Once I burned my tongue and couldn’t taste anything for a day. Don’t be me!
People Actually Ask Me…
- Can I use gluten-free buns?
- Yep! Just check they’re not too crumbly or they might fall apart, but I’ve done it for my mate’s kid, and it worked out okay.
- What’s the best cheese for this?
- Look, you can’t really beat cheddar or Monterey Jack, but I’ve used muenster, gouda, and those singles once in a pinch (it’ll melt, it just tastes more… processed-y). Try a mix—it’s a good way to clear out the cheese drawer.
- Do you need to wrap it in foil?
- Eh, sometimes I cover it for the first ten minutes if the oven is being extra toasty but mostly, nah. The tops get crisper without it.
- Can I make these ahead of time?
- Truthfully, they’re best hot and fresh, but I have stuck leftovers in the fridge and microwaved for lunch—still pretty great.
So, if you’re looking for a snacky, gooey treat that sounds way fancier than it is, try this Hawaiian Roll Mini Grilled Cheese. It’s officially my “just one more” party food. Or, well, my rainy day Netflix snack. Whichever comes first.
Ingredients
- 12 Hawaiian rolls
- 8 slices cheddar cheese
- 4 slices mozzarella cheese
- 3 tablespoons unsalted butter, melted
- 1 tablespoon mayonnaise
- 1/2 teaspoon garlic powder
- 1/4 teaspoon black pepper
- 1 tablespoon fresh parsley, chopped (optional)
Instructions
-
1Preheat your oven or a large skillet to 350°F (175°C).
-
2Slice the Hawaiian rolls in half horizontally, keeping the rolls connected.
-
3Place cheddar and mozzarella cheese slices evenly over the bottom halves of the rolls. Cover with the top halves to create sandwiches.
-
4Mix melted butter, mayonnaise, garlic powder, and black pepper in a small bowl. Brush the tops of the rolls with this mixture.
-
5Bake or grill for 10-12 minutes until the cheese is melted and the tops are golden brown. Slice into mini sandwiches and garnish with fresh parsley if desired. Serve warm.
Approximate Information for One Serving
Nutrition Disclaimers
Number of total servings shown is approximate. Actual number of servings will depend on your preferred portion sizes.
Nutritional values shown are general guidelines and reflect information for 1 serving using the ingredients listed, not including any optional ingredients. Actual macros may vary slightly depending on specific brands and types of ingredients used.
To determine the weight of one serving, prepare the recipe as instructed. Weigh the finished recipe, then divide the weight of the finished recipe (not including the weight of the container the food is in) by the desired number of servings. Result will be the weight of one serving.
Did you make this recipe?
Please consider Pinning it!!