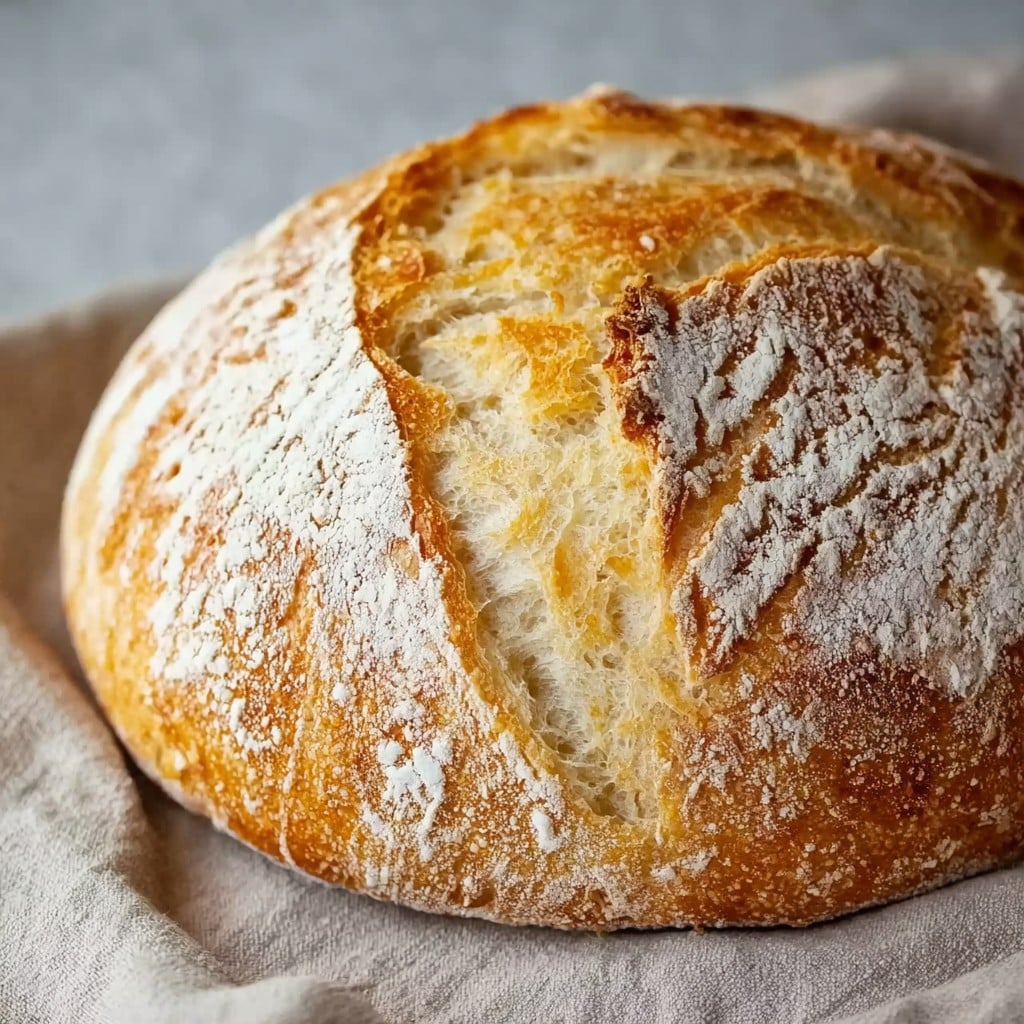
No Knead Gluten Free Bread
So, About This Bread (Or Why My Kitchen Smells Amazing)
I have to tell you about the first time I made this no knead gluten free bread: I’d just rewatched Paul Hollywood’s bread show (again), but couldn’t face another kneading session. Plus, turns out, if you’re making gluten free bread, all that stretching and folding? Totally unnecessary. I ended up with a loaf that shocked even my picky teenager. Side note—my dog tried to eat half while it cooled. (Keep an eye on your bread, honestly.)
Why You Might Actually Love This Bread
I make this one when I’m tired, crave something carby, but my arms veto “kneading.” My family basically hovers near the oven, waiting for that weirdly satisfying bang of my bread pan on the counter. And honestly, I used to dread gluten free dough—sticky drama! But this one isn’t as fussy and, with a pat of butter, nobody really complains (except that one time I accidentally left out the salt… let’s not talk about it). Actually, I find it’s even better after a night in the fridge. But good luck having leftovers.
What You’ll Need (With My Favourite Swaps)
- 3 cups (about 400g) gluten free flour blend – honestly, Bob’s Red Mill is easiest, but I’ve grabbed Tesco’s own in a pinch. If all else fails, mix half rice flour and half corn starch. Not perfect, but still works.
- 1 1/2 cups (350ml) warm water – I use hot tap water (don’t overthink it).
- 1 1/2 teaspoons salt – pink, sea, whatever I grab. Not the flaky kind, though.
- 1 tablespoon sugar, or honey if I’m feeling fancy.
- 2 1/4 teaspoons (1 packet) instant yeast – my gran used to insist on dried active; I just buy whatever’s on offer.
- 2 tablespoons olive oil – or just a “glug;” I’ve used sunflower oil before, worked fine.
Optional extras: handful of seeds, splash of apple cider vinegar for tang, or toss in herbs. Don’t stress, it’s all good.
Here’s How I Do It (A Bit Loosely)
- Mix the dry stuff: Grab a big bowl. In goes your flour, salt, sugar, and yeast. I sometimes forget the salt—I do NOT recommend doing the same.
- Add the wet bits: Pour in your warm water and oil. Stir with a wooden spoon or, if you’re brave, your hands (grease them a bit first). You want a thick, sticky batter—not dough. Don’t expect it to form a neat ball; it’ll look gloopy. Don’t panic.
- Optional bits: This is my pause-for-caffeine moment. Add any seeds, vinegar, herbs if you fancy. Give it another good stir.
- Let it rest: Cover with a tea towel or cling film (I use a shower cap, no judgment) and leave somewhere warm for an hour-ish. It won’t double like regular bread, but it’ll look puffier. Sometimes it sulks and barely rises—still tastes fine.
- Bake: Tip it into a lined loaf tin (grease the sides!). Smooth the top with wet hands. Bake at 200°C (400°F) for 40–50 minutes (I start checking at 40; sometimes I get distracted and leave it longer, no harm done except a crunchier crust). If you tap and it sounds hollow-ish, it’s done. Or just stick a skewer in to check for doughy bits.
- Let it cool a bit before slicing (though I usually can’t wait and burn my fingers. Regret it every time).
A Few Notes (Because Mistakes Were Made)
- If it looks too dry, add a splash more water. Too sloppy? Add a spoonful of flour. I’ve rescued it both ways.
- I found if I slice before it’s cool, it squashes, but honestly, warm bread calls for impatience.
- Check out Minimalist Baker’s recipe if you want to deep dive—very inspiring, but I keep things a bit more chaotic.
Some Variations I’ve Tried (and One Failure)
- Seed mix on top—poppy and sunflower seeds especially. Yum.
- Chopped olives and rosemary stirred in—fancy, for guests or pretending you’re in the Med.
- Lentil flour instead of half the usual blend: not a huge hit. Bit of an odd aftertaste, honestly.
Equipment—But You Don’t Need Everything
Honestly, a big bowl, wooden spoon, and a loaf pan are my go-tos. If you don’t have a loaf pan, any oven-safe dish works—just line it well. I once used a small roasting tin. Looked a bit wonky but tasted spot on.
How I Usually Store It (if There’s Any Left)
Wrap it in a clean tea towel or chuck it in a bread box. Stays good for a day or two, max. Freezes just fine, sliced up with bits of baking paper between (though in my house, it barely sees sunrise).
How to Eat It: My Favourite Way(s)
I love it just toasted with salted butter, but my daughter goes wild for it with a smear of jam. Sometimes, if we’re feeling posh, it’s all about smashed avo and chili flake. My mate swears it’s best dunked in soup (can’t disagree there).
Pro Tips—aka, Lessons I Learned the Hard Way
- Actually, rushing the rising bit gives you a brick. Don’t do as I did once. Take the time; check your social feeds while it does its thing.
- Overmixing? Don’t. You want just combined. Easier said than done, but it matters, promise.
- Lining the pan is annoying, but skipping it means you’ll be prying bread form the corners forever. Just do it.
FAQ—Real Questions I’ve Actually Been Asked
- Q: Can I use only almond flour?
A: Hmm, not really—needs starch for structure. I tried and got a sad, oily biscuit. - Q: Do I have to prove it for a whole hour?
A: Shorter works if you’re desperate (done it, lived), but the crumb is way lighter after a proper rest. Up to you. - Q: What makes it taste… well, bread-y?
A: Bit of sugar or honey actually helps, and nice olive oil. Oh, and salt! Don’t forget that. Unlike me—twice… - Q: How should I store leftovers?
A: Leftovers? Flex, but if you manage it, airtight container, or slice then freeze. - Q: Why does mine never rise?
A: Fresh yeast is key. Sometimes I get a dud packet and, well, not much you can do except start over (annoying, I know).
One final random note: this bread makes amazing croutons for salad. Or, if you’re like me and forget about the loaf for a day, sudden panzanella—waste not, want not, yeah?
Ingredients
- 3 cups gluten free all-purpose flour blend
- 2 1/4 tsp instant yeast
- 1 1/4 tsp sea salt
- 2 tbsp olive oil
- 1 tbsp sugar
- 1 1/2 cups warm water
- 1 tsp apple cider vinegar
Instructions
-
1In a large bowl, whisk together the gluten free flour, instant yeast, sea salt, and sugar.
-
2Pour in the warm water, olive oil, and apple cider vinegar. Stir well until a sticky dough forms.
-
3Cover the bowl with plastic wrap and let the dough rest at room temperature for 1 hour, or until slightly risen.
-
4Preheat the oven to 425°F (220°C). Line a loaf pan with parchment paper.
-
5Scrape the dough into the prepared loaf pan and smooth the top with a spatula. Bake for 55–60 minutes or until golden brown and the bread sounds hollow when tapped.
-
6Let the bread cool in the pan for 10 minutes, then transfer to a wire rack to fully cool before slicing.
Approximate Information for One Serving
Nutrition Disclaimers
Number of total servings shown is approximate. Actual number of servings will depend on your preferred portion sizes.
Nutritional values shown are general guidelines and reflect information for 1 serving using the ingredients listed, not including any optional ingredients. Actual macros may vary slightly depending on specific brands and types of ingredients used.
To determine the weight of one serving, prepare the recipe as instructed. Weigh the finished recipe, then divide the weight of the finished recipe (not including the weight of the container the food is in) by the desired number of servings. Result will be the weight of one serving.
Did you make this recipe?
Please consider Pinning it!!