Greek Yogurt Ice Cream: My Go-To Tangy, Creamy Homemade Treat
So, Here’s Why I Started Making Greek Yogurt Ice Cream
Alright, let me tell you how this little obsession started: one summer, I tried making Greek yogurt ice cream after I realized my actual ice cream tub had, well, just a sad little icy chunk left (who put it back in the freezer like that?). I didn’t want a super sweet or rich dessert; I wanted something quick but special, a bit tangy, the kind my aunt from Thessaloniki would always say was “good for the digestion” (I mean, she could sell a freezer burn as a health food if she wanted). Anyway, after one too many sticky-fingers failed attempts—once I even forgot to chill the bowl, yikes—I landed on a method that actually works and doesn’t taste like sad yogurt slush. I like to think I’ve gotten the hang of it, but, disclaimer: sometimes it still comes out more frozen yogurt than ice cream. Honestly, no one around here seems to mind; it disappears either way.
Why I Keep Coming Back to This Recipe
I make this when, frankly, it’s just too hot to bake anything, or when the regular ice cream starts tasting a bit samey. My family goes bonkers for this ice cream because it has that creamy, punchy-sour thing going on. And bonus: you can almost tell yourself it’s healthy! (Is it? I say yes. My doctor probably wouldn’t agree.)
I used to get annoyed at how hard the store-bought versions are, but with this recipe, even if I over-freeze it or forget it overnight—oops—it still scoops okay-ish, especially if you nuke it for like 15 seconds. It’s my secret weapon for surprise guests and also when I sort of panic because I forgot dessert entirely.
What You’ll Need (But Feel Free to Fudge a Bit)
- 2 cups Greek yogurt (full-fat is best; I sometimes use 0% if that’s all I’ve got—it’s less creamy but still does the job)
- 3/4 cup sweetened condensed milk (or—if you’re in a pinch—half a cup of honey works, though it’s not as creamy, just saying)
- 1 teaspoon vanilla extract (honestly, sometimes I splash in a bit more for the kick; my grandmother swore by Nielsen-Massey but I use store brand)
- Pinch of salt (oddly, this makes everything taste brighter, according to the internet and also me)
- Optional: zest of 1 lemon or a handful of summer berries, chopped. Or chocolate chips for that matter. (If you want to get fancy, swirl in a spoonful of berry jam.)
OK, Let’s Dive In: My Step-By-Step, Kinda Casual Process
- First, grab a big mixing bowl and pop your Greek yogurt in—don’t worry if it plops out looking a bit sad. That’s normal. Add the vanilla and salt.
- Pour in the condensed milk and just mix everything together until it’s smooth. (Actually, sometimes it looks lumpy at first. Don’t panic, just keep stirring.) This is where I usually sneak a taste and then contemplate adding more vanilla, or lemon if I feel zesty.
- If you’re feeling adventurous, fold in berries or whatever extras you have on hand. Usually, I do half the batch with chocolate chips because, well, kids are predictable.
- Dump the whole glorious goo into a loaf tin or any freezable container. (Tupperware works fine, but I once used a salad spinner bowl because I couldn’t find any lids. It worked but don’t judge.)
- Cover with something—plastic wrap, foil, or an old-fashioned lid if you’ve managed to keep track of one (I never do). Pop it in the freezer for at least 4 hours, but I think overnight is better. Remember, it’ll firm up more the longer it sits.
- When it’s go-time, give it 10–15 minutes on the counter to soften. Or, if patience isn’t your strong suit, zap each scoop in the microwave for literally 10 seconds. No shame in that game.
Notes from the (Somewhat Messy) Trenches
- Greek yogurt brands all taste different—Fage is my favorite but Lidl’s store brand is grand, to be honest.
- I used to think you needed an ice cream maker, but actually, I find it works better if you just freeze and forget, no fancy gear needed.
- If you double the recipe, you might want to stir it halfway through freezing, unless you like big icy bits (which I kinda do sometimes).
Variations, Experiments, and One Misfire
- Swirled in raspberry jam once—wow. Like, so good. Blueberries get a bit icy, but they’re pretty.
- Added a shot of espresso last week; not bad, but the kids declared it “just coffee yogurt gel” so that’s probably a grown-ups only thing.
- Tried folding in granola for a “breakfast ice cream”. It got soggy and weird, wouldn’t recommend (unless you like…very chewy ice cream?)
Do You Really Need an Ice Cream Maker?
Some folks act like an ice cream maker is as essential as a kettle, but honestly, I get by with just the freezer and a spatula, or even a fork. If you really want to go old-school, you can freeze it in individual cups—just watch out for the stubborn bottom bits; they cling for dear life.
Keeping It Fresh (Or, Attempting To)
Technically, you can store it for a week in the deep freeze if well-covered. Though honestly, in my house it never lasts more than a day! If it does get a tad icy, just let it sit out or give it a good stir before serving, it perks right up.
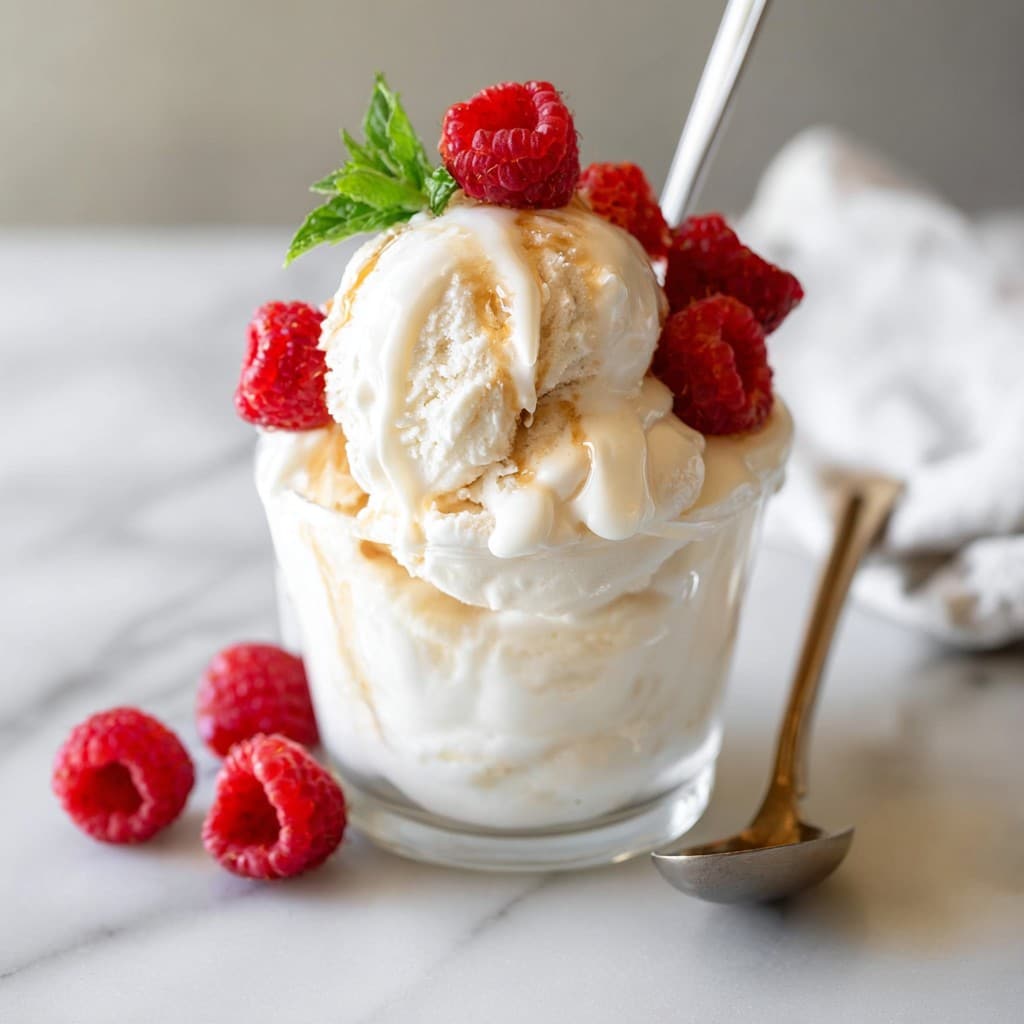
How I Like to Serve It (and Family Traditions)
I love a scoop (okay, sometimes two) with a drizzle of honey and some fresh figs if I can snag them at the market. The kids like sprinkles, of course, and my partner goes wild for a handful of toasted almonds on top. Oh, and occasionally at midnight, I’ll plop a scoop between oatmeal cookies—secret late-night treat.
Pro Tips—Mostly Lessons from My Mistakes
- I once tried rushing the freezing part, pulling it out after just two hours. It was glorified yogurt soup—don’t do it!
- Don’t overdo the mix-ins; once I went nuts with peanut butter cups and it just got lost in the yogurt’s tartness.
- A dash of salt really does make it more interesting—I used to skip it, but now I see what all the fuss was about.
Questions I’ve Been Asked (More Than Once)
- Does it taste like real ice cream?
- Sort of. It’s not Ben & Jerry’s thick, but honestly, I think it’s better if you’re a fan of tangy desserts.
- Can I make it with regular yogurt?
- Yup, but it might be a bit icier and a little runnier. I drain it through cheesecloth first if I’m feeling ambitious. But who has time for that?
- Is this actually healthy?
- I mean, kinda. There’s protein, not a load of added sugar if you don’t want, and probiotics and all that jazz. It’s healthier than a donut anyway. (No shade to donuts.)
- Can I add booze?
- Yes! A splash of liqueur can keep it softer, but if you add too much, it won’t freeze correctly—learned that the hard way one hectic Saturday night.
- Where’d you learn about Greek yogurt ice cream?
- Honestly? Just trial, error, and some internet rabbit holes, plus a little inspiration form Bon Appétit’s take. Highly recommend for further tinkering.
Oh, before I forget—you can totally make it vegan by using coconut yogurt and maple syrup. Tried it once at my cousin’s flat in Bristol. It set a bit softer, but the coconut flavor is lush if you’re into that sort of thing.
Right, that’s about it. If you try it, let me know what weird flavors you come up with! I’m always game for a kitchen experiment—unless it involves raisins (long story, trust me).
Ingredients
- 2 cups plain Greek yogurt (full-fat recommended)
- 1/2 cup heavy cream
- 1/2 cup honey
- 1 teaspoon vanilla extract
- 1 tablespoon lemon juice
- 1/2 cup fresh berries (optional, for garnish)
- 1/4 teaspoon salt
- 1/4 cup chopped nuts (optional)
Instructions
-
1In a large mixing bowl, whisk together Greek yogurt, heavy cream, honey, vanilla extract, lemon juice, and salt until smooth and well combined.
-
2Pour the mixture into an ice cream maker and churn according to the manufacturer’s instructions, usually about 25-30 minutes, until thick and creamy.
-
3Transfer the churned ice cream to a freezer-safe container. Smooth the surface and cover with a lid or plastic wrap.
-
4Freeze for at least 2 hours or until firm enough to scoop.
-
5Serve the Greek yogurt ice cream topped with fresh berries and chopped nuts, if desired. Enjoy!
Approximate Information for One Serving
Nutrition Disclaimers
Number of total servings shown is approximate. Actual number of servings will depend on your preferred portion sizes.
Nutritional values shown are general guidelines and reflect information for 1 serving using the ingredients listed, not including any optional ingredients. Actual macros may vary slightly depending on specific brands and types of ingredients used.
To determine the weight of one serving, prepare the recipe as instructed. Weigh the finished recipe, then divide the weight of the finished recipe (not including the weight of the container the food is in) by the desired number of servings. Result will be the weight of one serving.
Did you make this recipe?
Please consider Pinning it!!