Mushroom Cauliflower Pizza: My Genuinely Fun Kitchen Fix
Let Me Tell You About My Mushroom Cauliflower Pizza Obsession
Alright, I’ve got to spill the beans (well, mushrooms?) here—Mushroom Cauliflower Pizza isn’t fancy restaurant fare in this house. It’s grub for when I’m craving comfort food but still pretending I care about my step tracker. The first time I made this, the crust looked more like scrambled eggs than pizza base, and my brother said it smelled like “a mystery from the woods.” Still, everyone ate it. Honestly, it’s the sort of recipe that you learn to love for its quirks. Oh, and one time I totally dropped the crust upside down. Don’t recommend, but hey, the dog approved.
Why You’ll Love This (Or, Why My Family Demolishes It)
I make this Mushroom Cauliflower Pizza when I want to skip that heavy, doughy feeling but still need my pizza fix. Especially if there’s random cauliflower lurking in the crisper (does anyone else always buy too much?). My family goes bonkers for this, mainly because they don’t realize it’s mostly veggies… Not to brag, but I’ve learned how to outwit my picky nephew, and that’s no small feat. Once, though, I overloaded with mushrooms and it ended up a bit, well, swampy. But mostly? It’s a crowd-pleaser, promise.
Here’s What You’ll Need (with a Few Swaps Just in Case)
- 1 medium head of cauliflower (about 600g)—in a rush, those frozen cauliflower florets totally work, too.
- 2 eggs (sometimes I use an extra if the cauliflower’s a bit watery, or skip one if I’m low. Flexibility is the name here).
- 75g (about 3/4 cup) grated mozzarella (My gran would say “always use the real stuff” but supermarket cheese hasn’t failed me)
- 30g (about 1/4 cup) grated parmesan (or just throw in more mozzarella if that’s all you have)
- 250g mushrooms, sliced (Button, cremini, or even portobello; I sometimes mix them up for fun)
- 1 tsp dried oregano (or, if you’re out, a handful of chopped fresh parsley is great)
- 1/4 tsp garlic powder (fresh minced garlic works but I’m usually lazy by this step)
- 1-2 tbsp olive oil
- Salt and pepper, a good pinch of each
- Favorite pizza sauce (store-bought, or check out Smitten Kitchen’s quick one)
- Extra cheese for topping—I mean, obviously
- Optional: Red pepper flakes, arugula, even a couple sun-dried tomatoes if you dare. Or don’t.
How to Actually Make Mushroom Cauliflower Pizza (Mistakes Welcome)
- Fire up that oven. Preheat to 220°C (425°F). I never remember to do this until I’m halfway in, but it’s worth it.
- Roughly chop your cauliflower and blitz it in a food processor until it looks like, well, rice. Haven’t got a processor? Just grate it by hand—takes a bit longer and will get everywhere (I learned this the hard way), but totally doable.
- Microwave the cauliflower rice in a bowl (cover it, but not tightly!) for about 6 minutes until soft. Or steam it if you like doing dishes. Let it cool till you can actually touch it.
- Squeeze out all the water! This is the only bit that’s a pain. I dump my cooled cauliflower onto a clean tea towel and wring it like I’m milking a goat. More water out means less soggy pizza. Promise—it does make a difference.
- Mix the crust: Toss your now almost-dry cauliflower into a bowl with eggs, both cheeses, garlic powder, oregano, salt, and pepper. Smush it all up until it kinda looks like something you might actually bake. At this stage, honestly, it’s not pretty. That’s fine.
- Shape your base: Line a baking tray with parchment paper, then press your cauliflower mix out into a circle (or rectangle, or heart if you’re feeling sassy). Aim for half a centimeter thick. If the edges look wonky, just squish them back—nobody’s judging here.
- Bake it: About 15-20 minutes, right in the center oven rack, until golden and holding together. This is where I usually sneak a taste; I know, I know, the toppings are coming, but that crispiness is magic.
- Time for the mushrooms: While the crust bakes, heat olive oil in a pan, toss in your mushrooms, sprinkle with a little salt, and sauté on medium-high till they’ve shrunk and browned (not too wet). Don’t crowd them or they’ll just steam—take it from a former steamer here.
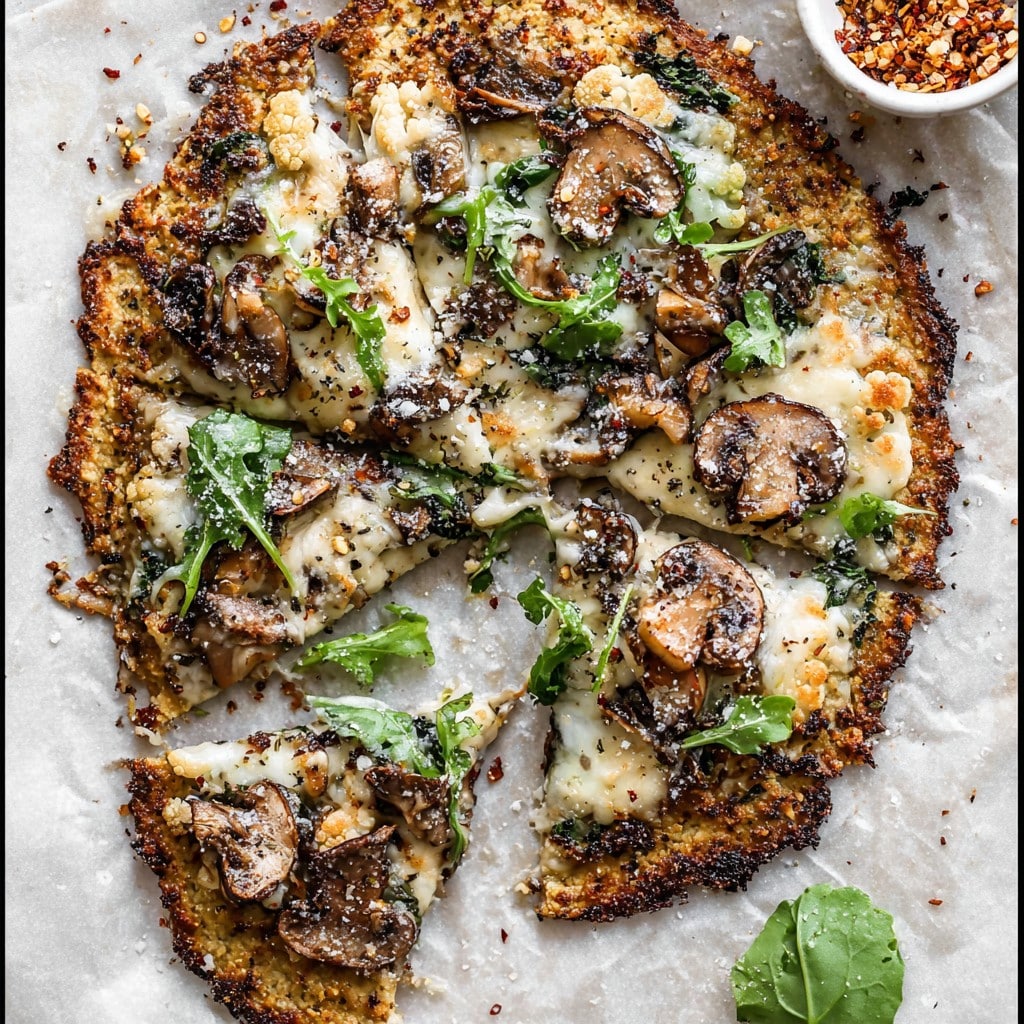
- Toppings ahoy: Spread pizza sauce over your crust, pile on the sautéed mushrooms, and smother with your extra cheese. The more, the merrier (or messier—depends how you see it).
- Final bake: Back in the oven for another 8-10 minutes, just till things are bubbly and a little browned. Add your fancy bits (arugula, red pepper flakes, whatever you like) right after. Cool for a minute or two…though, honestly, I usually burn my tongue anyway.
A Few Notes I Wish I’d Known Earlier
- If your crust falls apart—been there—it probably needed more squeezing or a tad more cheese to bind it. Or just eat it with a fork, no harm done.
- The mushrooms can be swapped for pretty much any veggie you’ve lost at the back of the fridge (zucchini’s not bad).
- On second thought, don’t skip pre-baking the crust. I tried, it was… gritty.
Variations I’ve Actually Tried (and a Flop)
- Tossed in chopped spinach with the mushrooms once. Surprisingly great.
- Used pesto instead of pizza sauce—bit rich but good for days when you want to feel posh.
- Tried goat cheese on top. Not everyone’s cuppa tea but I liked it.
- Once layered raw tomato slices before the bake—too watery, wouldn’t bother again.
The Gear I Use, and What I Do Without
I bang on about my food processor, but honestly, I’ve taken out my frustrations on cauliflower with a box grater many a time. Baking sheet or pizza stone is great, but a regular oven tray sorted with parchment does the trick. Don’t sweat it if you’re missing something—workarounds always pop up, right?
How to Store It (If It Lasts That Long)
Store leftovers in an airtight container in the fridge—good for 2 or 3 days, but honestly, in my house it never lasts more than a day! Cold pizza for breakfast is underrated. You can reheat it for a few minutes at 180°C (350°F), but sometimes I just eat it straight from the fridge. I think it tastes better the next day… could just be me, though.
How We Serve It (and a Family Ritual)
I usually slice this up (with a big, slightly blunt bread knife) and serve it straight off a chopping board for that rustic, slightly lazy look. It’s a tradition to argue over who gets the crispiest corner. Sometimes we toss a big bowl of salad next to it—lately, I’m into this tossed salad from Cookie and Kate—but most often… just the pizza, nothing else.
Pro Tips—AKA Things I’ve Messed Up So You Don’t Have To
- Don’t skip that squeezing step! One time I was rushing and my pizza ended up mush you needed a spoon for.
- Giving the crust time to bake—we’re talking closer to 20 minutes here—makes it crisp and way less likely to collapse under your toppings.
- If you go mad with sauce, it’ll get soggy. Sometimes less is more (but I rarely listen to my own advice; I just like sauce).
FAQ—Stuff People (Mainly My Friends) Actually Ask
- Can I use store-bought cauliflower rice? Yep, for sure! Actually, that’s what I use most of the time when I can’t be fussed with chopping.
- What mushrooms work best? Any, really! Portobellos get a bit meaty which I like, but honestly those basic white ones are cheap and fine.
- Can you freeze the crust? You can, but… the texture does go a bit weird. Migth be worth a try if you’re prepping ahead though.
- Do I have to use cheese? I’ve tried dairy-free cheese (shout out to Violife) and it works ok but doesn’t hold quite as well. If you skip cheese altogether, just accept it’ll be more crumbly.
- This looks tricky. Is it a faff? Oddly no. Once you’ve done it once, you’ll get into a rhythm. Bit messy, but aren’t all good things?
Quick non sequitur—I once tried making pizza on the barbecue in February while it was snowing. Jury’s out, but my eyebrows survived! Anyway, hope you enjoy this as much as we do, and if you wing it a bit, even better. If you need more tips on cauliflower crust, Serious Eats has a great breakdown, but honestly, you’ll get a feel for it the more you try.
Ingredients
- 1 medium head cauliflower, riced
- 2 large eggs
- 1 cup shredded mozzarella cheese, divided
- 1/4 cup grated Parmesan cheese
- 1/2 teaspoon dried oregano
- 1 cup sliced cremini mushrooms
- 1/2 cup tomato pizza sauce
- 1 tablespoon extra-virgin olive oil
- 1/4 teaspoon salt
- 1/4 teaspoon black pepper
Instructions
-
1Preheat your oven to 425°F (220°C) and line a baking sheet with parchment paper.
-
2In a large bowl, mix the riced cauliflower, eggs, 1/2 cup mozzarella, Parmesan, oregano, salt, and black pepper until well combined.
-
3Spread the cauliflower mixture onto the prepared baking sheet, forming a pizza crust. Bake for 15-20 minutes or until golden brown.
-
4While the crust bakes, heat olive oil in a skillet over medium heat. Add sliced mushrooms and cook for 4-5 minutes until softened.
-
5Remove the crust from the oven. Spread the tomato sauce over the crust, then top with sautéed mushrooms and the remaining mozzarella cheese.
-
6Return the pizza to the oven and bake for 8-10 more minutes, until the cheese is melted and bubbly. Slice and serve hot.
Approximate Information for One Serving
Nutrition Disclaimers
Number of total servings shown is approximate. Actual number of servings will depend on your preferred portion sizes.
Nutritional values shown are general guidelines and reflect information for 1 serving using the ingredients listed, not including any optional ingredients. Actual macros may vary slightly depending on specific brands and types of ingredients used.
To determine the weight of one serving, prepare the recipe as instructed. Weigh the finished recipe, then divide the weight of the finished recipe (not including the weight of the container the food is in) by the desired number of servings. Result will be the weight of one serving.
Did you make this recipe?
Please consider Pinning it!!