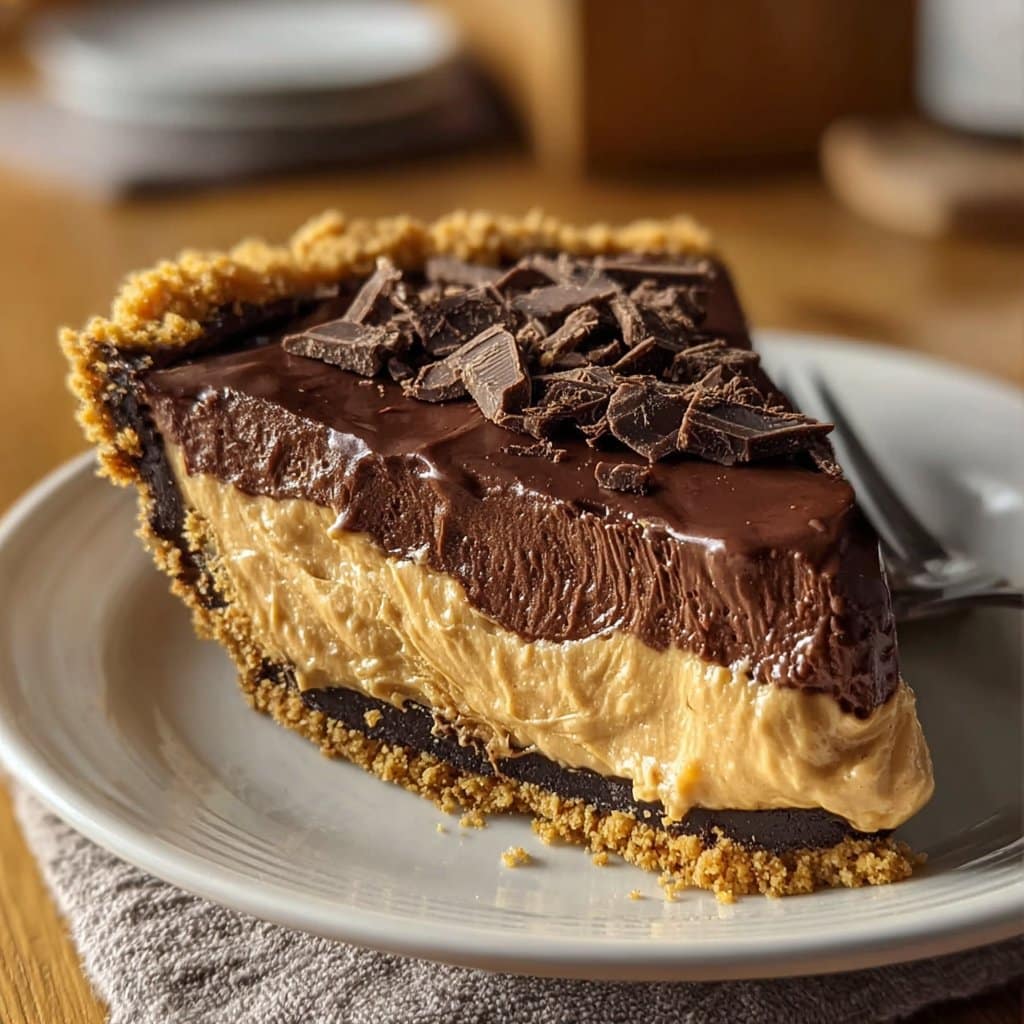
No-Bake Chocolate Peanut Butter Pie: My Honest Home Recipe
This Pie Is Kinda Famous In My House
I don’t want to brag, but if there’s one thing my family requests on birthdays (and, let’s be honest, most weekends), it’s this No-Bake Chocolate Peanut Butter Pie. I started making it ages ago when our oven decided to kick the bucket right before Thanksgiving—talk about timing. Back then, I mostly panicked and then cobbled some ideas together; the result? This glorious, unapologetically indulgent pie. And let me just say, some things are better when you don’t mess with tradition. Or, actually, that’s not true—I tinker with it all the time, but you get my drift.
I remember last New Year’s Eve we ended up eating the leftovers at midnight, straight from the pan, forks in hand (somebody forgot plates, I think?). Anyway, if you like Reese’s Cups or if you’ve ever just eaten peanut butter out of the jar with a spoon, you’re going to be happy you found this.
Why You’ll Love This Pie (Probably?)
- I make this when I have, say, 15 minutes and a sudden sweet tooth attack. Or when my niece swings by and reminds me she’s “allergic to boring desserts.”
- It’s the ultimate lazy pie—no oven, ridiculously forgiving, super creamy—so whatever mood you’re in, this pie can probably keep up. My family goes crazy for it because, well, it’s pie. And chocolate. And peanut butter. You figure out the math, I just make it.
- I struggled for ages with crumb crusts falling apart, so if yours crumbles a bit, trust me, you’re not alone. That’s just extra texture.
- Also, one bowl. Actually, two if you like less mess, but who’s counting?
What You’ll Need (And What I Sometimes Swap In)
- 1 store-bought chocolate cookie crust (or, if you’re feeling energetic, about 200g crushed chocolate cookies + 70g melted butter—I use digestive biscuits sometimes, which my grandmother found horrifying but I think taste great)
- 1 cup creamy peanut butter (I use Skippy when I can get it, but honestly, anything smooth-ish works. Crunchy adds a fun texture though.)
- 250g cream cheese, softened—full-fat is best, but I’ve used the reduced fat in a pinch. That time, nobody noticed.
- 1 cup powdered sugar (or more if your sweet tooth demands it; I’ve forgotten to add it once and called it a “healthier pie”—do not recommend!)
- 1 cup whipped topping (like Cool Whip), or the same amount of freshly whipped cream if you have the time and inclination
- 100g dark chocolate (chopped, or heck, just use chocolate chips. I’ve even used a chocolate bar I found at the back of the cupboard and it was totally fine)
- A handful of roasted peanuts or mini peanut butter cups for garnish (totally optional but they look quite posh on top)
How I Throw It Together
- If you made your own crumb crust (which I do maybe once a year), press it firmly into a pie dish and chill it for at least 10 minutes. If you bought yours, well, you’re smart. Move on.
- Beat the peanut butter and cream cheese in a big bowl until smooth and lighter in color. (This is where I usually sneak a taste. For quality control, obviously.)
- Slowly add in the powdered sugar, beating until it’s all friendly and combined. Don’t worry if it looks a bit weird right now—it always does, and then somehow it sorts itself out!
- Fold in the whipped topping or cream. Be gentle-ish, but don’t get too stressed if it’s a bit streaky.
- Scoop the whole creamy situation into your crust. Smooth it out, or if it’s a little rustic, that’s fine. Artisanal, right?
- Melt the chocolate in short bursts in the microwave (30 seconds, stir, repeat) or do it old-school over a pan of barely simmering water. I prefer the microwave honestly, less drama. Drizzle or blob over the pie. I drag a fork through the top sometimes to make a weird swirly pattern. Up to you.
- Scatter on your peanuts or whatever garnish if using. Pop it in the fridge for at least 3 hours. Or, if patience isn’t your thing, the freezer for 45 mins works in a pinch. Just don’t forget it or it will freeze solid (speaking form experience…)
A Few Notes I Learned The Hard Way
- If you over-mix the whipped topping, it gets runny and weird. Err on the side of lazy, here.
- That time I tried using natural peanut butter, the pie set softer—but if that’s your jam, just add a little more powdered sugar.
- The leftovers (if there are any) taste even better the next day. Might just be me, but it feels like the flavors get cozier overnight.
Other Ways I’ve Mangled It (And Sometimes Loved It)
Occasionally, I’ll swap in biscoff cookies for the crust (sweet-as, highly recommend) or add a banana slice layer before the filling if I’ve got sad-looking bananas. Once tried drizzling salted caramel over the top—it was a glorious sticky mess, but the pie itself kinda struggled to hold shape. So, maybe don’t do that if serving to impress.
Tools (Don’t Stress If You Don’t Have Something)
- You’ll need a mixing bowl, a spatula or big spoon, and ideally an electric beater, though I’ve made it with a fork in a rental kitchen before. It’ll give your arm a workout, but still works.
- Microwave for the chocolate, or good old double boiler over the hob. Or just don’t melt it and chop it fine for ‘texture’. Rules, schmules.
(If you happen to find a rolling pin for the crust, awesome. Wine bottle will do in a pinch. I’ve even used a big mug. No one cares.)
Storing Leftovers For That One Day When You Have Some
Stick any leftovers in the fridge, tightly covered. Probably lasts up to 4 days? Though honestly, in my house it never lasts more than a day! You can even freeze it, but let it thaw in the fridge or you’ll need a chisel to cut it.
How We Serve It (Also: My Bit Of Pie Math)
Big slices, extra whipped cream, sometimes a sprinkle of flaky sea salt on top if we’re feeling fancy. At Christmas, my cousin dunks hers in coffee (!)—swear it’s delicious, though I’ve never tried myself. Do what feels right.
Oops—I Learned These By Messing Up
- Don’t rush the chilling time; I once tried to serve it early and it basically slumped off the plate. Still tasty, just not what anyone expects.
- Tried blending the filling with a food processor; it over-mixed and got weirdly chewy. Better by hand (or mixer) for sure.
- If your crust breaks, use a spoon, call it a trifle, and move on.
A Few FAQs I’ve Heard (Or Asked Myself)
- Can I make it ahead? Oh, absolutely. I think it tastes better the next day. But, don’t hold it much longer than 3-4 days.
- What about allergies? Yep, swap in a seed butter or even cookie butter if peanut’s a problem. Crust can be gluten-free if you use GF cookies—I get mine here sometimes.
- Is it freezer friendly? It is, just let it soften before eating. Otherwise, you’ll need to gnaw at it. Trust me.
- Do I need Cool Whip? Not at all! Real whipped cream is lush (I like this technique from Serious Eats), or honestly any type of whipped topping will do the trick.
- What else can I top it with? Crushed toffee bits, berries, even broken up pretzels. Or nothing. It’s pie, not a fashion show.
Anyway, hope you enjoy it—and if you end up eating it straight from the pan, you’re in good company. Let me know if you find a weird but wonderful twist—I’m always looking for an excuse to make another one.
Ingredients
- 1 1/2 cups chocolate cookie crumbs
- 1/4 cup unsalted butter, melted
- 1 cup creamy peanut butter
- 8 oz cream cheese, softened
- 1 cup powdered sugar
- 1 1/2 cups whipped topping, thawed
- 3/4 cup semisweet chocolate chips
- 1/3 cup heavy cream
Instructions
-
1In a medium bowl, mix together chocolate cookie crumbs and melted butter. Press mixture firmly into the bottom and up the sides of a 9-inch pie dish to form the crust. Chill in the refrigerator while preparing the filling.
-
2In a large bowl, beat the peanut butter, softened cream cheese, and powdered sugar until smooth and creamy.
-
3Fold in the whipped topping until fully incorporated. Spread the peanut butter mixture evenly over the chilled crust.
-
4For the chocolate ganache topping, combine chocolate chips and heavy cream in a microwave-safe bowl. Microwave in 20-second intervals, stirring each time, until chocolate is melted and smooth.
-
5Pour the chocolate ganache over the peanut butter layer and gently spread to cover. Chill the pie in the refrigerator for at least 3 hours, or until set.
-
6Slice and serve chilled. Garnish with extra whipped topping or chocolate shavings, if desired.
Approximate Information for One Serving
Nutrition Disclaimers
Number of total servings shown is approximate. Actual number of servings will depend on your preferred portion sizes.
Nutritional values shown are general guidelines and reflect information for 1 serving using the ingredients listed, not including any optional ingredients. Actual macros may vary slightly depending on specific brands and types of ingredients used.
To determine the weight of one serving, prepare the recipe as instructed. Weigh the finished recipe, then divide the weight of the finished recipe (not including the weight of the container the food is in) by the desired number of servings. Result will be the weight of one serving.
Did you make this recipe?
Please consider Pinning it!!