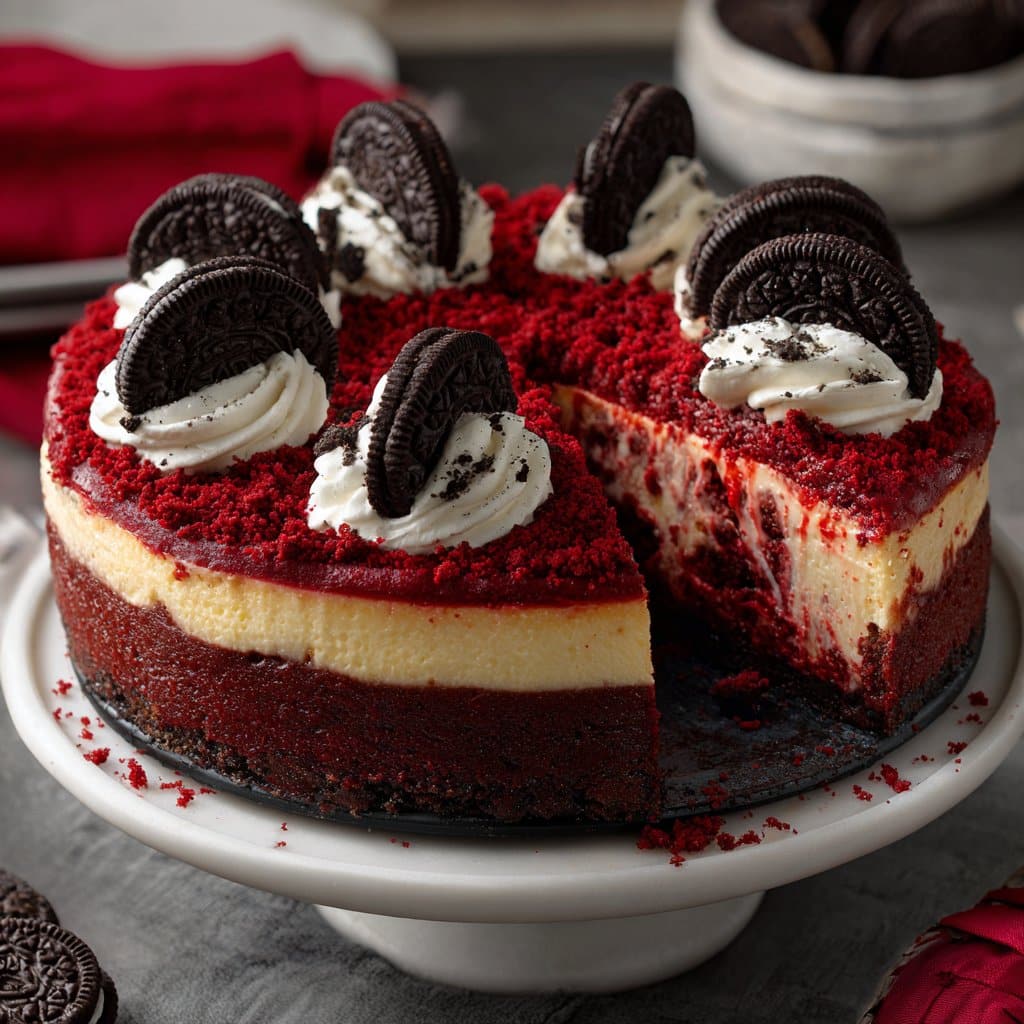
Red Velvet Oreo Cheesecake Recipe With My Quirky Tips
Honestly, Is There Anything Better Than Red Velvet Oreo Cheesecake?
Alright, story time! This Red Velvet Oreo Cheesecake is my fuss-free, showstopper dessert—emphasis on the “fuss.” My little brother begged for it after he saw something vaguely similar on Instagram, and (with a bit of side-eye) I cobbled together this version using what was lurking in my pantry. My aunt tried it last Thanksgiving and she’s still talking about it (in her Texas drawl—”Honey, that THING you made!”), so I think it’s a winner. But fair warning: you’ll probably end up with red velvet crumbs everywhere; even my dog got into them once.
Why I Keep Coming Back To This Cheesecake…
I make this whenever I want to knock people’s socks off without having to, you know, actually do anything tricky. My family goes a bit mad for it—mostly because the combo of creamy cheesecake, red velvet flavor, and the Oreo crunch just kind of…works. (Side note: You will get a red tongue if you scarf down a slice too fast. Ask me how I know!) Honestly, it’s the only dessert I’ve made where people beg for the recipe but never offer to wash up after. Typical.
Ingredients (Plus Substitutions and Opinions)
- 24 Oreo cookies (the regular kind—Grandma insisted on Double Stuf, but frankly, it’s up to you… even the store-brand kind works fine in a pinch)
- 1/4 cup melted butter (I’ve swapped in coconut oil once when I was out—it’s okay but a bit coconutty)
- 16 oz cream cheese (full-fat is best, but, you do you; the budget stuff is fine!)
- 1 cup sugar (sometimes I use 3/4 cup, if I’m feeling virtuous)
- 2 eggs (I’ve forgotten to bring them to room temperature and it turned out alright, but they say you should…)
- 1 cup sour cream (you can swap in Greek yogurt but I always get anxious and go back to sour cream last minute)
- 2 tbsp unsweetened cocoa powder (Dutch-process or natural; once I even used a bit of drinking chocolate powder, not ideal but it worked sorta)
- 2.5 tsp red gel food colouring (I know the bottle says 1 tsp is enough – they’re lying. Or my eyes just aren’t red-sensitive?)
- 1 tsp vanilla extract
- Pinch of salt (skip it if you forget—it’s not a dealbreaker)
- A handful of mini Oreos or a few roughly chopped regular ones for the top (this part is 100% optional but looks real cute!)
Let Me Walk You Through The (Not-So-Precise) Steps
- Blitz the Oreos: Throw 24 Oreos in a food processor and crush ‘em up to fine crumbs. (No processor? A zip-top bag + rolling pin or an elbow and a bowl both work, though it’s a proper faff.)
- Crust time: Mix in the melted butter until all the crumbs are moistened. Press them into the base of a lined 9-inch springform pan. Use a flat-bottomed glass if you want a smooth look—personally, I just use my hands and hope for the best.
- Preheat your oven to 325°F (160°C).
- Cheesecake batter: In a large bowl, beat the cream cheese and sugar until smoothish; don’t overdo it, or after the bake it’ll look more like a sponge than a cheesecake (voice of experience, here.) Add eggs one at a time, mixing just enough so the yellow disappears.
- Now add in the sour cream, cocoa powder, food coloring, vanilla, and salt. It’ll be pretty thick! If it looks a little lumpy right now—don’t panic. I usually sneak a taste here (salmonella who?), and this is the stage where I always second-guess the food coloring, but trust the process, the color intensifies in the oven.
- Bake: Pour the batter over the crust, tap the pan a few times—gets the air bubbles out, or at least that’s what I’ve read. Bake in the oven for 45–55 minutes, until the edges look set but there’s a gentle jiggle in the middle. Fun fact: I once left mine in an hour and it turned out fine, just a tiny bit dense.
- Switch off the oven, crack the door, let it cool inside for about 30 minutes because apparently that avoids cracking, but honestly, sometimes I forget and…cracks just get covered with whipped cream anyway.
- Chill it: Stick it in the fridge for at least 5 hours, but ideally overnight. If you try to slice it warm, it’ll sort of ooze everywhere—not always a bad thing, but not what you’re after here.
- Once chilled, decorate the top with mini Oreos or extra crumbs. Sometimes I do a swirl of whipped cream if I’m feeling retro.
Bits & Bobs I’ve Figured Out
- If you skip proper parchment paper on the pan base, you will regret it—just trust me.
- Don’t obsess over perfectly smooth batter. It always bakes out smoother than it looks raw (no magic here, just physics I suppose).
- Old Oreos go a bit soft and weird when used for the base, but if you only have those, go ahead; it’ll still work, promise.
Variations I’ve Tried (and, erm…Some That Flopped)
- Swap the Oreos: Ooh, Golden Oreos work surprisingly well! The flavor is less deep, but the color pops.
- Add-ins: I once folded in chocolate chips but they all sank (next time, maybe coat them in flour first?)
- I tried making mini cheesecakes in muffin tins—honestly, they were cute but a pain to get out in one piece. So, maybe skip that unless you love fiddly things!
What’s Actually Necessary? Equipment Chat
- Springform pan: If you don’t have one, a deep cake tin works but lining it with parchment and being very gentle when lifting it out is key.
- Hand mixer or stand mixer: But, you can absolutely use a big old spoon (bring your muscles!)—takes more time, but totally doable.
Storing…if That’s Even Relevant in Your House
Covers well and keeps in the fridge for up to four days. In all honesty, in my house it never lasts more than a day (maybe two if I stash a piece behind the jam jars). You can freeze slices too—wrap tightly!—but I think the texture gets a bit weird after thawing.
How I Like To Serve It (And the Family Trick)
Best cold, straight form the fridge. For birthdays, I’ll dot the top with candles and sprinkles, which is now apparently a tradition. On lazy Sundays, I just serve up wedges with a mug of strong coffee, and sometimes we add a little cherry compote on the side (not classic, but delicious anyway).
Absolutely-Not-From-a-Pro “Pro Tips”
- Once I thought I could skip the chill time. Immediate regret: cheesecake lava, everywhere. Breathe, and give it a proper nap in the fridge.
- Don’t try to slice it with a blunt knife. Warm a sharp knife under hot water, then dry before slicing—trust me on that.
- Actually, I find it works better if you let it sit at room temp for about 20 minutes before slicing. The crust isn’t rock-hard that way.
FAQ (Because My Family Keeps Asking…)
Q: Help, my cheesecake cracked! Now what?
Honestly, same. It’s totally normal—cover it with whipped cream, more Oreos, or just embrace the rustic look. Most folks are too busy eating to notice.
Q: Can I use low-fat cream cheese?
I mean, you can, but it’s just not the same texture—or taste, in my humble opinion. If you’re desperate, give it a try and let me know if you think I’m wrong!
Q: What’s the actual purpose of the red food coloring?
Purely for vibes. It won’t taste that different if you skip it. But the color is cheerful, so I say, why not?
Q: Do I need a water bath when baking?
I tried it once and didn’t really notice a difference besides more washing up. So I skip it, but if you like, here’s a reliable guide: Sally’s Baking Addiction Water Bath Tips.
Q: Can I make this ahead?
Yes! In fact, I think this tastes better the next day. The flavors settle, somehow.
Q: Where can I find other quirky cheesecake ideas?
There’s a bunch of cool recipes at Bigger Bolder Baking if you’re into more no-bake type stuff.
Ingredients
- 24 Oreo cookies, finely crushed
- 1/4 cup unsalted butter, melted
- 3 packages (8 oz each) cream cheese, softened
- 3/4 cup granulated sugar
- 3 large eggs
- 1 cup sour cream
- 1/3 cup buttermilk
- 2 tablespoons unsweetened cocoa powder
- 1 tablespoon red food coloring
- 1 teaspoon vanilla extract
Instructions
-
1Preheat the oven to 325°F (163°C). Grease a 9-inch springform pan with butter or non-stick spray.
-
2Combine the crushed Oreo cookies and melted butter in a bowl. Press the mixture firmly into the bottom of the prepared pan to form the crust. Set aside.
-
3In a large mixing bowl, beat cream cheese and sugar together until smooth. Add eggs one at a time, mixing well after each addition.
-
4Add sour cream, buttermilk, cocoa powder, red food coloring, and vanilla extract. Mix until fully combined and the batter is smooth and red.
-
5Pour the red velvet cheesecake batter over the Oreo crust. Smooth the top with a spatula.
-
6Bake for 60 minutes, or until the center is set but still slightly jiggly. Turn off the oven and let the cheesecake cool inside for 1 hour. Then refrigerate for at least 4 hours, or overnight, before serving.
Approximate Information for One Serving
Nutrition Disclaimers
Number of total servings shown is approximate. Actual number of servings will depend on your preferred portion sizes.
Nutritional values shown are general guidelines and reflect information for 1 serving using the ingredients listed, not including any optional ingredients. Actual macros may vary slightly depending on specific brands and types of ingredients used.
To determine the weight of one serving, prepare the recipe as instructed. Weigh the finished recipe, then divide the weight of the finished recipe (not including the weight of the container the food is in) by the desired number of servings. Result will be the weight of one serving.
Did you make this recipe?
Please consider Pinning it!!