Chicken Pillows With Creamy Parmesan Sauce: My Go-To Cozy Dinner
Why I Keep Coming Back to These Chicken Pillows
So, last Tuesday I made these Chicken Pillows With Creamy Parmesan Sauce for (honestly) the umpteenth time. It was the sort of evening where I realized I’d forgotten to defrost anything and the dog had learned how to open the crisper (thanks, Murphy). Anyway—somehow, this recipe always hauls dinner back from the brink. The first time I tried it, I thought it’d turn out like one of those internet fails, but it actually worked and everyone actually ate it. That’s not always a given at my table, let me tell you. Must be the sauce. I mean, who says no to parmesan?
Why You’ll Love This (Or At Least, Why I Do)
I usually make these when I want real deal comfort food but don’t want the fuss of something that needs three pans (and a Ph.D in patience). My family goes nuts for it—especially the youngest, who insists the pillows are “fancy pop-tarts.” Which, you know, is technically not wrong. I also use this recipe whenever I need to look like I tried harder than I did (puff pastry’s a lifesaver, isn’t it?). Anyway, this dish is one of those ‘everyone gets seconds’ situations. A small warning though: the creamy parmesan sauce might cause friendly skirmishes over the last spoonful. Been there.
Gathering What You’ll Need (With Real-Life Substitutions)
- 2 cups cooked chicken, shredded or diced (leftovers work; rotisserie is my lazy holy grail)
- 1 can (235g) refrigerated crescent roll dough (or puff pastry, if you’re feeling posh. I sometimes use whichever’s the closest)
- 120g cream cheese (room temp; I once used herbed Boursin in an emergency—it was strangely delicious)
- 2 tablespoons milk (or a good splash, as my Nan would say)
- 1/2 cup grated parmesan cheese (honestly, the pre-grated kind works okay, but it’s a bit saltier)
- 1/2 teaspoon garlic powder (if you’re out, a crushed garlic clove isn’t the end of the world)
- 1 teaspoon fresh parsley, chopped (dried is fine—sometimes I swap it for a chive snip. No one’s noticed yet!)
- Salt and pepper to taste
- 1 egg, gently beaten for brushing (if you skip this, it just looks a bit paler; still tastes good)
Let’s Make Chicken Pillows (Step by Step, More or Less)
- Heat your oven to 200°C (about 400°F). Line a baking tray with paper (parchment, if you want to be proper. I once just greased the tray; it was fine, just a bit more, uh, crispy in spots).
- In a bowl, toss together the chicken, cream cheese, and milk. Squidge it all up until blended. This is where I usually sneak a taste… for quality control, naturally. Stir in half the parmesan, garlic powder, and parsley (keep a pinch for later if you’re feeling fancy).
- Unroll the crescent dough and gently separate into squares/rectangles. Plop a generous spoonful of chicken mixture in the center of each. Fold the corners over to make a tidy little pillow, pinching to seal (or mostly seal—I always have a leaky one).
- Place them seam side down on the tray. Brush with beaten egg, then sprinkle with a bit more parmesan if you’re feeling indulgent (which, why not?).
- Bake 16–20-ish minutes, or until gorgeously golden and smelling like you actually know what you’re doing. It might take a little longer depending on your oven—mine runs hot on the left so I have to rotate the tray halfway. Watch for those tops!
- While they’re baking, let’s sort the sauce: in a small saucepan, gently heat 1 cup milk with a knob of butter (that’s about 2 tablespoons for the sticklers). Once warm, whisk in 1/3 cup grated parmesan and a scant tablespoon of flour. Keep whisking (it thickens a bit—don’t panic if it’s lumpy at first, just keep stirring; I promise it smooths out). Season with salt and pepper. Taste test! Or don’t, if you’re worried about double-dipping.
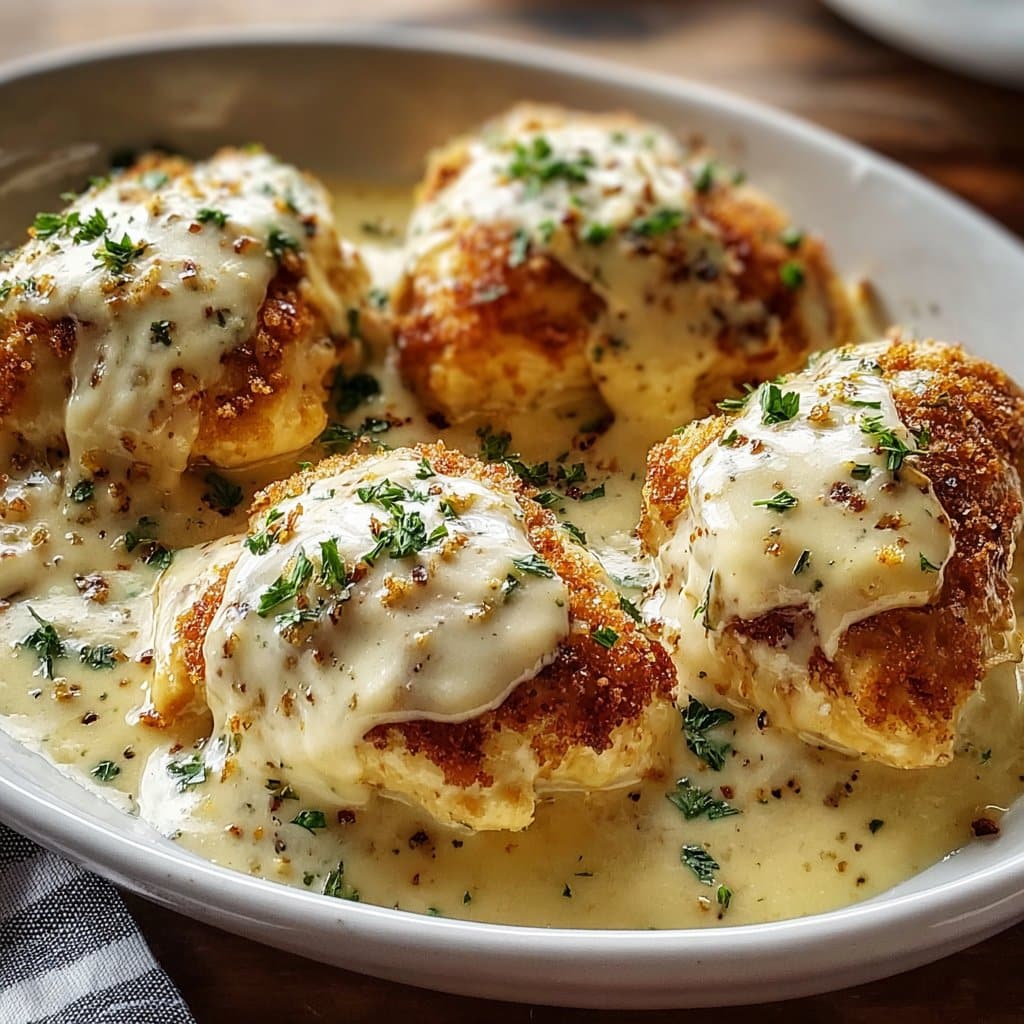
- Pour the sauce over the finished pillows or serve it in a jug. I let people do the honors themselves, keeps the pillows crispier for seconds.
Notes I Learned The Hard Way
- Once, I forgot the egg wash. Pillows were tasty, but a little anemic looking. Not the end of the world, just a bit blah in the photo.
- If the sauce gets too thick, splash in a little more milk. Honestly, I still can’t time it perfectly every time.
- Chopping the chicken really small helps avoid, you know, awkward air pockets or explosion-prone pillows.
- This tastes even better the next day, actually; something about the flavors settling in. Or maybe it’s just less stressful to eat without the audience.
If You Want to Mix Things Up (Adventures, Both Epic and Not)
- Tried with turkey—works fine, especially post-holidays!
- Added a tiny handful of chopped sun-dried tomatoes once. Big hit.
- One time I thought broccoli would be great in the filling. It got weirdly soggy… wouldn’t recommend unless you’re a broccoli completionist.
- If you’re dairy-free, check out cashew cream for the sauce; tasted surprisingly lush when my friend made it for me.
Equipment (But Don’t Panic If You Don’t Have Something!)
- Mixing bowl (any bowl will do—I’ve even used the salad bowl in a pinch)
- Baking tray—If you don’t have one, flip over a roasting pan, honestly
- Small saucepan for the sauce
- Whisk (a fork can work if you go slow—been there)
Keeping and Reheating (If You Somehow Have Leftovers)
Store leftovers covered in the fridge—good for two days in theory, though honestly, in my house it never lasts more than a day! Reheat gently in the oven to keep things crispy; microwaves work for the impatient, but it’ll be a bit softer (sometimes I actually prefer it that way, bit less faff).
How I Serve These (With a Family Quirk or Two)
Best with a crisp green salad or roasted veggies. My lot always asks for potato wedges on the side—probably a carb overload, but who’s counting? Bonus points if you serve extra creamy sauce in a gravy boat so people can fight over it.
Things I Wish I’d Known (AKA My Pro Tips)
- Don’t rush the folding stage! I once tried to multitask and ended up with filling on the dog. Worth the extra minute, trust me.
- Rotate your tray mid-bake if your oven has hot spots. Unless lopsided browning is your aesthetic (no judgment)
- I used to skip letting the cream cheese soften; it’s so much easier to mix when you let it warm up. Less arm workout, more time for a cup of tea.
FAQ—Questions I Actually Get Asked (Sometimes More Than Once)
- Can I make these ahead? Sort of! You can prep the filling and even form the pillows, stash them in the fridge for a few hours, and bake off when ready. But, I wouldn’t keep unbaked ones overnight (the pastry gets…blobby?)
- Does store-bought dough really work? Oh, yes—honestly, it’s half the point. No need to get heroic with homemade dough unless you love rolling pins. I tried once; it didn’t make a big difference and took ages.
- Gluten free? Yep! A friend uses gluten free puff pastry (she grabs hers here). And if you use cornstarch instead of flour in the sauce, you’re golden.
- Can I freeze them? You can—just don’t add the sauce beforehand. Pillows freeze best (unbaked or baked); warm in the oven straight from frozen, just add a few extra minutes. Sauce likes to separate if frozen, though.
- Any shortcuts for the sauce? Honestly, if you’re in a rush, bottled Alfredo from the shop isn’t half bad. But the homemade one is still best, if you ask me.
That’s pretty much the whole shebang! If you like this, by the way, you might love Spend with Pennies’ take on chicken roll ups—super handy for using up odd bits from the fridge. And if you get creative with fillings, let me know what works (or, honestly, what doesn’t). Happy cooking! And if you find chicken mysteriously disappearing before it makes it to the oven, you might want to check if your dog’s learned some new tricks too…
Ingredients
- 2 cups cooked chicken breast, shredded
- 4 oz cream cheese, softened
- 2 tbsp green onions, chopped
- 1/2 tsp garlic powder
- 1/2 tsp salt
- 1/4 tsp black pepper
- 1 can (8 oz) refrigerated crescent roll dough
- 2 tbsp unsalted butter, melted
- 1 cup heavy cream
- 3/4 cup grated Parmesan cheese
- 1/2 cup chicken broth
Instructions
-
1Preheat oven to 375°F (190°C). Line a baking sheet with parchment paper.
-
2In a large bowl, mix shredded chicken, cream cheese, green onions, garlic powder, salt, and black pepper until well combined.
-
3Unroll the crescent dough and separate into triangles. Place a spoonful of the chicken mixture onto the wide end of each dough triangle and fold the dough around to seal, forming a pillow.
-
4Place pillows seam side down on the prepared baking sheet. Brush tops with melted butter. Bake for 25-30 minutes, until golden brown.
-
5Meanwhile, in a saucepan over medium heat, combine heavy cream, Parmesan cheese, and chicken broth. Stir until cheese melts and sauce thickens, about 5 minutes.
-
6Serve baked chicken pillows warm, drizzled with creamy Parmesan sauce.
Approximate Information for One Serving
Nutrition Disclaimers
Number of total servings shown is approximate. Actual number of servings will depend on your preferred portion sizes.
Nutritional values shown are general guidelines and reflect information for 1 serving using the ingredients listed, not including any optional ingredients. Actual macros may vary slightly depending on specific brands and types of ingredients used.
To determine the weight of one serving, prepare the recipe as instructed. Weigh the finished recipe, then divide the weight of the finished recipe (not including the weight of the container the food is in) by the desired number of servings. Result will be the weight of one serving.
Did you make this recipe?
Please consider Pinning it!!