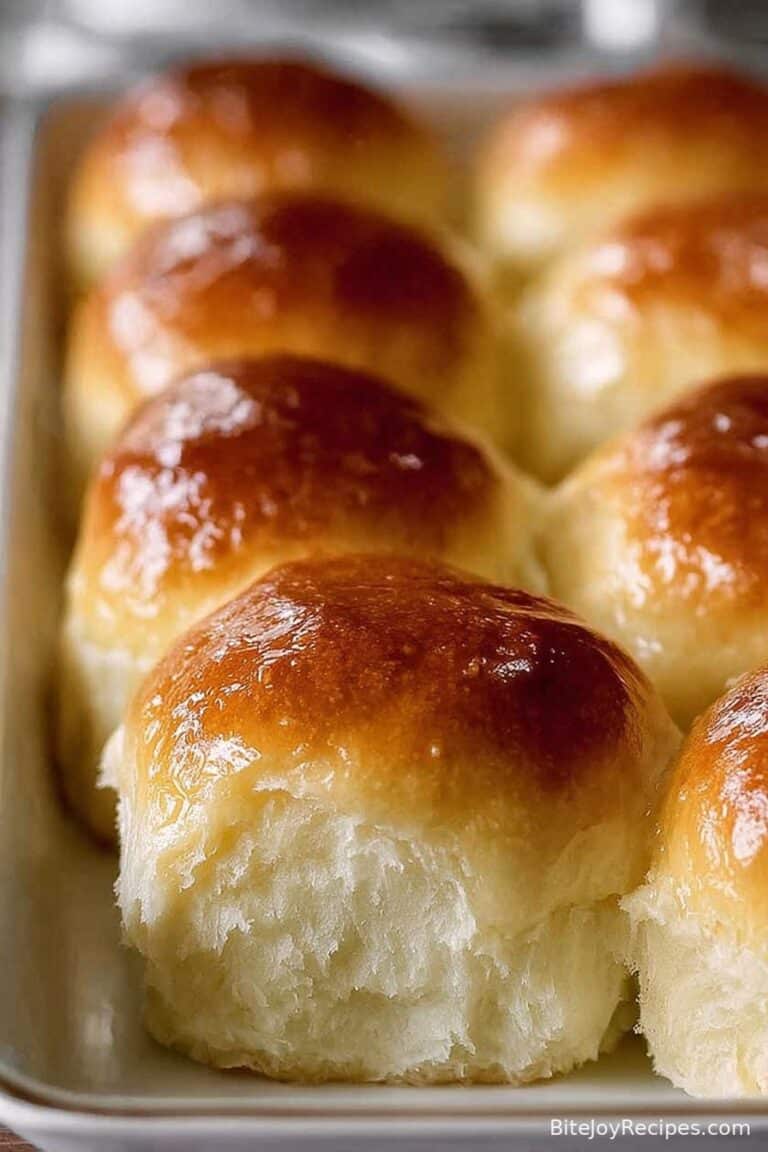
6-Ingredient Gluten-Free Bread Rolls
Let’s Chat About These Bread Rolls
Alright, picture this: it’s a dreary Sunday, nobody wants cereal, and you’re craving that bread smell wafting through the house. That’s honestly how I stumbled onto these 6-ingredient gluten-free bread rolls. My first batch ended up a bit, well, dense enough to stun a pigeon—but after much tinkering (and a few good-natured family complaints), this version finally hit smack in the middle of golden, fluffy, and yenno, edible. If you’re anything like me and sometimes bake just to delay actual chores—this’ll do the trick. Oh, and apologies in advance for the flour explosion that may occur. Comes with the territory, mate.
Why You’ll Love This (Or At Least I Do Anyway)
I make this when I want rolls that feel homey but don’t require, like, a 3-hour pep talk. My family goes mad for these with a slab of jam or—don’t laugh—dipped in leftover spag bol. Sometimes, I bake them just because my gluten-eating friends are popping round and I need to prove us gluten-free folk still eat nice things (with mixed results some days, I’ll admit). And honestly, I used to get so grumpy at gluten free dough sticking everywhere, but after the 17th attempt, it kind of became a badge of honor. So, whether you’re dodging gluten or just curious, these rolls have earned a spot on my scruffy favorites list.
What You’ll Need (And a Few Swaps)
- 2 cups gluten-free all-purpose flour blend (I usually reach for Bob’s Red Mill 1-to-1, but I’ve had luck with whatever the local Tesco stocks—Grandma swears by Dove’s Farm but, honestly, use whatever’s handy)
- 1 tbsp baking powder (Aluminum-free if you’ve got it. Not that it’ll ruin your day if not)
- 1/2 tsp salt
- 2 eggs (Or 2 flax eggs if your fridge is bare or you’re vegan—just stir 2 tbsp flaxseed meal with 5 tbsp water, wait till gloopy)
- 3/4 cup plain yogurt (Greek-style makes things richer, but when I’m out, I’ve used regular yogurt or, one desperate evening, sour cream; honestly, all fine)
- 2 tbsp olive oil (Any neutral-ish oil works if Olive oil’s not your jam)
How I Usually Do It (No Fancy Equipment Required)
- Preheat your oven to 190°C (or 375°F for folks state-side). I almost always forget until I’m elbow deep in flour—don’t be me!
- Line a baking sheet with parchment, or just oil it up if you’re out of paper (I promise it’ll be fine. Maybe just a bit more scrubbing after.)
- Toss your flour blend, baking powder, and salt into a big-ish bowl. I use the one with the chip in it (don’t ask).
- Crack in your eggs, dollop in the yogurt, and pour in the oil. Mix with a spatula or your clean hands (the dough’s sticky, so maybe oil your fingers a bit first—trust me).
- This is where I sneak a tiny taste—just to check salt levels, of course. Don’t worry if it looks suspiciously gloopy. It always does.
- Scoop out six plops onto your tray. A big spoon or even two spoons works. They won’t be perfect orcircular, but rustic is in, right?
- Bake for 18-22 minutes till golden, puffed, and slightly crackly on top. I tap them and if they sound a bit hollow, they’re done (or at least close enough in my house).
A Few Things I’ve Learned (Usually the Slow Way)
- If you overmix, they turn out gummy. I do this at least twice a year, so… go easy.
- The dough looks weird. Keep going. I nearly gave up the first time—glad I didn’t (not to get all soppy).
- Using slightly less yogurt makes them denser, which is fine for dunking in soup, but, I mean, it’s your call.
Stuff I’ve Tried (Can’t Win ‘Em All)
- I once swapped the oil for melted butter; super tasty, but the rolls were crumblier than my resolve at 4pm. Still worth a shot.
- Chopping in a handful of chives or grated cheddar is delicious—unless you go nuts and add too much, in which case they turn into, well, cheesy soup bombs. Moderation.
- I tried almond flour once instead of the blend. Not great. Bit like eating wet sand, honestly. Wouldn’t repeat.
Grab These Bits and Bobs
- Bowl (deeper the better, unless you want flour on your cat, not that I’ve done that…)
- Spoon or spatula (a wooden one feels proper, but if you’re in a bind, a clean hand works—messy but somehow satisfying)
- Baking sheet or even, at a push, an oven-safe frying pan—I did that once on a holiday, and it wasn’t half bad

How to Keep ‘Em Fresh (If You Can!)
Honestly, these barely see sunrise in my house, but if you do manage some leftovers, just pop them in an airtight container. They’re okay at room temp for a day or two. After that, I’d toast them, or reheat in the oven to bring them back to life (sort of).
How I Like to Serve Them (Each to Their Own)
I love mine split and filled with salty butter and a drizzle of local honey—odd combo, but don’t knock it before you try (here’s my honey butter inspo if you fancy DIY). My partner is a fiend for egg mayo in these. And once, at a picnic, we cut them in half, loaded with cheese and stuck ‘em on the grill for pseudo-toasties. Not traditional—just tasty.
Mistakes I’ve Definitely Made (So You Don’t Have To)
- Once, I tried to bake at 220°C to hurry things along. Ended up dry, almost weaponised. Slow and steady, yeah?
- Forget to oil your hands? Enjoy wearing dough gloves for an afternoon.
- Leaving out salt (accidentally or otherwise) is… tragic. Don’t do it, unless you like disappointment.
Questions Folks Have Actually Sent Me
Q: Can I freeze these gluten-free bread rolls?
A: Yup. Stick ‘em in a freezer bag once cool. Defrost and reheat in the oven; microwaving works but the texture’s a bit chewy—fair warning!
Q: What flour blends actually work?
A: I swear by Bob’s Red Mill 1-to-1 (see here) for most things, but the King Arthur blend is also spot-on if you’re over in the States. Don’t bother with coconut flour—trust me.
Q: My dough is super sticky! Normal?
A: Oh, totally. Gluten-free stuff just is. Oil those hands, and soldier on. It’ll bake up okay.
Q: Do they taste eggy?
A: I don’t think so, but if you’re sensitive, swap one egg for 1/4 cup applesauce (works, but texture’s softer).
Q: Is a stand mixer necessary?
A: Not really. I use a spoon (sometimes a fork!) or get the kids to stir. Only use a mixer if you want one more thing to wash up.
And if you ever end up with an extra roll, jam slathered and tea beside you, texting a mate instead of cleaning the kitchen—I’d say you’ve done it right.
Ingredients
- 2 cups gluten-free all-purpose flour blend
- 1 packet (2 1/4 tsp) instant yeast
- 1/2 teaspoon salt
- 1 tablespoon sugar
- 1 cup warm water
- 2 tablespoons olive oil
Instructions
-
1Preheat your oven to 375°F (190°C). Line a baking sheet with parchment paper.
-
2In a large bowl, mix together the gluten-free flour blend, instant yeast, salt, and sugar.
-
3Add the warm water and olive oil to the dry ingredients. Stir until a thick, sticky dough forms.
-
4Scoop and shape the dough into 8 even rolls, placing them on the prepared baking sheet.
-
5Cover loosely with a clean towel and let rise for 15–20 minutes until slightly puffy.
-
6Bake for 25 minutes or until the tops are golden brown. Allow to cool slightly before serving.
Approximate Information for One Serving
Nutrition Disclaimers
Number of total servings shown is approximate. Actual number of servings will depend on your preferred portion sizes.
Nutritional values shown are general guidelines and reflect information for 1 serving using the ingredients listed, not including any optional ingredients. Actual macros may vary slightly depending on specific brands and types of ingredients used.
To determine the weight of one serving, prepare the recipe as instructed. Weigh the finished recipe, then divide the weight of the finished recipe (not including the weight of the container the food is in) by the desired number of servings. Result will be the weight of one serving.
Did you make this recipe?
Please consider Pinning it!!